Quantcast
Channel: PeteNetLive
Viewing all 802 articles
Browse latest View live

Error: 0x8007232B DNS Name Does Not Exist

$
0
0

KB ID 0001622

Problem

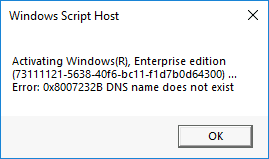
Seen when attempting to ‘Activate’ a Window machine;

Activation 0x8007232B DNS name does not exist

Error: 0x8007232B DNS name does not exist

Solution

The reason for this error is the Windows machine has looked for a KMS (Key Management Server) in its local DNS, and not found one. This is because (out of the box) it has a Windows KMS licence code installed. Now if you have a KMS server you need to work out why you cant see it, I’ve covered troubleshooting KMS in link below;

Using a KMS Server

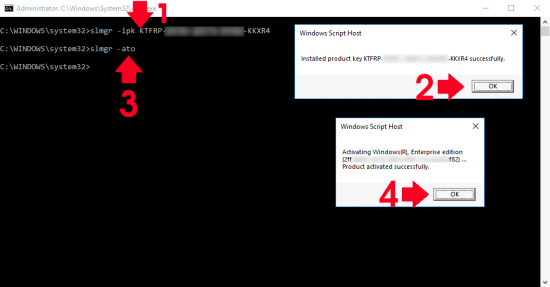
So if you don’t have a KMS server and dont wish you deploy one, you need to change, the Windows activation code on this machine to a MAK (Multiple Activation Key) instead,  Note: you will get these keys from the Microsoft Volume Licence Service Center. Then from an administrative command window;

slmgr -ipk 12345-ABCDE-12345-ABCDE-12345
slmgr -ato

0x8007232B Error

Related Articles, References, Credits, or External Links

NA


RDS Gateway Connection Error

$
0
0

KB ID 0001623

Problem

I had to deploy a Remote Desktop Gateway Server into an existing RDS farm for a client this week, the RDS farm was presenting Windows Desktops (VDI) from Hyper-V. All went well until I tested the Gateway Server Externally, this is the error I got.

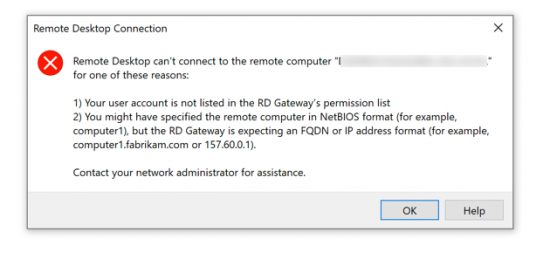
RD Gateway Permission List

Remote Desktop can’t connect to the remote computer ‘server/farm-name} for one of these reasons.

1) Your user account is not listed in the RD Gateway’s permission list.
2) You might have specified the remote computer in NetBIOS format (for example Computer1), but the RD Gateway is expecting an FQDN or IP address format (for example, computer1.fabrikam.com or 157.60.0.1).

Contact your network administrator for assistance.

Solution

This was perplexing because, on the Gateway Servers RAP (Remote Authorization Policy) it was set to allow access to ‘Domain Computers” and allow access for “Domain Users”. Also I was feeding the gateway server the correct FQDN of the internal server farm (farm-name.domain-name.local).

I did TWO things and the problem went away;

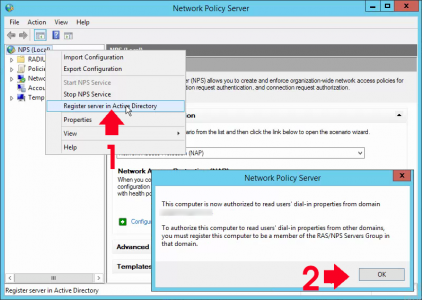
Firstly, you might not realise this, but your RD Gateway policies are actually controlled by NPS (Network Policy Server). From administrative tools open the Network Policy Server, management snap-in. Right click the NPS (Local) entry > ‘Register server in Active Directory‘ > OK > OK.

RD Gateway Connection error

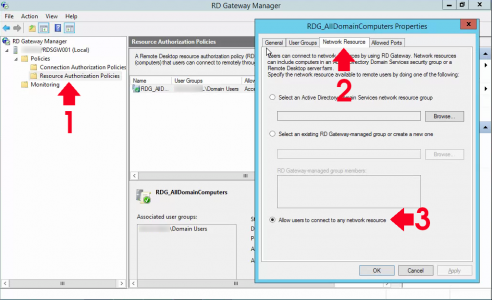
(I agree the following makes no sense, but it worked!) Open the RD Gateway Manager console > Policies > Remote Authorisation Policy > Right click the RDG policy > Properties > Network Resource > I changed the option to ‘Allow users to connect to any network resource‘ > OK.

RD Gateway RAP Allow to Any

I then rebooted the server and all worked correctly.

Related Articles, References, Credits, or External Links

NA

Outlook: Import and Export Data (.pst)

$
0
0

Backup and restore from .pst file

KB ID 0000154

Problem

You want to import your mail from an older version of Outlook  into your new Outlook mailbox, or you simply want to backup your mail.

Solution

Thankfully the process is the same for modern Outlook as it was for previous versions of Outlook.

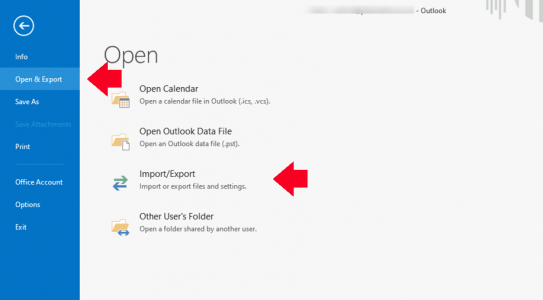
1. In Outlook > Select the “File” Tab > Open > Open & Export > Import/Export

Note: On older versions of Outlook  its simply Open > Import (you select Import even if your going to Export!)

Outlook Import and Export


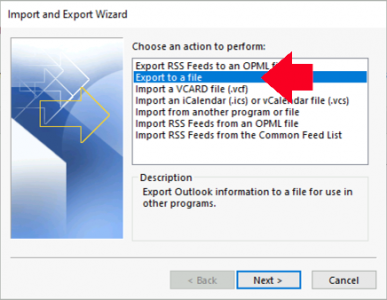
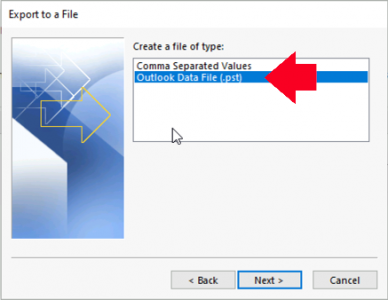
2. Export to a file.

Export Email From Outlook

3. Outlook Data File (.pst).

Export PST From Outlook

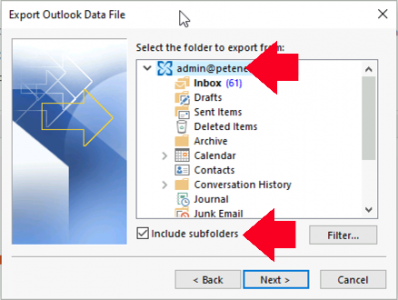
4. Select your mailbox, select the ailbox – {username} > To back up everything (calendar contacts the lot), tick “Include sub folders” > Next.

Note: If using a POP mail account, here it may say Personal Folders.

Export Mailbox From Outlook

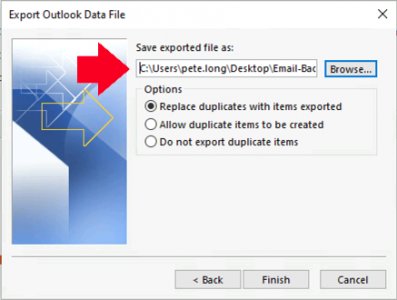
5. Choose a location to save the .pst file.

Outlook Export to PST

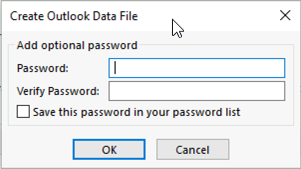
6. If you want to password protect this (remember someone can import your .pst and read all your mail). I usually leave this option blank > OK.

Password protect PST

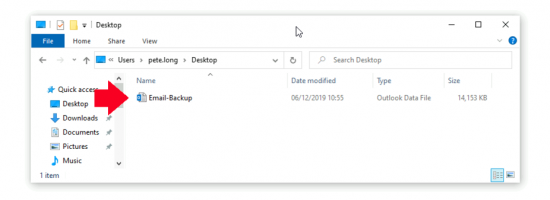
7. After a few seconds the mailbox will export. (Note: if the mailbox is very small this might happen so quickly nothing is displayed on the screen). And there it is.

Exported PST

To “Import” your mailbox,

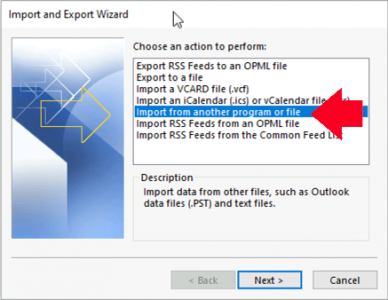
1. Launch thewWizard as above (Step 1) > Select “Import from another program or file” > Next.

Outlook Import from PST

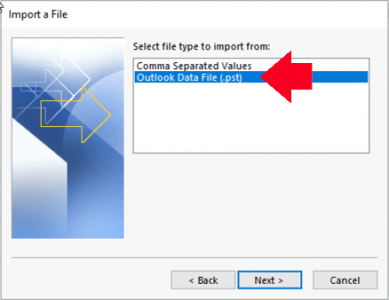
2. Outlook Data File (.pst) >Next.

Outlook Import PST

3. Browse to, and select your .pst file > Next.

Outlook Import PST Location

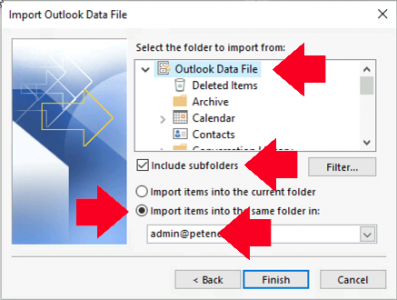
4. Stop and think! where do you want to import the files to? Select as appropriate > Finish (Note at this point if the .pst is password protected you will be prompted for a password).

Outlook Import PST Instructions

Related Articles, References, Credits, or External Links

NA

Stop Windows Asking For Password After Sleep / Standby

$
0
0

KB ID 0001624

Problem

I’ve done a few posts that involve me demonstrating how to disable a security feature, and people have messaged me with a mix of disgust/distain/horror. But I’m sick and tired of all the machines on my test network getting locked while I’m dragged onto something else, they are test machines, with no live data on them, and there’s only me uses them anyway! 

And some people just want to log on on a morning and not have to log on again, (Oh the security horror!) But let’s be honest Tom Cruise is not going to abseil down from the rafters to steal your order forms for spanners, or whatever mundane junk you have on your PC/laptop that no one other than you, and your office is bothered about.

Note: Don’t get this confused with Windows – Disable the ‘Lock Screen’

Solution

There are two policies that control this, one is in effect if your Windows machine is plugged in, the other takes over when you are running on battery power, you can disable password prompting for one or both.

Disable Password Prompt When Computer Wakes Up

You can see this on an individual machine (local policy) or you can create a domain computer policy, and enforce this on many/all Windows clients. 

  • For Local Policy: Windows Key+R > gpedit.msc {Enter}
  • For Domain Policy: (On a domain controller) > Windows Key+R > gpmc.msc {Enter} > Create a new policy or edit one that’s linked to computer objects.

Disable When Plugged In

Navigate to;

Computer Configuration > Administrative Templates > System > Power Management > Sleep Settings

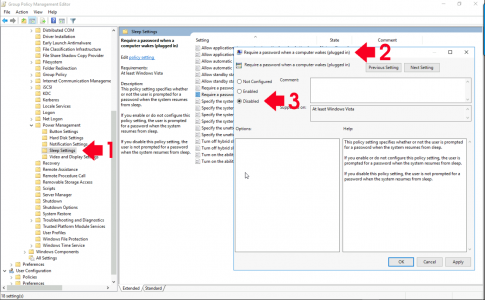
Locate ‘Require a password when a computer wakes (plugged in)‘ > Set to Disabled > Apply > OK > Close the policy editor.

Stop Windows Prompting out of sleep


Disable When On Battery Power

Navigate to;

Computer Configuration > Administrative Templates > System > Power Management > Sleep Settings

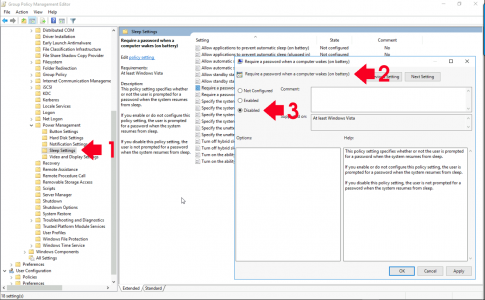
Locate ‘Require a password when a computer wakes (on battery)‘ > Set to Disabled > Apply > OK > Close the policy editor.

Stop Windows Prompting out of Standby

Then either wait or Windows – Forcing Domain Group Policy

Related Articles, References, Credits, or External Links

NA

Gpupdate: Windows Could Not Locate the Directory Object

$
0
0

KB ID 0001625

Problem

Saw this on a Windows client on my test network;

GPO Error Could not locate directory Object

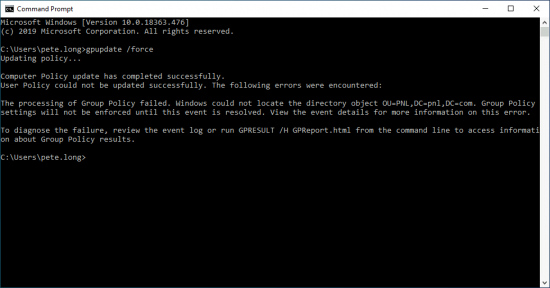
User Policy update has completed successfully.
Computer policy could not be updated successfully. The following errors were encountered:

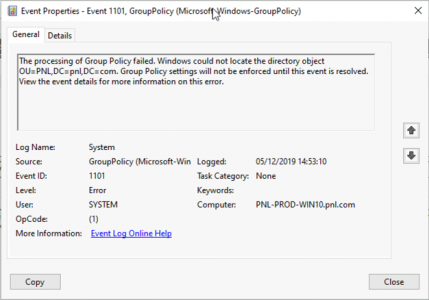
The processing of Group Policy failed. Windows could not locate the directory object OU=Top-Level,OU=computers,DC=PeteNetLive,DC=com. Group Policy settings will not be enforced until this event is resolved. View the event details for more information on this error.

To diagnose the failure, review the event log or run GPRESULT /H GPReport.html from the command line to access information about Group Policy results.

Note: You may also see Event ID 1101

Event ID 1101

Event ID 1101

Log Name: System
Source: Microsoft-Windows-GroupPolicy
Event ID: 1101
Task Category: None
Level: Error
Keywords:
User: SYSTEM
Computer: PNL-PROD-WIN10.pnl.com
Description:
The processing of Group Policy failed. Windows could not locate the directory object OU=PNL,DC=pnl,DC=com. Group Policy settings will not be enforced until this event is resolved. View the event details for more information on this error.

Solution

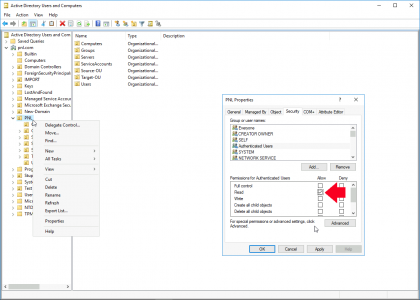
Strangely the OU that this computer was in, needed to have the ‘Read‘ right, granting to ‘Authenticated Users’ group, not sure how that got removed! Note: Remember start at the OU that’s directly on the root of the domain, of you have nested OUs.

GPO Error Add Authenticated Users

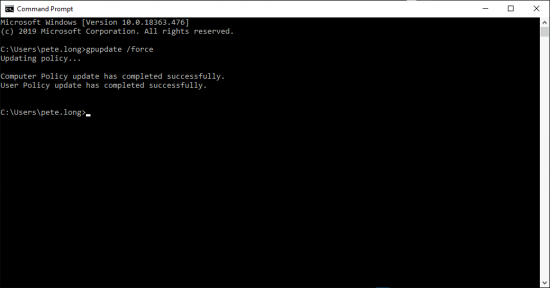
After that everything was peachy!

Manual Refresh GPO

Related Articles, References, Credits, or External Links

NA

Windows Error Code 0x800F0954

$
0
0

KB ID 0001626

Problem

Seen when attempting to add a Windows Optional Feature;

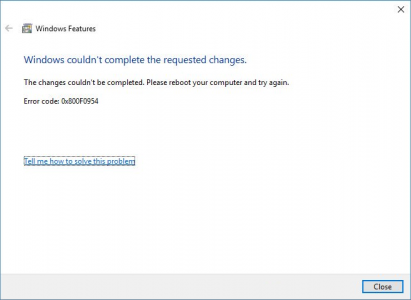
Feature Update Error 0x800F0954

Windows couldn’t complete the required changes.
The changes could not be completed. Please reboot your computer and try again
Error code: 0x800F0954

Solution

Typically you see this error if your machine is set to get its updates from WSUS. You can change the way Windows operates to get the ‘Feature addition’ files directly from Microsoft with a group policy.

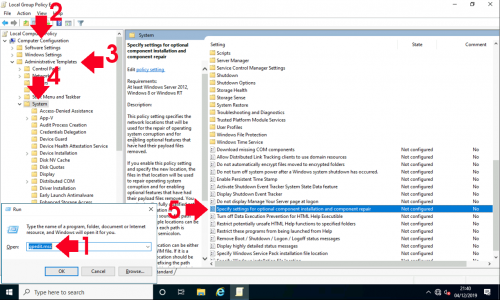
  • For Local Policy: Windows Key+R > gpedit.msc {Enter}
  • For Domain Policy: (On a domain controller) > Windows Key+R > gpmc.msc {Enter} > Create a new policy or edit one that’s linked to computer objects.

Navigate to;

Configuration > Administrative Templates > System 

Locate ‘Specify Settings for optional component installation and component repair‘.

Bypass WSUS for Optional Componnents

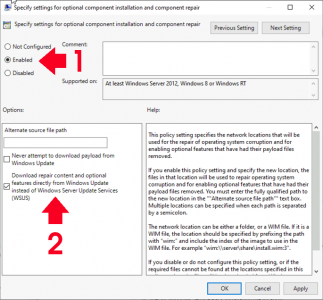
Set to Enabled > Tick ‘Download repair content and optional features directly from Windows Update instead of Windows Server Update Services (WSUS) > Apply > OK > Close the policy editor.

GPO To Bypass WSUS for Optional Componnents

Then either wait or Windows – Forcing Domain Group Policy

Related Articles, References, Credits, or External Links

NA

Windows In VMware Fusion ‘Cannot Access Shared Folders’

$
0
0

KB ID 0001627

Problem

Every so often I have a problem with the Windows 10 VM that I run on my mac in VMware Fusion, last time I needed to upgrade to Fusion 11.5, before that it was a registry fix. This time I could not access any files or folders on the parent mac.

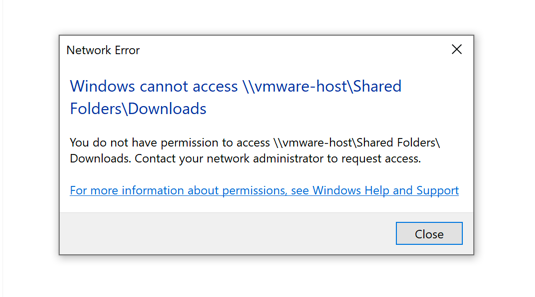
Network Error
Windows cannot access \\vmware-host\Shared Folders\{Folder-Name}
You do not have permissions to access \\vmware-host\Shared Folders\{Folder-Name}. Contact your network administrator to request access.

Solution

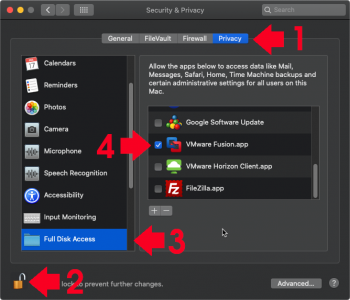
Removing and re-adding the share in VMware Fusion didn’t fix the problem, in the end I had to grant VMware Fusion, ‘Full Disk’ access before the problem ceased.

System Preferences > Security & Privacy > Privacy > ‘Unlock’ > Full Disk Access > Tick ‘VMware Fusion.app”.

Fusion shared Full disk Access

Related Articles, References, Credits, or External Links

NA

The Term ‘Uninstall-WindowsFeature’ is not Recognized

$
0
0

KB ID 0001628

Problem

I was removing Windows Defender from a lot of servers that had just been deployed, (while doing and AV rollout). So I had a remote session open to all the servers and issued the command on each one, and moved onto the next one. when I went back, about three or four of them had failed with the following error;

Uninstall-WindowsFeature is not recognised

PS C:\Users\Administrator> Uninstall-WindowsFeature -Name Windows-Defender
Uninstall-WindowsFeature : The term ‘Uninstall-WindowsFeature’ is not recognized as the name of a cmdlet, function,
script file, or operable program. Check the spelling of the name, or if a path was included, verify that the path is
correct and try again.
At line:1 char:1
+ Uninstall-WindowsFeature -Name Windows-Defender
+ ~~~~~~~~~~~~~~~~~~~~~~~~
+ CategoryInfo : ObjectNotFound: (Uninstall-WindowsFeature:String) [], CommandNotFoundException

This is strange, the servers were a mix of 2016 and 2019 but were all freshly built, I Googled the error and was told I needed to import the servermanager module, again I thought this was strange,  as most of them had worked but OK, then I got this;

Servermanager was not loaded

PS C:\Users\Administrator> Import-Module servermanager
import-module : The specified module ‘servermanager’ was not loaded because no valid module file was found in any
module directory.
At line:1 char:1
+ import-module servermanager
+ ~~~~~~~~~~~~~~~~~~~~~~~~~~~
+ CategoryInfo : ResourceUnavailable: (servermanager:String) [Import-Module], FileNotFoundException
+ FullyQualifiedErrorId : Modules_ModuleNotFound,Microsoft.PowerShell.Commands.ImportModuleCommand

Solution

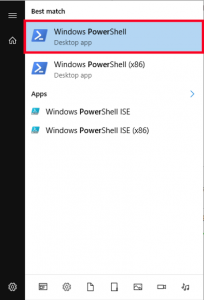
As is usually the case, I’d been a doofus! I assumes as I ‘rattled though each server I’d opened the x64 bit version of PowerShell, but as you can see (from the window headers above) that’s NOT the case!

Launch Powershell

Sometimes the problem is simply PEBKAC, (Problem Exists Between Keyboard And Chair).

Related Articles, References, Credits, or External Links

NA


XenServer: Enable SNMP

$
0
0

KB ID 0001629

Problem

We had to enable SNMP on a XenServer today, I’d never even logged onto one, but it turns out, much like ESX, it’s just a Linux server, at least the good folk at Citrix included nano on there so I didn’t have to struggle with the vi editor!

Solution

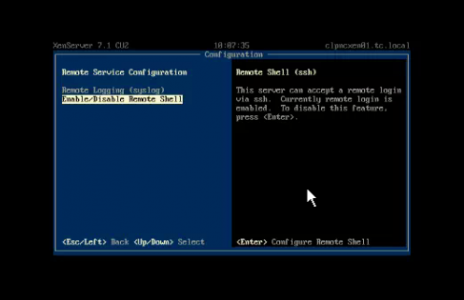
First from the web console ensure that SSH access is enabled > Remote Services Configuration > Enable/Disable Remote Shell.

Xen enable SSH

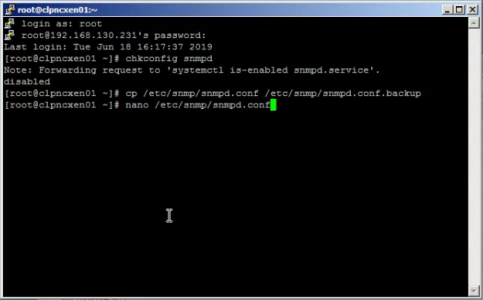
SSH into the host and execute the following commands to start the SNMP daemon,  take a backup of the config file, and finally edit the ‘live’ config file.

chkconfig snmpd
cp /etc/snmp/snmpd.conf /etc/snmp/snmpd.conf.backup
nano /etc/snmp/snmpd.conf

Xen enable SNMP

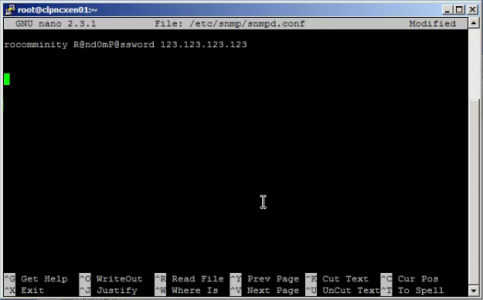
You can delete EVERYTHING (At the beginning of the file press CTRL+6 to mark the file, then Press ALT+Shif+T (or ALT+T) to cut the text away). Then type in;

rocommunity {SNMP-String} {IP address or range with /{bits}}

i.e.
rocommunity public 192.168.1.0/24


Xen SNMPD conf

Save and Exit (CTRL+X > ‘Y’ > {Enter}). Now you need to edit the firewall on the host (iptables). To allow the IP addresses of your SNMP collector(s).

nano /etc/sysconfig/iptables

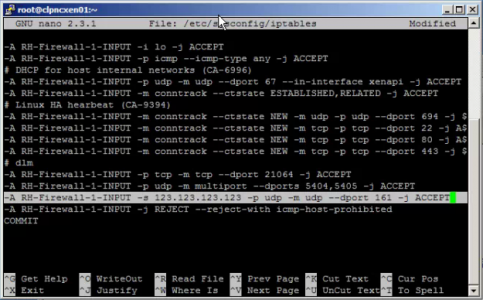
At the bottom, (usually) you will see a deny for ICMP, put an entry for each collector BEFORE that in the following format;

-A RH-Firewall-1-INPUT -s {Collector-IP-Address} -p udp -m udp --dport 161 -j ACCEPT

Citrix Xen Allow SNMP on Firewall iptables

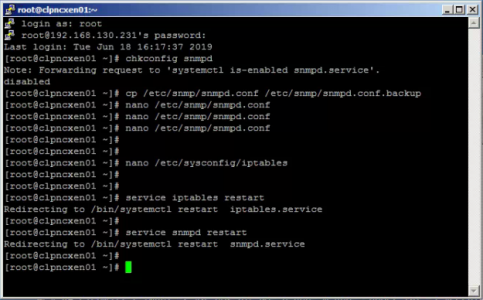
Save and Exit (CTRL+X > ‘Y’ > {Enter}). then restart iptables and the snmp daemon.

service iptables restart
service snmpd restart

Citrix Xen Restart SNMP and IPtables

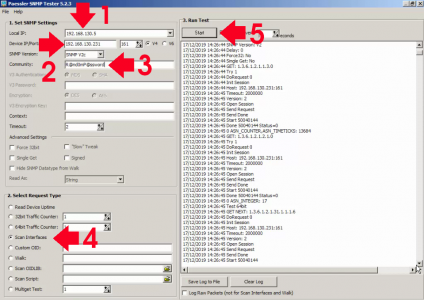
If you are polling it though a firewall you can test it locally using this piece of freeware, (I use this to test, but remember to add the local IP you are testing from to the sump config and the iptables!)

Citrix Xen Test SNMP Setup

Related Articles, References, Credits, or External Links

NA

Cisco Catalist Upgrading 2900, 5500 and 3700 Stacks

$
0
0

KB ID 0001630

Problem

People are often nervous about doing this, I’m not sure why because Cisco have made it painfully simple now. That’s because instead of the old /bin files we used to use, you can now upgrade a switch (or a switch stack) using a .tar file with one command, (and it will also upgrade all the stack members and the firmware on any other network modules you have in the switches at the same time).

Yes it does take a while*, and for long periods of time theres no updated output on the screen, which is worrying if you’ve never done it before.

*Note: The procedure below was updating two 2960-X switches and took about 45-50 minutes. If anyone wants to post any further timings below as a help to others, state the switch types and quantities, and versions you used, etc.

Solution

First things first, BACK UP YOUR SWITCH CONFIG. I also have a habit of copying out the original .bin file from the flash to my TFTP server as an extra ‘belt and braces’ precaution, in case everything ‘Goes to hell in a hand cart!’

I find it easier to do this with the update file on a USB Drive, (format the drive as Fat32). If you dont have a USB Drive, or the switch does not have a working USB port then don’t panic, you can use ftp or tftp to upgrade also.

Place your new upgrade .tar file on your USB Drive and insert it into the master switch, you should see the following;

Dec 19 13:13:18.466: %USBFLASH-5-CHANGE: usbflash0 has been inserted!

Note: If yours says usbflash1, or usbflash2 etc. Then that’s just the switch numbering in the stack, use the number it tells you!

Make sure the switch can see your upgrade file;

Petes-Switch# dir usbflash1:
Dec 19 16:56:45.712: %USBFLASH-5-CHANGE: usbflash0 has been inserted!

Directory of usbflash0:/
 -rw- 37488640 Nov 25 2019 10:08:34 +00:00 c2960x-universalk9-tar.152-7.E0a.tar

8036286464 bytes total (7997743104 bytes free)

You can execute the entire upgrade with this one command;

Petes-Switch# archive download-sw /overwrite usbflash0:/c2960x-universalk9-tar.152-7.E0a.tar

Note: If using tftp then use archive download-sw /overwrite tftp:/{ip-of-tftp-server}/{image-name}.tar instead.

It will take quite a long time, as soon as it says extracting xyz….go and have a coffee, wait until it says ‘All software images installed.’

---LOTS OF OUTPUT OMITTED FOR THE SAKE OF BREVITY---
New software image installed in flash2:/c2960x-universalk9-mz.152-7.E0a
Deleting old files from dc profile dir "flash:/dc_profile_dir"
extracting dc profile file from "flash:/c2960x-universalk9-mz.152-7.E0a/dc_default_profiles.txt" to "flash:/dc_profile_dir/dc_default_profiles.txt"
Deleting old files from dc profile dir "flash2:/dc_profile_dir"
extracting dc profile file from "flash2:/c2960x-universalk9-mz.152-7.E0a/dc_default_profiles.txt" to "flash2:/dc_profile_dir/dc_default_profiles.txt"
All software images installed.

Now let’s do a couple of checks just for our ‘peace of mind‘, first make sure the images are in all the relevant switches flash storage;

Petes-Switch#dir flash1:
Directory of flash:/

    2  -rwx        5486  Dec 19 2019 16:55:40 +00:00  private-config.text
    3  -rwx          33   Aug 7 2019 08:28:12 +00:00  pnp-tech-time
    4  -rwx       11114   Aug 7 2019 08:28:14 +00:00  pnp-tech-discovery-summary
    5  -rwx        3096  Dec 19 2019 16:55:40 +00:00  multiple-fs
  699  drwx         512  Dec 19 2019 17:35:25 +00:00  c2960x-universalk9-mz.152-7.E0a
  480  drwx         512  Dec 19 2019 17:35:28 +00:00  dc_profile_dir
  696  -rwx         796   Aug 9 2019 09:48:30 +00:00  vlan.dat
  698  -rwx        7539  Dec 19 2019 16:55:40 +00:00  config.text

122185728 bytes total (84392960 bytes free)
Petes-Switch#dir flash2:
Directory of flash2:/

    2  -rwx        5486  Dec 19 2019 16:55:40 +00:00  private-config.text
    3  -rwx          33   Aug 7 2019 08:32:38 +00:00  pnp-tech-time
    4  -rwx       11126   Aug 7 2019 08:32:40 +00:00  pnp-tech-discovery-summary
    5  -rwx        7539  Dec 19 2019 16:55:40 +00:00  config.text
    6  drwx         512  Dec 19 2019 17:35:26 +00:00  c2960x-universalk9-mz.152-7.E0a
  481  drwx         512  Dec 19 2019 17:35:28 +00:00  dc_profile_dir
  696  -rwx        3096   Aug 8 2019 10:21:29 +00:00  multiple-fs
  697  -rwx         796  Dec 11 2019 10:55:22 +00:00  vlan.dat
  698  -rwx        7514  Dec 19 2019 16:55:40 +00:00  config.text.backup
  699  -rwx        5486  Dec 19 2019 16:55:40 +00:00  private-config.text.backup

122185728 bytes total (84378624 bytes free)

Note: Repeat for each switch in the stack, if you have further switches.

Why does it not have .tar or .bin on the end? Because it’s a folder 🙂

The let’s make sure the ‘boot variable‘ in the device is set to use the new image;

Petes-Switch# show boot
BOOT path-list      : flash:/c2960x-universalk9-mz.152-7.E0a/c2960x-universalk9-mz.152-7.E0a.bin
Config file         : flash:/config.text
Private Config file : flash:/private-config.text
Enable Break        : yes
Manual Boot         : no
Allow Dev Key         : yes
HELPER path-list    :
Auto upgrade        : yes
Auto upgrade path   :
Boot optimization   : disabled
NVRAM/Config file
      buffer size:   524288
Timeout for Config
          Download:    0 seconds
Config Download
       via DHCP:       disabled (next boot: disabled)
-------------------
Switch 2
-------------------
BOOT path-list      : flash:/c2960x-universalk9-mz.152-7.E0a/c2960x-universalk9-mz.152-7.E0a.bin
Config file         : flash:/config.text
Private Config file : flash:/private-config.text
Enable Break        : yes
Manual Boot         : no
Allow Dev Key         : yes
HELPER path-list    :
Auto upgrade        : no
Auto upgrade path   :

All looks good save the config and reload the stack.

Petes-Switch# write mem
Petes-Switch# reload
Proceed with reload? [confirm] {Enter}

Dec 19 17:38:50.952: %SYS-5-RELOAD: Reload requested by console. Reload Reason: Reload command.

Time for another coffee while it’s reloading the stack, when it’s back up you can check it was successful like so;

Petes-Switch# show version
---LOTS OF OUTPUT OMITTED FOR THE SAKE OF BREVITY---
Switch Ports Model                     SW Version            SW Image
------ ----- -----                     ----------            ----------
*    1 54    WS-C2960X-48TS-L          15.2(7)E0a            C2960X-UNIVERSALK9-M
     2 54    WS-C2960X-48TS-L          15.2(7)E0a            C2960X-UNIVERSALK9-M

Related Articles, References, Credits, or External Links

NA
No Mail Flow On-Premise To/From Office 365

$
0
0

KB ID 0001631

Problem

I upgraded my On-Premise Hybrid Exchange server recently, from Exchange 2016 to Exchange 2019. I remembered to add the new server onto the Office 365 send connector, but there was no mail flow between an on premise mailbox and an office365 mailbox?

Solution

This happens because, (even if you are using the same certificate on the new and old servers) the certificate that is used for TLS security between your on-premise Exchange server and Exchange online, does not get ’embedded’ properly on the send/receive connectors. You may see either (or both) of the following two problems.

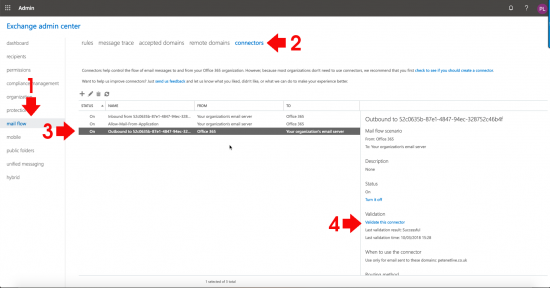
Check The Office 365 Mail Flow

Log into Office 365 > Admin > Exchange Admin Center > Mail Flow > Connectors > Select the ‘Outbound’ connector > Validate this connector.

Herein lies the problem!

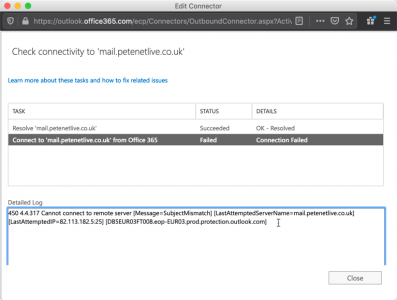
450 4.4.317 Cannot connect to remote server [Message=SubjectMismatch] [LastAttemptedServerName={on-prem-fqdn}] [LastAttemptedIP={on-prem-ip}}:25] [{outlook-FQDN}]

Message=SubjectMismatch Error

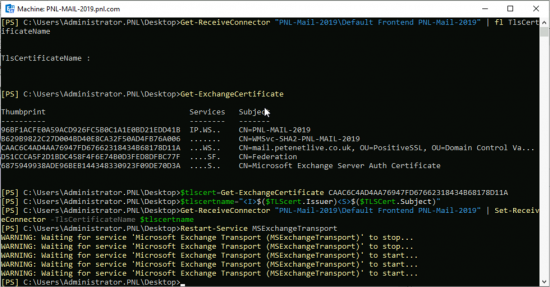
At first I thought the on-premise server was presenting the wrong cert for TLS, turns out it was not presenting a cert at all! You can check by executing the following command on the RECEIVE CONNECTOR;

Get-ReceiveConnector "{SERVER-NAME}\Default Frontend {SERVER-NAME}" | fl TlsCertificateName  

If it returns no entry (like the image below), then you need to simply attach the correct certificate. To do that first get the ‘thumbprint’ of the correct certificate;

Get-ExchangeCertificate  

Copy the correct thumbprint, and embed it with the following commands;

$tlscert=Get-ExchangeCertificate {THUMBPRINT}
$tlscertname="<I>$($TLScert.Issuer)<S>$($TLSCert.Subject)"
Get-ReceiveConnector "{SERVER_NAME}\Default Frontend {SERVER_NAME}" | Set-ReceiveConnector -TlsCertificateName $tlscertname
Restart-Service MSExchangeTransport

Validate connector Office365 Fails

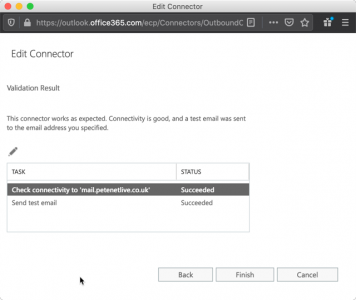
Now test validation again from Office 365 portal.

Sucessfully Validate Office365 Fails

Check The Office On-Premise Mail Flow

To do this, open Exchange Tools > Queue Viewer, and you will probably see something like this;

Send Connector to Office 365 Fails

454 4.7.5 The certificate specified in TlsCertificateName of the SendConnector could not be found.

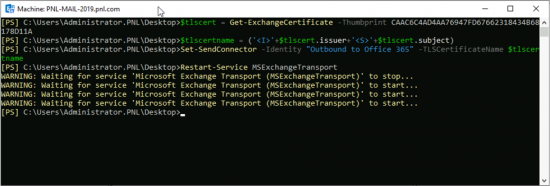
To fix this, the procedure is much the same as above, only this time you perform the procedure on the SEND CONNECTOR ;

Note: I’m assuming you are using the same Thumbprint you used above,

$tlscert=Get-ExchangeCertificate -Thumbprint {THUMBPRINT}
$tlscertname = (‘<I>’+$tlscert.issuer+'<S>’+$tlscert.subject)
Set-SendConnector -Identity "Outbound to Office 365" -TLSCertificateName $tlscertname
Restart-Service MSExchangeTransport

Send Connector to Office 365 TLS Name

By the time you go back to Queue viewer the queues should have started to empty.

Related Articles, References, Credits, or External Links

NA
Exchange Cant Mount Database ‘0x80004005’

$
0
0

KB ID 0001632

Problem

When attempting to mount an Exchange Database I got this error;

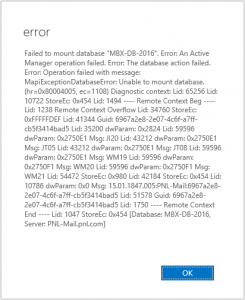
Unable to Mount Maibox DB 4005

Failed to mount database “{Database-Name}”. Error: An Active Manager operation failed. Error: The database action failed. Error: Operation failed with message: MapiExceptionDatabaseError: Unable to mount database. (hr=0x80004005, ec=1108) Diagnostic context: Lid: 65256 Lid: 10722 StoreEc: 0x454 Lid: 1494 —- Remote Context Beg —- Lid: 1238 Remote Context Overflow Lid: 34760 StoreEc: 0xFFFFFDEF Lid: 41344 Guid: 6967a2e8-2e07-4c6f-a7ff-cb5f3414bad5 Lid: 35200 dwParam: 0x3F28 Lid: 59596 dwParam: 0x231090 Msg: JI20 Lid: 43212 dwParam: 0x231090 Msg: JT05 Lid: 43212 dwParam: 0x231090 Msg: JT08 Lid: 59596 dwParam: 0x231090 Msg: WM19 Lid: 59596 dwParam: 0x231090 Msg: WM20 Lid: 59596 dwParam: 0x231090 Msg: WM21 Lid: 54472 StoreEc: 0x980 Lid: 42184 StoreEc: 0x454 Lid: 10786 dwParam: 0x0 Msg: 15.01.1847.005:PNL-Mail:6967a2e8-2e07-4c6f-a7ff-cb5f3414bad5 Lid: 51578 Guid: 6967a2e8-2e07-4c6f-a7ff-cb5f3414bad5 Lid: 1750 —- Remote Context End —- Lid: 1047 StoreEc: 0x454 [Database: Database-Name, Server: Server-Name]

Solution

It’s been a while since I last saw an 0x80004005 error, last time it was because the AV software on the Exchange server had quarantined a log file, but this server was not running any third party AV. On closer inspection the problem was pretty obvious;

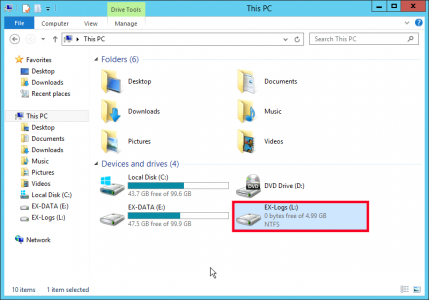
Unable to Mount Mailbox Drive Full

My ‘log-file’ partition was full, (I had something else doing diagnostic logging), once I tidied up the partition and freed up some space the database mounted without complaining.

Related Articles, References, Credits, or External Links

Exchange – Failed to mount database(hr=0x80040115, ec=-2147221227)

Event ID 3154 ‘Active Manager Failed To Mount Database’

Control Panel ‘Mail Icon Missing’

$
0
0

KB ID 0000237

Problem

Problem usually seen on x64 Office versions, to set up some mail profiles;

Solution

Firstly what happens if you try running;

outlook.exe /manageprofiles

The file you are looking for is called mlcfg32.cpl Find it and double click it. here’s where I found it

C:\Program Files (x86)\Microsoft Office\root\Office{Version}

or

C:\Program Files (x86)\Common Files\System\MSMAPI\1033

Mail Icon Missing Control Panel

If you get stuck, or are using x64 bit version of Office, go old school *remember to run it form the root of the drive!)

Mail Icon Missing x64

Related Articles, References, Credits, or External Links

NA
Windows – Find your ‘Uptime’

$
0
0

KB ID 0000552 

Problem

There are lots of reasons you might want to know your PC/Servers uptime, to make sure a client has rebooted a server (like you asked them to), or to see if a server has had a BSOD and rebooted overnight, etc.

Check Uptime with Task Manager

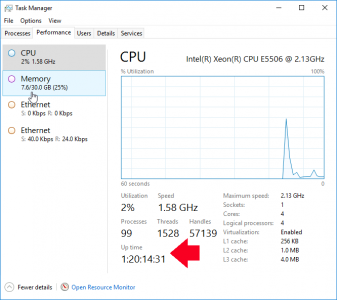
You can get your uptime from the Task Manager’s “Performance” tab.

To launch Task Manger

Start > Run > Taskmgr.exe {enter}. or Press CTRL+SHIFT+ESC, or Right click the Task bar > Select Task Manager.  > Options


Use PowerShell to find Server Boot time

From Powershell Use the following syntax;

[Management.ManagementDateTimeConverter]::ToDateTime((Get-WmiObject Win32_OperatingSystem).LastBootUpTime)

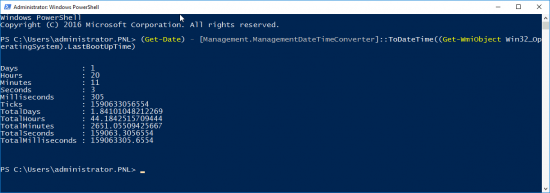
Use PowerShell to find Uptime

From Powershell Use the following syntax;

(Get-Date) - [Management.ManagementDateTimeConverter]::ToDateTime((Get-WmiObject Win32_OperatingSystem).LastBootUpTime)

Option 3 – Use Systeminfo to find Uptime

From command line execute the Systeminfo | find /I “boot” command;


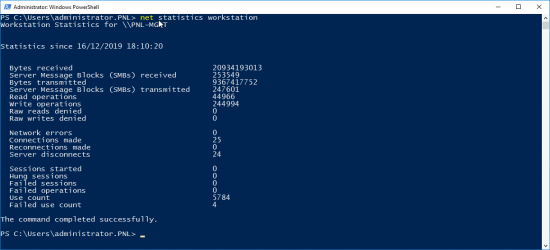
Option 3 -Use Net Statistics to find Uptime

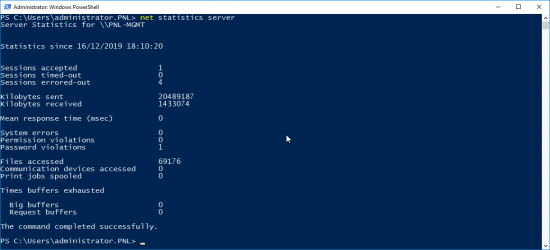
You can get uptime information by either querying the workstation service, or the server service, issue either, the following command;

net statistics workstation

Or the following command;

net statistics server

Option 4 – Use Uptime.exe to find Uptime

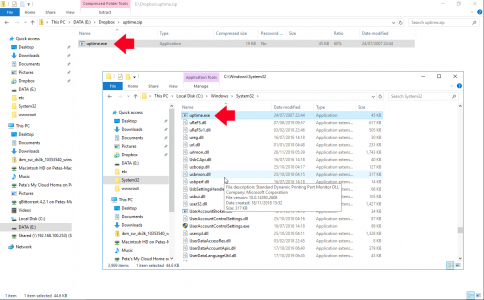
Download uptime and put a copy in your “System32” Directory, you can then use the uptime command.

Option 5 – Use WMI (Windows Management Instrumentation) to find Uptime

Issue the following command;

wmic os get lastbootuptime

Find server Uptime WMIC

As you can see the result is not pretty, it is presented in UTC format.

20120109081112.925800+000 = Year 2010, Month 01, Day 09, Time 08:11:12

Option 6 – Check the Event Log to find Uptime

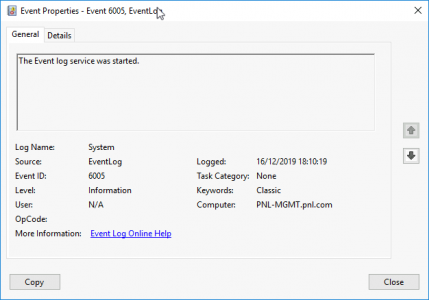
Launch the Event Viewer (eventvr.msc) > Windows Logs > System Log > Find > Search for Event ID 6005, (Note: This event gets logged each time the server boots, as the event log service starts). Event ID 6006 will be labeled as “The event log service was stopped.” This is synonymous with system shutdown.

Event Server Boots 6005


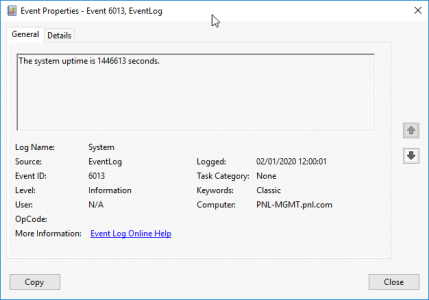
Note: Event 6013 is periodically logged this shows the machines uptime at that point.

Note:  In the event of an abnormal shutdown look for Event ID 6009 indicates the processor information detected during boot time. Event ID 6008 will let you know that the system started after it was not shut down properly.

Option 1 – Use Uptime.exe to get a Remote Machines Uptime

Already mentioned above download uptime and extract it to your system32 directory. Then to get a remote machines uptime, use the following command;

uptime {Name of Remote PC}

Use Powershell to get a Remote Machines Uptime

Use the following syntax;

[Management.ManagementDateTimeConverter]::ToDateTime((Get-WmiObject Win32_OperatingSystem -ComputerName RemoteMachine).LastBootUpTime)

Related Articles, References, Credits, or External Links

NA
Exchange – Display Mailbox’s by size

$
0
0

KB ID 0000469

Problem

Yesterday a client asked me how he could find out, which of his users were the “worst offenders” for mailbox size. Normally a simple Get-MailboxStatistics command would be fine, and we would sort the results in descending order.

Solution

On one of the Exchange servers, launch the Exchange Management Shell.

Issue the following command:

Note: That’s all one command, replace the name PNL-MAIL-2019 with your Exchange server name.

Get-MailboxStatistics -Server PNL-MAIL-2019  | Select DisplayName, ItemCount, TotalItemSize | Sort-Object TotalItemSize -Descending

And here’s your nicely formatted list (Note: this is my test environment so there’s not much mail in it).

List Mailboxes by Size

Fo Exchange 2010 use the following syntax;

Get-MailboxStatistics -Server DC2A | where {$_.ObjectClass –eq “Mailbox”} | Sort-Object TotalItemSize –Descending | ft @{label=”User”;expression={$_.DisplayName}},@{label=”Total Size (MB)”;expression={$_.TotalItemSize.Value.ToMB()}},@{label=”Items”;expression={$_.ItemCount}},@{label=”Storage Limit”;expression={$_.StorageLimitStatus}} -auto

Note: To see the sizes of the individual Folders in users mailboxes see the following article;

Exchange – Display/Export Users Mailbox Folder Sizes

Related Articles, References, Credits, or External Links

NA

Setup Cant Continue PowerShell Has Open Files

$
0
0

KB ID 0001633

Problem

While attempting to uninstall Microsoft Exchange server;

Cant continue powershell has open files

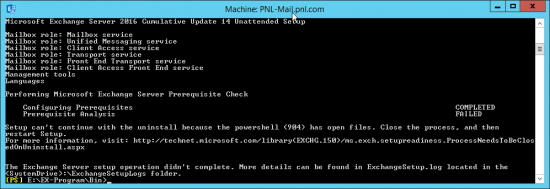
Setup can’t continue with the uninstall because the powershell (PID) has open files. Close the process, and then restart setup.

Solution

Seems to be a common error, and is usually caused because someone has the Exchange Web Management page open, (probably in another user session);

Cant continue powershell has open files

In some cases you may need to reboot, but in my case I was simply being a doofus, look at the window I’m running the command from! Open an administrative command window and try again 😉

Related Articles, References, Credits, or External Links

NA
ADFS: Changing the Certificate

$
0
0

KB ID 0001634

Problem

I needed to change the certificate used by an ADFS server today. I’d used a temporary self signed wildcard cert to get me up and running now I needed to replace it with a new publicly signed one.

I found a number of ways of doing this INCORRECTLY, so hopefully I will save you making the same mistakes!

Solution

Firstly you need to import your certificate, here from a PFX file, (if you want a PFX file import by double clicking the certificate, then export the certificate, include the private key, and set a password on it). I’ve done this in lots of different articles just use the search bar above it you get stuck.

To import the certificate, open an administrative command window and execute the following command;

certutil -importpfx certificate-name.pfx AT_KEYEXCHANGE
{supply the pfx password}

Open an administrative PowerShell Window and execute the following command;

Set-ADFSProperties -AutoCertificateRollover $false

ADFS Disable Certificate Rollover

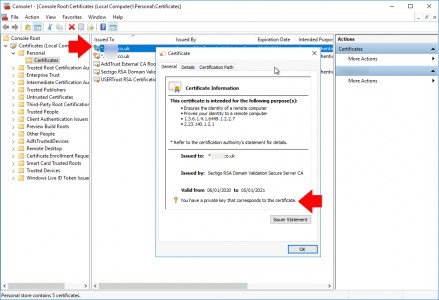
Make sure your certificate has a small key over the icon, or says ‘you have a private key that corresponds to this certificate‘. If yours does not, then import it on the server/PC you created the CSR (Certificate Signing Request) on, then export it to PFX, them import it using the command above on your ADFS server.

Certificate With Private Key

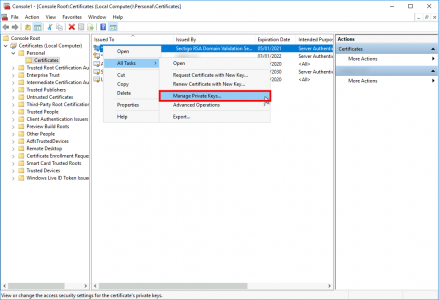
On your certificate > All Tasks > Manage Private Keys.

Certificates Manage Private Keys

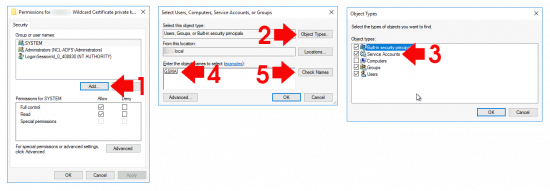
Add > Object Types > Select Service Accounts > Locate and select your ADFS service account. Grant full control.

Allow ADFS GSMA Account Access to Certificate Keys

Launch the AD FS management console > Service > Certificates > Set Service Communication Certificate.

ADFS Change certificate

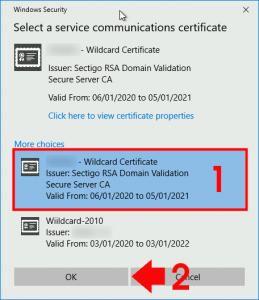
Select the correct (new) certificate > OK.

ADFS Renew Certificate

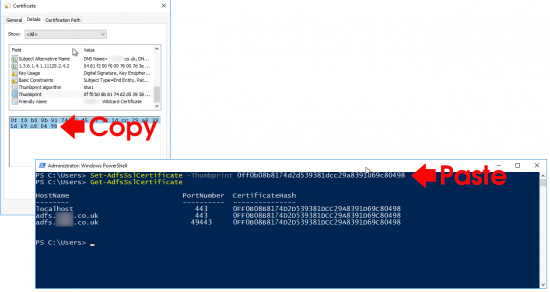
On the properties of your new certificate locate the thumbprint (not the serial number!) Copy it to the clipboard, then execute the following command;

Set-AdfsSslCertificate -Thumbprint {Paste in the thumbprint - minus the spaces!}

ADFS Replace Certificate PowerShell

Then to finish off;

Set-ADFSProperties -AutoCertificateRollover $true
Restart-Service ADFSSRV

ADFS - Restart

Changing ADFS Certificates: Things That Might Go Wrong

Error;

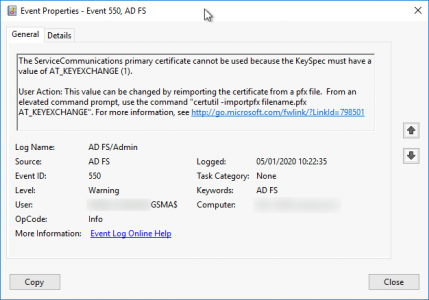
AT_KEYEXCHANGE Error

The ServiceCommunications primary certificate cannot be used because the KeySpec must have a value of AT_KEYEXCHANGE (1).
This value can be changed by reimporting the certificate from a pfx file. From an elevated command prompt, use the command “certutil -importpfx filename.pfx AT_KEYEXCHANGE”. For more information, see http://go.microsoft.com/fwlink/?LinkId=798501

You will also see an Event ID 550

Event ID 550 ADFS

Solution: Import the certificate using the ‘certutil -importpfx certificate-name.pfx AT_KEYEXCHANGE‘ syntax.

Error

ADFS - Rollover enabled

Solution: Disable certificate rollover with ‘Set-ADFSProperties -AutoCertificateRollover $false‘ syntax. (Note: Dont forget to enable it again afterwards!)

Related Articles, References, Credits, or External Links

NA
Connections From Machines That Don’t Map to Sites?

$
0
0

KB ID 0001635

Problem

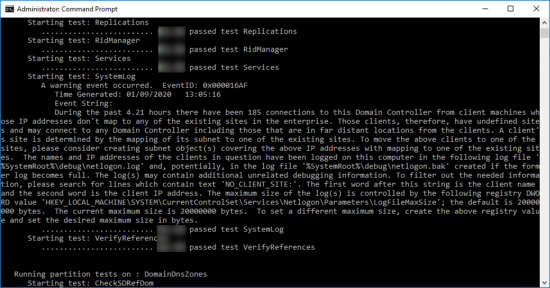
I was troubleshooting some replication issues for a client, and carried out a dcdiag on one of their domain controllers, and saw this;

 Starting test: SystemLog
A warning event occurred. EventID: 0x000016AF
Time Generated: xx/xx/xxxx xx:xx:xx
Event String:
During the past 4.21 hours there have been {xxx} connections to this Domain Controller from client machines whose IP addresses don’t map to any of the existing sites in the enterprise. Those clients, therefore, have undefined sites and may connect to any Domain Controller including those that are in far distant locations from the clients. A client’s site is determined by the mapping of its subnet to one of the existing sites. To move the above clients to one of the sites, please consider creating subnet object(s) covering the above IP addresses with mapping to one of the existing sites. The names and IP addresses of the clients in question have been logged on this computer in the following log file ‘%SystemRoot%\debug\netlogon.log’ and, potentially, in the log file ‘%SystemRoot%\debug\netlogon.bak’ created if the former log becomes full. The log(s) may contain additional unrelated debugging information. To filter out the needed information, please search for lines which contain text ‘NO_CLIENT_SITE:’. The first word after this string is the client name and the second word is the client IP address. The maximum size of the log(s) is controlled by the following registry DWORD value ‘HKEY_LOCAL_MACHINE\SYSTEM\CurrentControlSet\Services\Netlogon\Parameters\LogFileMaxSize’; the default is 20000000 bytes. The current maximum size is 20000000 bytes. To set a different maximum size, create the above registry value and set the desired maximum size in bytes.

Solution

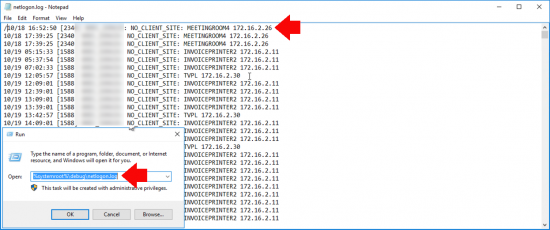
On the DC in question, Windows Key+R > %Systemroot%\debug\netlogon.log > OK > There’s you missing subnet!

Missing AD Subnet

Go to Active Directory Sites and Services, add the missing subnet, and allocate it to the correct site.

Related Articles, References, Credits, or External Links

NA
Azure AD Sync: ‘Insufficient access rights to perform this operation’

$
0
0

KB ID 0001636

Problem

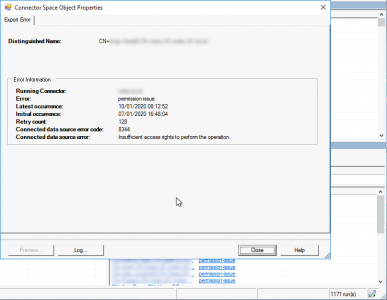
With Azure AD Replication, you may notice that you have the following error when you take a look at your connector status;

AAD Permission Issue Insufficient Rights

Error: permission-issue
Connected data source error code: 8344
Connected data  source error: Insufficient access rights to perform this operation.

Solution

Firstly ensure that the user you are running AAD sync under, has the following permissions on the ‘root’ of your local AD domain.

  • Replicating Directory Changes: Allow
  • Replicating Directory Changes All: Allow

AAD Replication User Rights

If the problem persists it’s usually because the account that is running the AAD sync does not have the appropriate rights to the mS-DS-ConsitencyGuid attribute for the affected users in the local Active Directory. The following commands will add the appropriate rights you ALL your local users;

$accountName = "Domain-Name\User-Name" 
$ForestDN = "DC=Domain-Name,DC=Domain-Extension"
$cmd = "dsacls '$ForestDN' /I:S /G '`"$accountName`":WP;ms-ds-consistencyGuid;user'"
Invoke-Expression $cmd

Grant AAD User Replication Rights

Lastly, if you have this problem on some ‘sporadic’ users, check to ensure that their individual user objects and inheritance enabled on their user object, before retrying.

Allow Inhritance on AD User

Related Articles, References, Credits, or External Links

NA
The specified module ‘MSOnline’ was not loaded.

$
0
0

KB ID 0001637

Problem

I was trying to do some Azure Powershell this morning, I’d executed a Connect-MsolService command and got a;

The term ‘Connect-MsolService’, function, script file, or operable program.

A quick Google for that turned up ‘You need to run an Import-Module MSOnline‘ command, but doing that simply gave me;

PS C:\Users> Import-Module MSOnline
Import-Module : The specified module 'MSOnline' was not loaded because no valid module file was found in any module
directory.
At line:1 char:1
+ Import-Module MSOnline
+ ~~~~~~~~~~~~~~~~~~~~~~
    + CategoryInfo          : ResourceUnavailable: (MSOnline:String) [Import-Module], FileNotFoundException
    + FullyQualifiedErrorId : Modules_ModuleNotFound,Microsoft.PowerShell.Commands.ImportModuleCommand

Solution

Well before you can run Import-Module MSOnline, run Install-Module MSOnline, you may need to answer ‘Y’ to proceed.

MSOnline was not loaded

Then, run Import-Module MSOnline and you are good to go!

Related Articles, References, Credits, or External Links

NA
Viewing all 802 articles
Browse latest View live