Quantcast
Channel: PeteNetLive
Viewing all 802 articles
Browse latest View live

VMware Unified Access Gateway: Horizon Deployment

$
0
0

KB ID 0001605

Problem

With older versions of Horizon View, we simply deployed another Connection server and called it a Security Server. The drawback of that is, it requires another Windows licence. You can now deploy  VMware UAG (Unified Access Gateway), try to think of it as a ‘Netscaler for VMware’, and like other VMware solutions it’s a small appliance built on VMware’s ‘Photon’ Linux.

Below is a typical deployment and shows you the ports you will be required to open on your firewall to make this work;

UAG-Port-Requirements

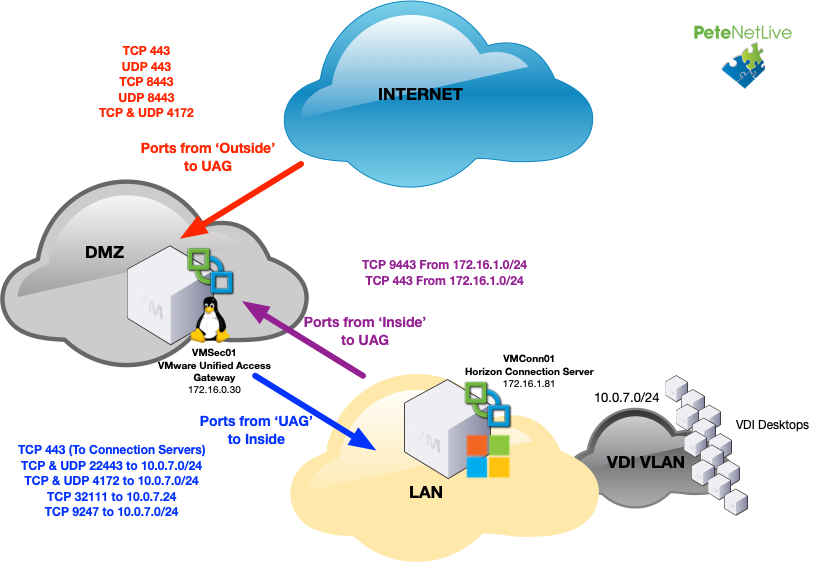
You can deploy multiple UAGs and have them behind a load balancer, or point individual UAGs to separate Horizon Connection servers. Her I’m simply deploying one internal Horizon Connection Server, and one VMware UAG in my DMZ.

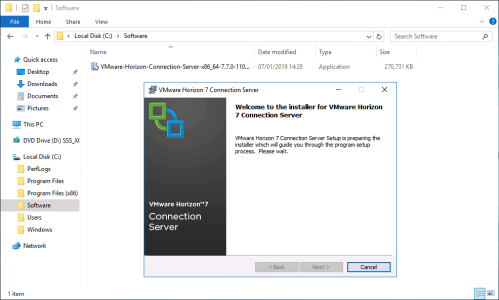
Step 1: Deploy the UAG Appliance

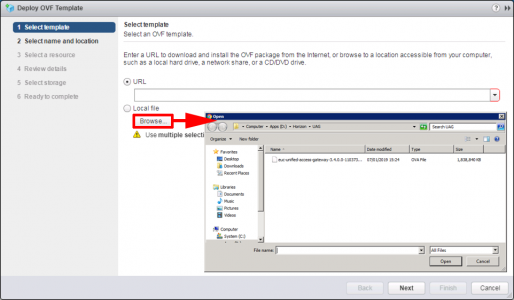
I’ve covered deploying OVA files before, but essentially download the OVA, and within your vSphere client select deploy OVF template. Navigate to, and select the OVA file you have downloaded from VMware > Next.

Deploy VMware UAG OVA

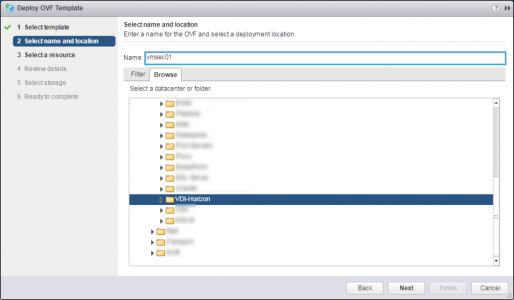
Select your Datacenter and optionally folder > Next.

Deploy VMware UAG OVA Placement

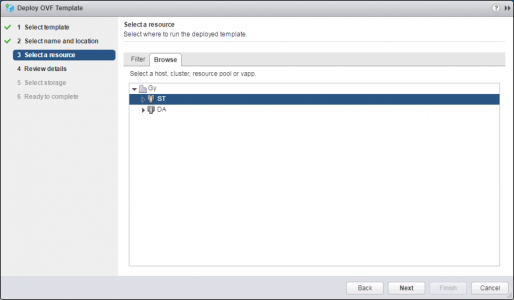
Pick where you want to deploy the appliance (Cluster etc.) > Next.

Deploy VMware UAG OVA Resource

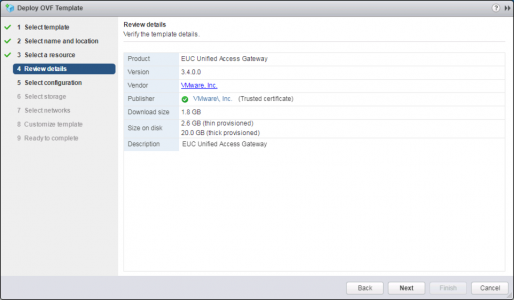
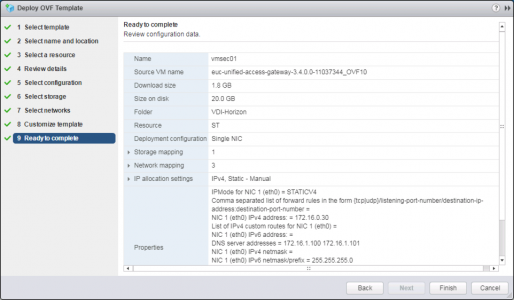
Review your settings > Next.

Deploy VMware UAG OVA Review

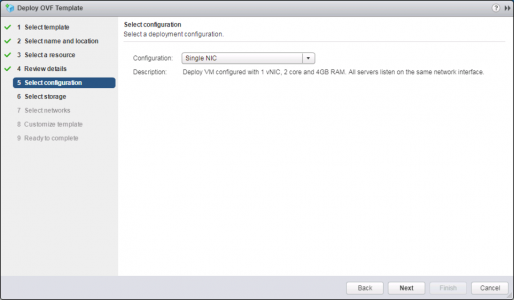
I’m deploying into a DMZ so there will be no shortcutting the firewall! > Single NIC > Next.

Deploy VMware UAG OVA Single NIC

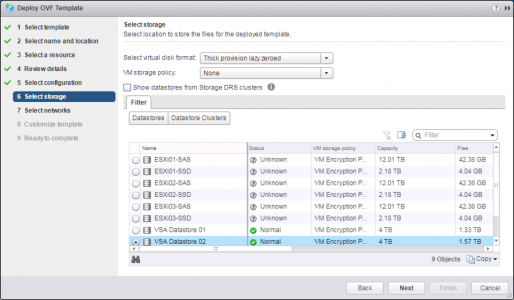
Select the storage you want to deploy the appliance to > Next.

Deploy VMware UAG OVA Storage

Confusingly, (as we have picked single NIC?) set them all to the correct port group > Next.

Deploy VMware UAG OVA Networks

Specify the IP address > Scroll down.

Deploy VMware UAG OVA IP Setup

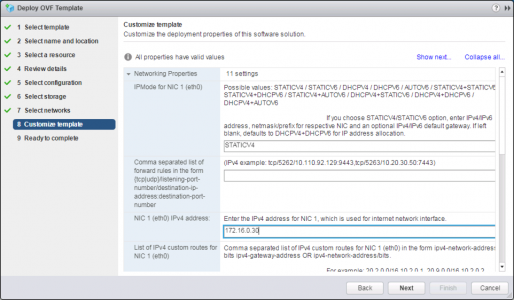
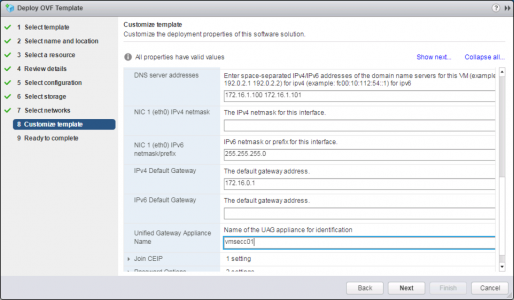
Complete the DNS and IP settings > Give the appliance a name > scroll down.

Deploy VMware UAG OVA DNS Setup

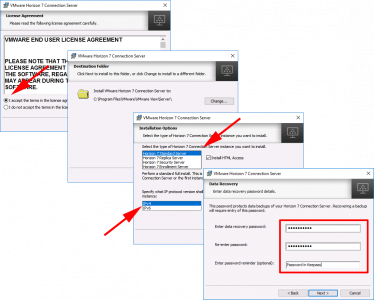
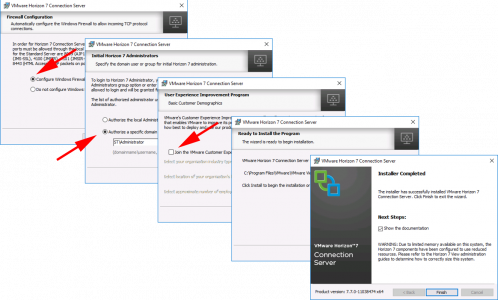
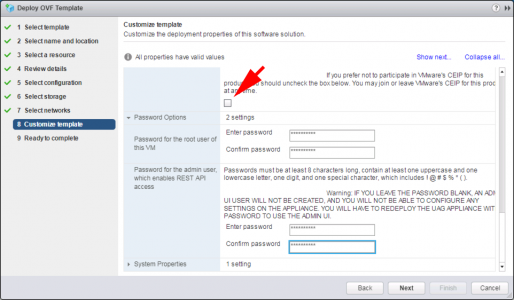
Untick CEIP > Set the admin, (needed for the web front end), and root (needed for console login) passwords.

Deploy VMware UAG OVA Password Setup

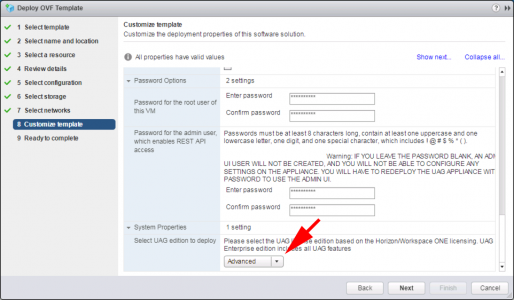
Select the edition to deploy (based on your licence) > Next.

Deploy VMware UAG OVA Licence

Review the settings > Finish.

Deploy VMware UAG OVA Ready

Step 2: UAG Pre Configuration Tasks

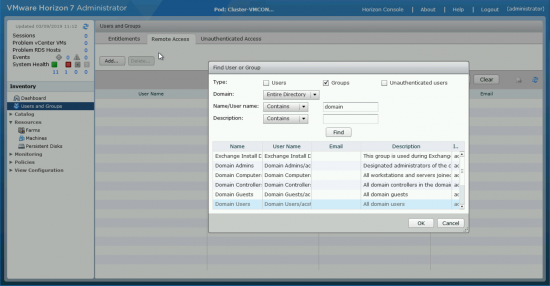
To allow users to access Horizon machines externally, you need to ensure you have granted Remote Access Rights in Horizon Administrator, Note: This is in addition to any Entitlements you have already setup for the machine pools.

Allow VMware UAG Access

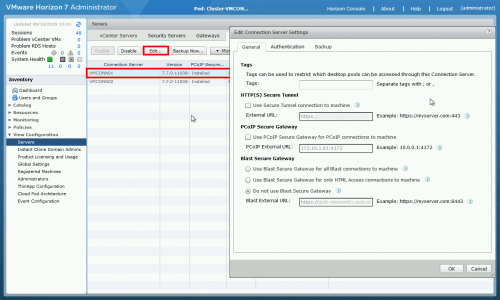
Take a copy of the Thumbprint, from the Horizon Connection Server you will be pointing the UAG at, keep it handy you will need it in a minute.

Get Horizon Thumbprint

Optionally

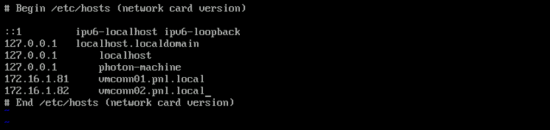
If your UAGs are going into a DMZ there’s a chance that they wont be able to resolve internal domain names, (you can specify internal IP addresses of course). I prefer to enter the names/FQDNs of my connections servers, in the appliances hosts file, so it can be resolved. Log into the console as root;

vi /etc/hosts

Photon Edit Host File

If you’re unsure how to use vi, (i.e you don’t wear sandals, or have a ginger pony tail.) Press I (insert) make your changes > Press Esc > Type :wq {Enter}.

Photon Manually Edit Hosts File

Step 3: Configure UAG for Horizon

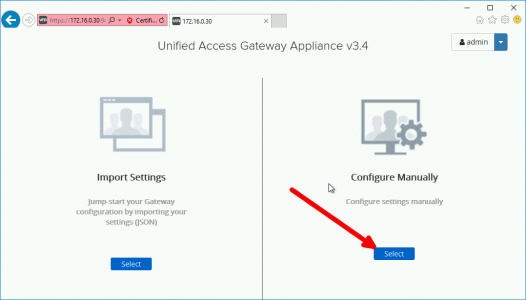
Connect to the UAG with a web browser (https{ip-address}:9443) > Login with the admin account > ‘Configure Manually’.

Manually configure UAG

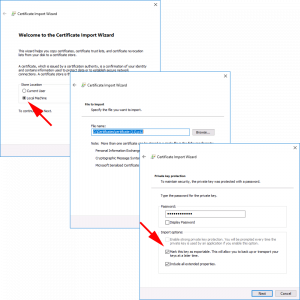
Optional: Add Certificate

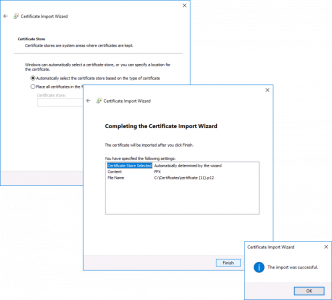
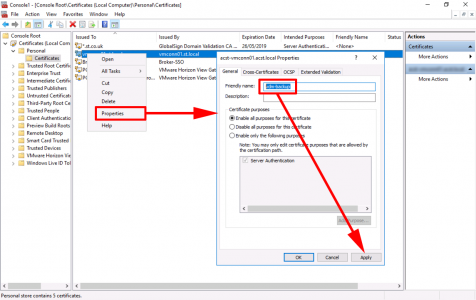
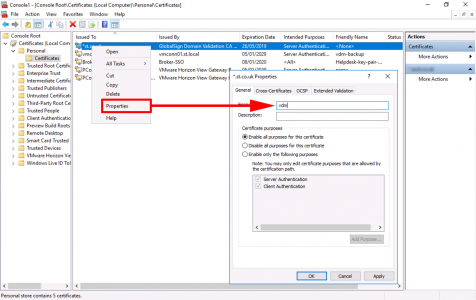
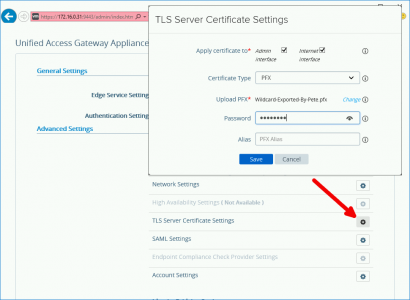
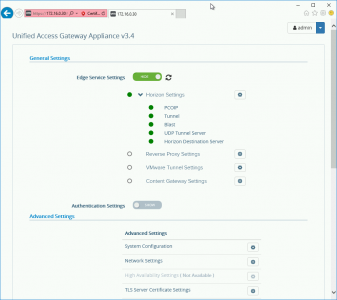
If you have a publicly signed certificate, the easiest way to import it is with a PFX file and a password, (use the search box above, I’ve covered creating PFX files many times). You need to go to Advanced Settings > TLS Server Certificate Settings > Select admin and internet interfaces, (as required) > Browse to the PFX file and enter the password you set, (for the pfx file!) > Save.

UAG Certificates Replacing

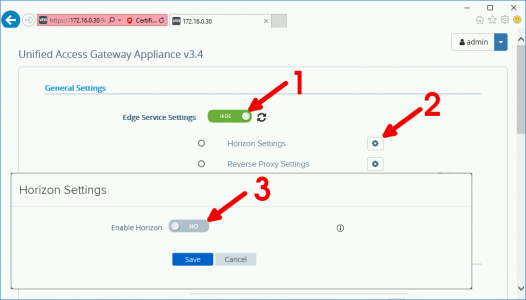
General Settings > Edge Service Settings > SHOW > Horizon Settings > Enable Horizon > Save.

UAG Enable Horizon

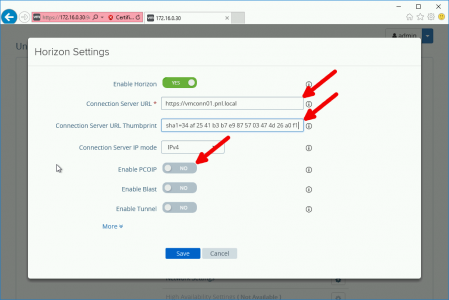
Enter the URL of the internal connection Server, and the Thumbprint you took note of, (above) > Enable PCOIP.

UAG Horizon URL

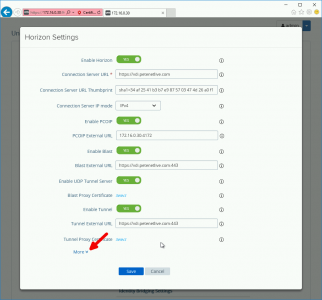
Set the external PCIOP URL to the external IP of the UAG, (or load balancer if using one) and add :4172 to the end, Enable Blast > Set the public URL of the UAG, (or load balancer if using one) and add :443 to the end. Enable Tunnel, and set the same URL again with :443 on the end. If you want to, open the ‘more options’ section and take a look at the optional settings, though I’m leaving everything else on the default settings > Save.

UAG Horizon public URLs

Have a cup of coffee, refresh the page a few times > Log off and back on again, and hopefully all the options should ‘go green‘. If not, check the firewall ports, and make sure the UAG can resolve the name of the connection server.

UAG Horizon Settings Online

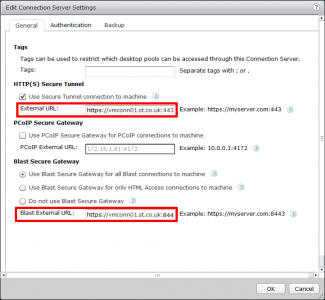
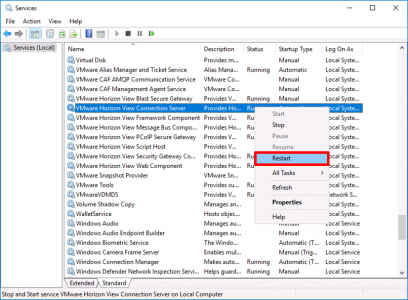
Over in Horizon Administrator > Select each internal connection server and remove ‘Secure Tunnel‘, PCOIP Secure Gateway, and select ‘Do not use Blast Secure Gateway‘ > OK.

Horizon Server Secure Tunnels

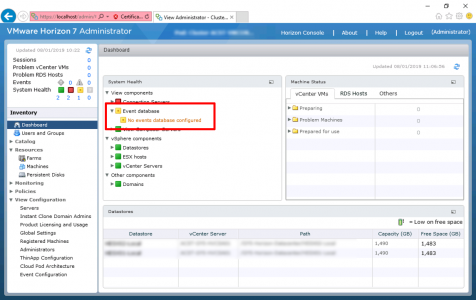
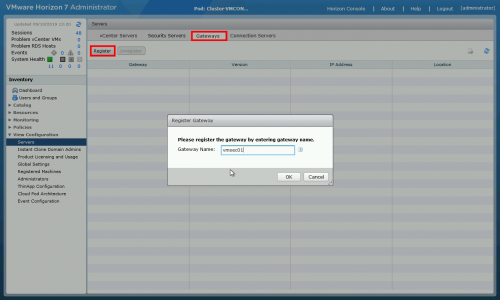
You can register the UAGs, in the Gateway section, but you wont see anything change until they have been used ‘in anger’.

Register UAG in Horizon

You can now test externally by trying to connect with a Horizon Client.

Related Articles, References, Credits, or External Links

NA


VMware: Install PowerCLI

$
0
0

KB ID 0001606

Problem

There was a time you had to go to VMware and download PowerCLI then install it, that’s no longer the case, any machine with a, (reasonably new) version of PowerShell can simply pull the commandlets down from a repository and you are ready to go.

Solution

Firstly if you have the ‘old version’ of PowerCLI you can uninstall it from Add/Remove programs (appwiz.exe).

Before installing, you need to be running Powershell version 5 or above, so issue the following command;

$psversiontable

Below, you will see this is version 4, if yours is the same, you need to upgrade to version 5.

You can upgrade the PowerShell version by installing Windows Management Framework 5.1, like so;

Install PowerCLI with the following command;

Install-Module -Name VMware.PowerCLI -AllowClobber

Why AllowClobber? Well if you have any old commandlets hanging around, they will be updated and if you are installing on a Hyper-V server you can see some errors.

Related Articles, References, Credits, or External Links

NA

Hybrid Exchange: ‘Mailbox Delegation’ Missing?

$
0
0

KB ID 0001607

Problem

This was asked on EE this morning, if you are on a Hybrid Exchange environment then you cannot allocate Mailbox Delegation to an Office365 mailbox;

Office365 Mailbox Delegation

However you can add ‘Mailbox Delegation’ to a ‘local mailbox’.

On Premise Mailbox Delegation

This is completely normal behaviour, to allocate mailbox delegation permissions to your Office 365 mailboxes, you need to use PowerShell.

Managing Mailbox Delegation Permissions in Office 396

I’ve covered elsewhere how to do this, but first connect to Office 365;

PowerShell to Office 365

View Office 365 Mailbox Delegation Permissions

Get-MailboxPermission -Identity "Alias or email" | Format-Table

PowerShell Show Delegate Permissiona

Add Office 365 Mailbox Delegation Permissions

Add-MailboxPermission -Identity "Alias or Email of account granting rights TO" -User "Alias or Email of account granting rights FROM" -AccessRights FullAccess -InheritanceType All

PowerShell Add Delegate Permissiona O365

To check it worked simply use the Get-Mailboxpermission again;

PowerShell Check Delegate Permissions O365

Remove Office 365 Mailbox Delegation Permissions

Temove-MailboxPermission -Identity "Alias or Email of account removing rights TO" -User "Alias or Email of account removing rights FROM" -AccessRights FullAccess -InheritanceType All

PowerShell Remove Delegate Permissions O365

Related Articles, References, Credits, or External Links

NA

Group Policy Preferences and Client Side Extensions

$
0
0

KB ID 0000389

Problem

Group Policy Preferences (GPP) first came in with Server 2008 and were enhanced for Server 2008 R2, To be able to apply them to older Windows clients, you need to install the “Client side Extensions” (CSE), You can either script this, deploy with a group policy, or if you have WSUS you can send out the update that way.

OS
Download Link
Client side extensions for Windows XP (x86)
Client side extensions for Windows XP (x64)
Client side extensions for Windows Vista (x86)
Client side extensions for Windows Vista (x64)
Client side extensions for Windows Server 2003 (x86)
Client side extensions for Windows Server 2003 (x64)
Client side extensions for Windows 7 (x86)
Already Installed
Client side extensions for Windows 7 (x64)
Already Installed
Client side extensions for Windows 8 (x64)
Already Installed

Solution

You may not have noticed, but if you edit or create a group policy after Server 2008 now, you will see there is a “Preferences” branch. Most IT Pro’s will have seen the addition of the “Policies” folder some time ago because it adds an extra level to get to the policies that were there before 🙂

GPP and GPO

OK Cool! What can you do with them?

1. Computer Preferences: Windows Settings

Environment: Lets you control, and send out Environment variables via Group Policy.

GPO deploy environment variables

Files: Allows you to copy, modify the attributes, replace or delete a file (for folders see the next section).

deploy files via gpo

Folder: As above, but for folders.

Deploy folders via gpo

Ini Files: Allows you to Create, Replace, Update or Delete an ini file.

Edit ini files by GPO

Registry: Allows you to Create, Replace, Update or Delete a Registry value, You can either manually type in the reference use a Wizard, or extract the key(s) values you want to send them out via group policy.

Deploy Registry Key via GPO

Network Shares: Allow you to Create, Replace, Update, or Delete shares on clients via group policy.

Shortcuts: Allows you to Create, Replace, Update, or Delete shortcuts on clients via group policy.

Add Shortcut via GPO

2. Computer Preferences: Control Panel Settings

Data Sources: Allows you to Create, Replace, Update, or Delete, Data Sources and ODBC settings via group policy. (Note: there’s a bug if your using SQL authentication see here).

Devices: Lets you enable and disable hardware devices by type and class, to be honest it’s a little “clunky”.

Folder Options: Allows you to set “File Associations” and set the default programs that will open particular file extensions.

Local Users and Groups: Lets you Create, Replace, Update, or Delete either local users OR local groups. Handy if you want to create an additional admin account, or reset all the local administrators passwords via group policy.

GPO Add local administrators

Network Options: Lets you send out VPN and dial up connection settings to your clients, handy if you use PPTP Windows Server VPN’s.

GPO Deploy VPN Connections

Power Options: With XP these are Power Options and Power Schemes, With Vista and later OS’s they are Power Plans. This is much needed, I’ve seen many “Is there a group policy for power options?” or disabling hibernation questions in forums. And you can use the options Tab, to target particular machine types (i.e. only apply if there is a battery present).

GPO Power scheeme

Printers: Lets you install printers (local or TCP/IP), handy if you want all the machines in accounts to have the accounts printer. for further info see,

Deploying Printers with Group Policy Preferences

GPO Deploy Printers

Scheduled Tasks: Lets you create a scheduled task or an immediate task (Vista or Later), this could be handy to deploy a patch or some virus/malware removal process.

Service: Essentially anything you can do in the services snap in you can push out through group policy, set services to disables or change the logon credentials used for a service. In addition you can set the recovery option should a service fail.

3. User Configuration: Windows Settings

Applications: Answers on a Postcard? I can’t work out what these are for!

Drive Mappings: Traditionally done by login script or from the user object, but use this and you can assign mapped drives on a user/group basis.

GPO Deploy Drive Mappings

Environment: As above lets you control and send out Environment variables via Group Policy, but on a user basis.

Files: As above. allows you to copy, modify the attributes, replace or delete a file (for folders see the next section), but on a user basis.

GPO change File attreibutes

Folders: As above, but for folders on a user by user basis.

Ini Files: As above, allows you to Create, Replace, Update or Delete an ini file, on a user by user basis.

Registry: As above, allows you to Create, Replace, Update or Delete a Registry value, You can either manually type in the reference use a Wizard, or extract the key(s) values you want to send out via group policy, this time for users not computers.

Shortcuts: As Above, allows you to Create, Replace, Update, or Delete shortcuts on clients via group policy for users.

GPO deploy shortcuts

4. User Configuration: Control Panel Settings

All of the following options are covered above on “Computer Configuration”

Data Sources Devices Folder Options Local Users and Groups Network Options Power Options Printers Scheduled Tasks

Internet Settings: Using this Group Policy you can specify Internet Explorer settings/options on a user by user basis.

Policy Temporary Internet Files

Regional Options: Designed so you can change a users Locale, handy if you have one user who wants an American keyboard.

Start Menu: Provides the same functionality as right clicking your task bar > properties > Start Menu > Customise, only set user by user.

Policy start menu


Related Articles, References, Credits, or External Links

Deploying Printers with Group Policy Preferences

Windows – Stop the Welcome to Internet Explorer from launching via GPO

$
0
0

KB ID 0000459

Problem

If your’e logging on as a new user and Internet Explorer has not yet been ran, then it wants to run the “Setup Windows Internet Explorer Wizard”.

Suppress Setup Internet Explorer

On just one machine with one user that’s fine, but if you are logging in all over the place, with multiple credentials, this can get quite annoying. Also you might not want your domain users having to do this at all, for security reasons.

Solution

On a Single (stand alone) machine.

1. Click start and in the run/search box type gpedit.msc{enter}

2. Navigate to > Computer Configuration > Administrative Templates > Windows Components > Internet Explorer > Prevent Running First Run wizard.

Disable IE First Run

Note: In older versions of Windows its called, ‘Prevent Performance of First Run Customize settings

GPO Prevent Performance of First Run Customize

3. If you enable the policy you can set it to either:

a. Go directly to home page.
b. Go to the “Welcome to Internet Explorer” Web page.

Suppress IE First Run

4. Reboot the PC or Force a Group Policy Refresh.

In a Windows Domain Environment

1. On one of your domain controllers > Start > Administrative Tools > Group Policy Management Console > Either select and existing policy or create and link one to the COMPUTERS you want this policy to affect. Then edit the policy.

2. Navigate to > Computer Configuration Policies > Administrative Templates > Windows Components > Internet Explorer > Prevent Running First Run wizard.

Suppress IE First Run GPO

Note: On older Windows Platforms this is called ‘Prevent Performance of First Run Customize settings.

group policy Prevent Performance of First Run Customize

3. If you enable the policy you can set it to either:

a. Go directly to home page.
b. Go to the “Welcome to Internet Explorer” Web page.

Group Policy Disable IE First Run

4. Reboot the PC or Force a Group Policy Refresh.

Related Articles, References, Credits, or External Links

Group Policy Preferences and Client Side Extensions

Deploy VMware Horizon View (Part 1)

$
0
0

KB ID 0001608

Note: You don’t need VMware Composer, or SQL, to use Horizon, but if you want to deploy ‘Composed’ pools then you will, (also if you want to maintain an events database), so I’ll cover this first.

Below I’m going to create a database for Horizon Composer, and Horizon Events. Then I’ll install Horizon Composer.

Horizon View SQL Installation

Installing SQL is straight forward enough, just remember to enable ‘Mixed Mode Authentication’ when you install it, you will also need to install SQL Management studio which is now a separate download. Start by double checking the authentication > {Server-Name} > Properties > Security > Ensure ‘SQL server and Windows Server Authentication’ > OK.

Horizon SQL Authentication

Horizon Composer Database

Database > New Database > Database name VMwareHorizonComposer > Under options set the recovery option to Full > OK.

Horizon Composer SQL Database

Security > Logins > New Login > Login name VMwareHorizon > set a password > untick ‘enforce password history’ > User mapping > Select the new user > and select db_owner > OK.

Horizon Composer SQL Database User

Horizon Events Database

Database > New Database > Database name VMwareHorizonEvents.

Horizon Events SQL Database User

Deploy VMware Horizon Composer

On a domain joined Windows server, that you wish to install VMware Composer on, download the Microsoft SQL Server 2012 Native Client Setup. (Yes it will work with newer version of SQL).

SQL Client VMware Horizon

Accept the EULA and then accept all the defaults, (there’s no need to install the SQL Server Native Client SDK).

SQL Client VMware Composer

Finish.

SQL Client VMware Composer Install

Open the ODBC (64 Bit) management console > System DSN > Add > SQL Server Native Client > Next.

QL Client VMware Composer ODBC

Give the connection a name > Enter the name of you SQL Server, (and optionally an instance name) > Next.

Composer ODBC Setup

Select ‘With SQL Authentication..’ > Enter the username and password you created above, (from within SQL Management Studio) > Next.

Composer ODBC Setup SQL Auth

Change the default database to ‘VMWareHorizonDatabase‘ > Next.

Composer ODBC Setup Database

Finish.

Composer ODBC Setup Complete

Test Data Source > Assuming it completes successfully > OK.

Horizon Test ODBC

Run the VMware Composer Installer.

Install Horizon composer

Accept the EULA > Next > Accept or change the install location > Next > Select the ODBC connection you configured above > Enter the username/password you created in the SQL Management Studio > Next. 

Install Horizon wizard

Accept the default port > Next > Next > Finish > ‘Yes’ to reboot.

Install Horizon Ports

Note: The remainder of the Horizon Composer configuration is done in ‘Horizon Administrator‘, which will be installed on your Horizon Connection Servers (see Part 2)

Related Articles, References, Credits, or External Links

NA

Deploy VMware Horizon View (Part 2)

$
0
0

KB ID 0001609

Back in part one we setup SQL and our Composer server, now we will deploy our VMware Horizon View Connection Server(s).

Install VMware Horizon View Connection Server

On a domain joined Windows server, download and launch the Connection Server installer.

Horizon connection Server

Accept the EULA > Next > Acept or change the install location > Next > Select Horizon ‘Standard’  Server > Next > Set a data recovery password > Next.

VMware Horizon Connection Server Installation

Select configure the Windows Firewall > Next > Type in a domain account, (I typically use the domain administrator, you may wish to use another account > Next > Untick the  UEIP > Next  > Next > Finish.

vmware horizon connection server setup

Deploying Additional Horizon Connection Servers

Repeat the install on any additional connection servers BUT this time choose Horizon Replica Server, and specify your first connection server as the ‘Source Server’.

VMware Horizon Replica Server Setup

Note: I don’t Deploy Horizon Security Servers any more, it’s much easier to deploy a UAG.

VMware Unified Access Gateway: Horizon Deployment

To access the Horizon Administrator console you will need Flash, this is not normally enabled on Windows Server. To enable it follow this article.

Horizon Administrator 2016 Install Flash

You can now login to Horizon Administrator.

Horizon Administrator 2016

Configuring VMware Horizon Connection Server(s)

First you need to enter your Horizon Licence > View Configuration > Product Licensing and Usage > Edit Licence > Paste yours in > OK.

Licence Horizon Administrator 2016

Vire Configuration > Servers. >vCenter Servers > Add > Type in your vCenter details > Next.

VMware Horizon Add vCenter

If using Horizon Composer, enter the server details > Next.

VMware Horizon Add Composer

Add in your domain details > OK > Next.

VMware Horizon Add Composer Domain

Accept the defaults > Next.

Horizon 7 Add ESX Storage

Finish.

Horizon 7 Configure Infrastructure

Horizon Connection Server Certificates

Over on the main dashboard at this point you may see some certificate errors. You can either import certificates from your own CA. But Im going to use a wildcard certificate published by a public CA.

Horizon Connection Server Utrusted Certificates

I have my wildcard certificate in PFX format, so I can simply double click it and import it like so. (Note: Remember to I port if to local machine).

Horizon Connection Server Import Certificates

Finish the import wizard.

Horizon Connection Server Import Certificates

On the connection server settings you will need to change the URLs to match your certificate. (Note: You will disable this later, if you are also deploying UAG appliances).

Horizon Connection Server Change URL

Now to swap to the newly imported certificate> Start > mmc.exe > Add/Remove  Snap-In > Certificates > Add.

Horizon Connection Server Import Public Certificates

Computer account > Local computer > OK.

Horizon Connection Server Import Public Certificates

Navigate to Certificates > Personal > Certificates > Locate the certificate that has the friendly name vdm and change its friendly name to vdm-backup.

Horizon Connection Server Import Public Certificates

Now locate your publicly signed certificate and change its friendly name to vdm.

Horizon Connection Server Import Public Certificates

Restart the VMware Horizon View Connection Server service to make the swap.

Horizon Connection Server Import Public Certificates

Configure Horizon Event Database

Back in part one we created the database for this, now we just need to enter the details.

Horizon Connection Server Events Database Not Configured

View Configuration > Event Configuration > Edit > Enter you SQL Event Database details,  as shown below, if you have a Named SQL instance it will be on a different port number.

Horizon Connection Server Events Database Configuration

That is your infrastructure setup. Now you simply need to create an image, and deploy that image with a pool, and grant a user entitlement to that pool. Creating an Image is quite a lengthy process, and there is always a much better and up to date guide on doing that on VMWare’s website, so I’m not going to cover it here.

Just remember to make sure you put your image in Audit mode, and always install an agent that is the same version as the connection server, and get the latest version of VMWare Tools on there as well! 

Related Articles, References, Credits, or External Links

NA

Moving From Photoshop to GIMP

$
0
0

KB ID 0001610

Problem

I upgraded to macOS Catalina last week, and post upgrade all was well, with the exception of Photoshop. I went to see if there was an update, I needed. No! If I want to use Photoshop I need to pay for PhotoShop CC, which costs £10 a month! The fact my friends stateside can get it for $10 a month annoys me even more.

Photoshop-to-GIMP

I’ve spent years, shouting about how great Photoshop is, and when people were struggling with it I encouraged them to persevere, because when you got used to is it was second to none. Well as is usually the case as soon as a company/product gets to the top of the food chain, they just assume they can do and charge what the hell they like, and treat their customers pretty shabbily because ‘Hey who cares about one less customer’!

So I’m switching to GIMP (GNU Image Manipulation Program) Which is FREE and pretty awesome. This switch has been much the same as switching form Windows to macOS, it wasn’t as difficult as I thought it was going to be, and now I wish I’d done it a long time ago.

The point of this post is to, highlight all the things I used to do in Photoshop, that I needed to work out how to do in GIMP, so that with any luck this ‘one less customer’ can persuade many more to follow.

I’ll keep updating this with new things as I work them out.

GIMP Open New File the Same Dimensions as the Clipboard Image

I work with a lot of screen shots and desktop images, Photoshop automatically opened a new image with the correct dimensions that matched what I’d copied to the clipboard. GIMP Does this much better, Simply select Edit > Paste as > New Image.

Paste as new image

This sets the correct canvas size, and puts the clipboard Images into it, which saves me pasting it in, which I’d have to do in Photoshop 🙂

GIMP Set ALL New File’s with Transparent Background

Out of the box GIMP sets the background colour (or fill with option) to background colour, as does Photoshop, but with Photoshop once you have changed it to transparent background it stops that way, GIMP does not. You need to set ‘Transparency’ as the default option. Preferences > Default Image > Fill with > Set to ‘Transparency’.

GIMP New File Options

GIMP Drawing Arrows

I need to do this a lot when doing walkthroughs and tutorials etc, out of the box GIMP does not do this at all! What you need to do is download this file, then extract it to;

\Applications\GIMP-2.10.app\Contents\Resources\share\gimp\2.0\scripts

GIMP Scripts Directory

Restart GIMP, then you will have an ‘Arrow Tool’. To use it you use the paths tool, set a start point (where the arrow head will be) and an end point;

Path Tool GIMP

Then Tools > Arrow-set-size > OK.

I’ll keep updating this……

Related Articles, References, Credits, or External Links

NA


Cant Add Repository to a Scale Out Backup Repository?

$
0
0

KB ID 0001611

Problem

When adding repositories to a Veeam Scale Out Backup Repository you may see this error;

Unable to add repository to SOBA

Unable to add extent {Repository-Name} because it serves as the target for one or more job types which are not supported by a scale-out backup repository

Selecting ‘Show jobs‘ shows;

Backup- Configuraiton Job stopping scale out backup repository

Backup-Configuration-Job

Solution

If you didn’t already know, the Backup-Configuration-Job, is a backup of the Veeam database and job settings, it’s what you would use if you wanted to reinstall or migrate Veeam to another server. It gets created automatically, and gets put into your first created repository. Note: It’s considered good practice NOT to have this backup stored actually on the Veeam server, but if your only repositories are on the Veeam server, you don’t have much choice!

To Fix: Simply create a new repository just for the Configuration-Backup-Job, it can be on the same Storage/Array/Disk/Partition as an existing repository (as you can see below). I typically name the repository Config-Backup-Repository to avoid confusion in the future.

Backup- Configuraiton Job new repository

Now simply change the job to use the new repository, this is NOT done where all the other jobs are configured! Select Options > Configuration Backup > Change the Repository > (I manually run it, by clicking Backup-Now) at this point, just to make sure all is well.

Move Backup- Configuraiton Job to new repository

You should now be able to create your Scale Out Backup Repository without an error.

Related Articles, References, Credits, or External Links

NA

PowerShell: Find Computers Last Logon Date

$
0
0

KB ID 0001612

Problem

I had to find the last time a particular server had logged on for a client the other week, so we knew for sure it was dead!

Solution

The two commands you may need are;

Locate Servers Last Login Time

Get-ADComputer -Filter {OperatingSystem -Like '*SERVER'} -Properties lastlogondate,operatingsystem | Select name,laslogondate,operatingsystem

Locate Clients Last Login Time

Get-ADComputer -Filter {OperatingSystem -notLike '*SERVER'} -Properties lastlogondate,operatingsystem | Select name,laslogondate,operatingsystem

Find Computer Last Logon Times

Short and sweet!

Related Articles, References, Credits, or External Links

NA

Network Profile Switches from ‘Private’ to ‘Public’

$
0
0

KB ID 0001613

Problem

This popped up in the forums last night, if you have a Workgroup*, (non domain joined) machine, the profile of the network card keeps switching from Private to Public.

*Note: A domain joined machine, automatically will set its network profile to ‘Domain‘.

Option 1: Set the Network Profile using Local Group Policy

Hit Windows Ker + R to open Run prompt, and type gpedit.msc
Navigate to

Computer Configuration > Windows Settings > Security Setting  > Network List Manager Policies

Note: To show networks currently connected, right-click Network List Manager Policies in the left pane and choose Show Connected Networks. (or all networks if it’s not currently not connected!)

Then Go to Network Location tab and change the Location type from Public to Private.

Set-Network-Profile-in-Local-Policy

Close the policy editor and then force a policy update.

Option 2: Set the Network Profile using Powershell

Execute the following command to list the network connections;

Get-NetworkConenctionProfile

Take a note of the Interface Index (in the example below that is ‘6’. Then set the profile of that interface with the following command;

Set-NetConenctionProfile -InterfaceIndex 6 -NetworkCategory Private

Set-Network-Profile-via-PowerShell

Related Articles, References, Credits, or External Links

Credit to David Johnson for the Powershell!

Windows Group Policy – Disable The Local Windows Firewall

$
0
0

KB ID 0001090

Problem

I’ve got nothing against the Windows firewall, it’s certainly a lot easier to manage now than it was back in the XP SP2 days. But I find a lot of clients still just ‘want it gone’ and, providing they have a decent corporate firewall in front of them that’s fair enough.

Solution

1. On a domain controller or a client running the remote administration tools > Windows Key+R > gpmc.msc {Enter} > The Group Policy Management Console will open.

2. Select the OU that contains the ‘Computers’ you want to enforce this policy on, (or here I’m choosing the entire domain) > Right Click > ‘Create GPO in this domain, and link it here..’.

3. Give the policy a sensible name so you can see what it is doing later.

4. Right click your new policy > Edit.

5. Navigate to;

Computer Configuration > Policies > Administrative Templates > Network > Network connections > Windows Firewall > Domain Profile > Windows Firewall: Protect all network connections

Windows Firewall GPO

6. Set the policy to disabled.

Windows Firewall GPO

7. Close the Group Policy Management Editor. If you have a Windows 2012 domain you can force the policy refresh on a particular OU like so.

2012 force GPO update

9. Or simply run gpupdate /force on the target machine, (or you could also wait a couple of hours, or reboot the target machines).

gpupdate force

SBS Note

An (SBS) Small Business Server domain enables the client firewall by default! The policy us called Windows Firewall Policy, which is usually linked to the computer OU under  ‘My Business’.

SBS Firewall Group Policy

Related Articles, References, Credits, or External Links

Windows – Open a Firewall Port with Group Policy

Veeam: ‘Error Storage Not Initialized’

$
0
0

KB ID 0001614

Problem

I got tasked with looking at a failover plan for a customer recently, but I noticed their replications were failing, two of the VMs in the replication job were repeatedly failing with;

Error storage not initialized

Error: Storage not initialized

Error storage not initialized

Veeam Replication Error storage not initialized

Solution

This took a while to get to the bottom of! Essentially the problem was the ‘Metadata’ for these two VMs was either corrupt or could not be written to. So to fix the problem, the VMs had to be removed and re-added, though the procedure for this has to be done in the following sequence;

From the Replicas Ready section remove the affected VMs from configuration.

Veeam Remove VM From replication

Go to the ‘Replica VM‘ itself (within your hyper visor), and remove all the snapshots.

Veeam Replica Remove Snapshots

Edit the replication job, and add the affected VMs back in again.

Add VM to Veeam Replication.

Make Sure: You you repoint the Replica Mapping back to your original replica VM again, (simply hitting ‘Detect‘ will do this, 99 times out of 100).

Replication mapping Veeam

Related Articles, References, Credits, or External Links

NA

Add The ‘Group Policy Management Console’

$
0
0

KB ID 0001615

Problem

On a Domain Controller you will get Group Policy Management, (by default) listed under administrative tools. But if you have a ‘Management Server‘ of a ‘Jump Box‘, that you want to install the tool onto, (without making it a domain controller!) Then do the following;

Option 1: Install GPMC with Powershell

This quickest and simplest option! Open a PowerShell Windows and execute the following command;

Install-WindowsFeature –Name GPMC

 Add Group Policy Managenent with PowerShell

Note: For older, (Windows Server 2012 and older) servers use the following commands instead.

Import-Module servermanager
Add-WindowsFeature –Name GPMC

Option 2: Install GPMC with Add Roles and Features

From Server Manager > Manage > Add Roles And Features > Proceed to ‘Features‘ > Select Group Policy Management > Next > Finish.

Add Group Policy Managenent

Related Articles, References, Credits, or External Links

NA

ASA Local CA Depreciated: Use Windows CA

$
0
0

KB ID 0001616

Problem

I got an email about this last night, I rarely ever use the ASA as a Local CA, But that has now been completely depreciated, (post version 9.12(x)) The documentation tells us;

Local CA server is deprecated in 9.12(1), and will be removed in a later release—When ASA is configured as local CA server, it is enabled to issue digital certificates, publish Certificate Revocation Lists (CRLs), and securely revoke issued certificates. This feature has become obsolete and hence the crypto CA server command is deprecated.

OK, so if you want to ‘self sign’ certificates then you can use Microsoft Certificate Services. 

Solution

Setting up Microsoft Certificate Services is a subject I’ve ‘done to death’ see the following article;

Microsoft PKI Planning and Deploying Certificate Services

What about user/computer certificates? See the following article.

Deploying Certificates via ‘Auto Enrollment’

Can I automate this? Yes use NDES.

Cisco ASA – Enrolling for Certificates with NDES

Related Articles, References, Credits, or External Links

NA


NGINX: Redirect HTTP to HTTPS

$
0
0

KB ID 0001617

Problem

Rather by accident I discovered this was not working on the site. I know it used to work, but when the old certificate expired last year I was on holiday in The States, and had a panic trying to disable https, (to keep the site up until I got back and bought a new cert). So I’m guessing its been broken since then.

Solution

I spent about two days looking at forums about how to do this, and every time I edited the NGINX default file, the site stopped working. In the end I found one post in the middle of a discussion about this and that was the ONLY solution that worked for me.

Paste the following WITHIN your server block.

# Force HTTP to HTTPS Redirection (Entire Site)
if ($scheme != "https") {
    rewrite ^ https://$host$uri permanent;
}

Related Articles, References, Credits, or External Links

NA

VMware: List/Audit VMware Tools Versions

$
0
0

KB ID 0001618

Problem

If you want to either audit, or simply get a quick list of which of your VMs are running which versions of VMware Tools, here are a few options.

Show VMware Tools Versions With PowerCLI

Use the following Syntax

Get-VM | Select-Object -Property Name,@{Name='ToolsVersion';Expression={$_.Guest.ToolsVersion}}

Like so;

Show VMware Tools Versions

Show VMware Tools Versions With VI Client

Using HTML Client To Show VMware Tools Information

Select either a host or the virtual center > VMs > More Info arrow > Show/Hide Columns > VMware Tools Options.

VMware HTML5 Client Show VMwarte Tools Versions

Using FLEX Client To Show VMware Tools Information

Select either a host or the virtual center > VMs > Columns Icon > VMware Tools Options.

VMware Web CLient Show VMwarte Tools Versions

Use RVTools To Audi VMware Tools Versions

I use RVTools a lot, especially for auditing new clients infrastructures, it has a section dedicated to VMware Tools.

Show VMware Tools with RVTools

Related Articles, References, Credits, or External Links

NA

Exchange Event ID 1012 & 1013

$
0
0

KB ID 0001619

Problem

Seen on Exchange 2013/2016

Event ID 1012

Event ID 1012

Log Name: Application
Source:  MSExchangeDiagnostics
Event ID: 1012
Task Category: General
Level: Error
Keywords: Classic
User:  N/A
Description: Data loss occurred in RetentionAgent: RetentionAgent: Data loss occurred. The size of this folder E:\Program Files\Microsoft\Exchange Server\V15\Logging\Diagnostics\DailyPerformanceLogs has reached the max size allowed – 5120 MB. Some files will be purged.

Event ID 1013

Event ID 1013

Log Name: Application
Source: MSExchangeDiagnostics
Event ID: 1013
Task Category: General
Level: Warning
Keywords: Classic
User: N/A
Description: Potential data loss warning in RetentionAgent: RetentionAgent: Warning: Potential data loss. The size of this folder E:\Program Files\Microsoft\Exchange Server\V15\Logging\Diagnostics\DailyPerformanceLogs has reached 95% of max size allowed – 5120 MB. Some data will be purged once it reaches the max limit.

Solution

I must say I don’t really like this solution, if you trawl the forums, you will see this is how you suppress the error. But you should really relocate the logs, (which is good advice.) However, no one tells you how to do that! So if anyone follows up below please feel free to comment the process to do such a thing, because I could not find it.

Navigate to: {Drive Letter}:\Program Files\Microsoft\Exchange Server\V15\bin\Microsoft.Exchange.Diagnostics.Service.exe.config

Locate the DailyPerformanceLogs section and look for the LogDataLoss entry, change it from True to False.

Event-ID 1013 Fix

Then restart the Microsoft Exchange Diagnostic Service.

Related Articles, References, Credits, or External Links

NA

Office 365 Retention Policies

$
0
0

KB ID 0001620

Problem

Most things in Office 365 operate on a 30 day retention principle, but what if you are governed by restrictions that require you to retain your data for 5 years or 7 years in some cases? We have had Retention policies in Exchange for years, and I knew you could create a policy in exchange online, but what about OneDrive or SharePoint data?

Well with O365 you can specify a ‘top level’ retention policy that applies to ‘most’ of your data. I say most because some application data is not 100% retained.

BE AWARE: Despite the name containing ‘retention’ this is also how you specify when to automatically delete old files (if that is MORE your requirement).

Solution

From Office 365 admin > Admin Centers > Security and Compliance.

O365 Security and Compliance

Information governance > Retention > Create.

O365 Retention Policies

Give your policy a name > Next.

OneDrive and Exchange Retention Policies

Obviously we want to choose ‘Yes I want to retain’ > I would change the retain based on to ‘when it was last modified’ > Next.

Note: You can choose the second option to automatically delete files that are a certain age.

Note2: You can add a specific policy for files containing certain words/phrases or specific date i.e. financial, (at present this does not apply to Teams).

Office 365 Retention Policy Settings

Specify ‘What’ you want to apply the policy to, by default it’s off for Skype and Teams Data, and Exchange public folders strangely? > Next.

Office 365 Retention Policy Locations

Review the settings > Create this policy.

Office 365 Retention Policy Changes


Office 365 Retention Policies via PowerShell

As usual, you can do similar things with PowerShell;

New-RetentionCompliancePolicy -Name "PeteNetLive-Retention-Policy" -ExchangeLocation All -SharePointLocation All -ModernGroupLocation All -OneDriveLocation All -Enabled $true
New-RetentionComplianceRule -Name "PeteNetLive-Retention-Policy-Rule" -Policy "PeteNetLive-Retention-Policy" -RetentionDuration 2555

Note: 2555 Days is 7 years.

Related Articles, References, Credits, or External Links

NA

Cluster: Not Reachable On UDP Port 3433

$
0
0

KB ID 0001621

Problem

Seen on a Microsoft Hyper-V failover cluster (Server 2019);

Cluster not reachable UDP Port 3433

Network Interfaces {Node-Name} {Interface-Name} and {Node-Name} {Interface-Name} are on the same cluster network, yet address {IP-Address} is not reachable from {IP-Address} using UDP port 3433

Solution

I’ve seen this error before, and usually you just need to disable the firewall or open UDP port 3433 and then re-validate the cluster (job done). However, in my case the following was true;

  • All IP addresses could ‘ping’ the IP addresses that it was telling me it could not communicate with.
  • All local firewalls were turned off on the domain profile.
  • No AV was running, or third party firewalls were installed.

There seemed to be no reason for this, I disabled and re-enabled the ‘Live migration’ NIC and 50% of the links ‘went green’ but then the Live Migration link said ‘partitioned‘ 🙁

In the end, (even though the cluster was in a failed state) I moved all my VMs onto one Host, then ran Windows update, and bounced the server, then repeated the process on the other host and the problem went away. I don’t know it it was a bug/update/driver problem, but fingers crossed it’s been OK since.

Related Articles, References, Credits, or External Links

NA

Viewing all 802 articles
Browse latest View live