Quantcast
Channel: PeteNetLive
Viewing all 790 articles
Browse latest View live

PowerShell: Prompt Has Changed To Two Greater Than Signs

$
0
0

KB ID 0001380

Problem

What does this mean? Well it means you’ve either got something wrong, or missed something out, and PowerShell is not sat waiting for more input. Which is fine but in most cases you simply need to fix your syntax and sort again so how do you ‘escape’ back to the normal PowerShell prompt?

Solution

As you can see, (below) typing quit or exist does not help.

Prompt is two great than signs

You need to press CTRL+C.

Related Articles, References, Credits, or External Links

NA


Remote Registry: No Location Found

$
0
0

KB ID 0001379

Problem

When attempting to connect to a remote machines registry;

Remote Registry Error

Error
The program cannot open the required dialog box because no locations can be found. Close this message and try again.

Solution

The ultimate cause of this problem is, that the machine you are on cannot see Active Directory, either because there are no domain controllers are online, or  its DNS settings are incorrect.

Related Articles, References, Credits, or External Links

NA

PX4-300D Lenovo EMC NAS Device Stuck at 95%

$
0
0

KB ID 0001381

Problem

I decided to update the firmware on my PX4-300D 16TB NAS Device, (big mistake!) I had some lunch and went to see how it was getting on, I could no longer connect to the device via web or SSH. It had done this to me once in the past when It had a failed drive, simply removing the drives rebooting and then putting the drives back in got me going last time.

PX4-300D

So I got on the Lenovo forums, it’s full of posts with the same problem, and theres hope! They do a tool that you can load from USB that you can boot your device from and it will re-image it. But you cant download it, you need to log a call to Lenovo to get it, Which I attempted to do but a) It sends you to IBM support which is terrible, and b) I’m out of warranty and not supported.

So I could download the firmware that ‘bricked’ my “worth over a thousand quid” device, but not the tool to rescue it? No amount of searching yielded a result.

Solution

What I did find was a post with a link to the re-imaging tool for another device, but when I looked at the URL, I noticed that the filename was the same at the firmware version name, it simply had a .zip extension not a .tgz extension. Why is that important? Well what if I used the same URL but put in my firmware version and changed the file extension, that wouldn’t work would it?

https://download.lenovo.com/nasupdate/asgimage/px4px6-4.1.308.34385.zip

PLEASE BE AWARE, I LOST ALL MY DATA WHILE RE-IMAGING! But I’d rather have a working NAS than a broken one! SEE UPDATE BELOW

You get a full set of instructions in the zip file, but basically, you need a FAT32 formatted USB Drive, run the executable file, point it at the USB drive, then boot the NAS with the USB drive in it AND the reset button pressed (for 60 seconds). you will then see this;

When finished, the device shuts down, simply power it back on

UPDATE: Received 040118

Prior to having the opportunity to try your solution, I received a reply from Lenovo.  The tech sent a link to an older version of the software.  The difference is that he told me… “on your unit the OS is actually stored on the NAS and not on the HDD’s, so you can do this process without losing information, all you need to do is to remove the HDD’s while using the USB stick on the NAS, once that the process is complete you can insert the drives back. If you leave the HDD’s inside, the process will wipe them.”

I removed the drives (stacking to preserve slot order in case it mattered).  Flashed the unit.  It then shut down.  I restarted and it booted to “Insert drives”.  I powered the unit down, then reinserted the drives in the same slots they came out of.  Booted unit and NO DATA LOSS!! You can imagine how thrilled I am.  (Thanks Dennis)


Related Articles, References, Credits, or External Links

NA

Hyper-V 2016 – Missing VM Hardware Versions?

$
0
0

KB ID 0001382

Problem

I was helping a colleague with a Hyper-V upgrade this week, he asked if I would upgrade the hardware versions on the guest VM’s

Get-VMHostSupportedVersionl

Supported VMware hardware Versions

However I could not get the cluster to accept a hardware version above version 5 (Server 2012 R2)

Solution

As it turns out the cluster had had all its nodes upgraded to 2016, but the cluster functional level was still at version 8 (Server 2012)

Get-Cluster | select ClusterFunctionalLevel

ClusterFunctionalLevel

So I upgraded that first;

Update-ClusterFunctionalLevel

UpdateClusterFunctional Level

Something strange happened at this point: The node I’d upgraded the cluster on, didn’t show me the additional hardware versions , but all the other nodes in the cluster did. I had to wait 40 mins to an hour before all nodes reported supporting all the newer hardware versions!

Supported VMware hardware Versions 2016

Then I could shut down the guest machines and upgrade them;

Update-VMVersion “{vm-name}

Update VMware hardware Version

Related Articles, References, Credits, or External Links

NA

VMware: Depreciated VFMS Volume(s) Found On This Host

$
0
0

KB ID 0001383

Problem

Well there is a bug on ESX version 6.0.0 that causes this error message, in my case the client had VFMS3 volumes.


Depreciated VFMS volumes found

Depreciated VFMS volume(s) found on the host. Please consider upgrading volumes(s) to the latest version.

That’s what was causing the error in my case!

Solution

I chose to simply update the VFMS3 volumes to VFMS5 > Right click the volume > Upgrade to VFMS5.

Upgrade VFMS3 volumes

Select the volume(s) > OK.

Upgrade VFMS3 volume to VMFS5

Note: The upgrade is non-destructive, and does not require you to power off any virtual machines etc. (It’s also usually very quick)

Be Aware: While upgrading a datastore to VFMS5 it still retains its original block size and restrictions. To fully appreciate the benefits of VFMS5 a better approach is to create a new VFMS5 volume, then migrate your machines into it, then delete your VFMS3 volume(s) and recreate them as VFMS5.

Related Articles, References, Credits, or External Links

NA

Hyper-V Creating a NAT Network and vSwitch

$
0
0

KB ID 0001384

Problem

I’m without access to all my test equipment at the moment, so when I needed to do some testing, I thought I’d use Hyper-V on my new work laptop. I needed to ‘knock up’ a quick vSwitch that would NAT my test machines, to my laptops connected NIC.

Solution

Open an administrative PowerShell window, and execute the following three commands. Note: You can change the values in RED to suit your own requirements, or leave them as they are to copy my network setup.

New-VMSwitch -SwitchName "NAT-Switch" -SwitchType Internal

New-NetIPAddress -IPAddress 192.168.200.1 -PrefixLength 24 -InterfaceAlias "vEthernet (NAT-Switch)"

New-NetNAT -Name "NAT-Network" -InternalIPInterfaceAddressPrefix 192.168.200.0/24

Hyper V Nat Network Switch

As far as Hyper-V is concerned that’s it! Now simply connect your virtual machines to the new switch.

Connect Hyper V Guest to NAT Switch

Remember you have a NAT switch, it’s not doing DHCP, you will need to assign your virtual machines static IP addresses, though you can of course configure a DHCP server on one of your virtual machines.

Hyper-V IP Settings NAT


Related Articles, References, Credits, or External Links

NA

Finding Out Your Microsoft Office Licence Version

$
0
0

KB ID 0001385

Problem

While doing some upgrades on a clients RDS farm this week, I needed to find out what version  of Microsoft Office they were running. I’m not talking about Office 2013, Office 2016, etc, that’s easy to find out, (run appwiz.cpl and look in Add/Remove Programs). I’m taking about are you running a retail copy, or a volume licensed copy, or an Office 365 Office subscriptions copy.

Solution

For some time now every time Office has been installed it has installed a small vbs script that will tell you what you want to know, this script is called ospp.vbs. Where it lives, depends on two things;

  • Are you running an x32 or x64 version of Microsoft Office.
  • What Release of office are you running (2016, 2013, 2010 etc).

x64 bit versions of office ospp.vbs location

%installdir%\Program Files\Microsoft Office\Office{version number}

x32 bit versions of office ospp.vbs location

cscript “C:\program files (x86)\Microsoft Office\Office{version number}

Determine your Office {version number}

  • OfficeXP: Office10
  • Office 2003: Office11
  • Office 2007: Office12
  • Office 2010: Office14
  • Office 2013: Office15
  • Office2016: Office16

Armed with that information you can run the script, if you didn’t already know you execute .vbs scrips by calling them with the cscript command, so either change to the correct directory and execute the script directly, or use the full patch to the script in the command like so;

cd "C:\program files (x86)\Microsoft Office\Office16\"
cscript ospp.vbs /dstatus

OR

cscript "C:\program files (x86)\Microsoft Office\Office16\ospp.vbs" /dstatus 
 

Examples;

Display Office 2013 Licence Version

Display Office 2016 Licence Version

Display Office 2016 Licence Version o365


Related Articles, References, Credits, or External Links

Office 2010 – Find your Version and Licensing Information

Hyper V: Get All The Guest VM IP Addresses

$
0
0

KB ID 0001386

Problem

Getting the IP address for an individual guest VM is easy enough, but if you have a lot of guest VM’s then you need some PowerShell.

Solution

To get the IP’s of all the Guest VM’s on an individual Hyper-V host, use the following syntax;

Get-VM | Select-Object -ExpandProperty NetworkAdapters | Select-Object VMName,IPAddresses | Format-Table -Auto

Get Hyper V VM IP Addresses

Note: The entries with no IP, are either powered off, (or are VM replicas).

But if you have a Hyper-V cluster, you would have to do this on every host. Or you can use the following syntax;

Get-VM -ComputerName (Get-ClusterNode)| Select-Object -ExpandProperty NetworkAdapters | Select-Object VMName,IPAddresses | Format-Table -Auto

Get All Hyper V VM IP Addresses in a cluster

Related Articles, References, Credits, or External Links

NA


Hyper V: Live Migration Error 0x80071008

$
0
0

KB ID 0001387

Problem

When attempting to perform a ‘live migration’ of a virtual machines storage, this happened.


Solution

Oddly I had already moved one of the virtual machines drives to another cluster, before this happened, so I was a little confused. To get the migration to work, I needed to ‘unmount’ the parent VMs mounted .ISO file.

The set the migration going again.

Related Articles, References, Credits, or External Links

NA

IBM Storwize 3700 Recover Lost IP Address

$
0
0

KB ID 0001388

Problem

While repurposing an IBM Storwize V3700 SAN, it became apparent that I didn’t know the IP addresses and they had been ‘misplaced’ by the client. 

Solution

Arm yourself with a FAT32 formatted USB drive, and create a file on it called satask.txt.

SATASK.txt file Srorwize

Pop your USB into the controller, and the fault light will flash for a few seconds.

USB in IBM v3700

Now on your USB drive theres should be a file called satask_result.html which you can open and locate the IP addresses

v3700 IP addresses

Related Articles, References, Credits, or External Links

NA

Windows Server 2016: Active Directory Recycle Bin

$
0
0

KB ID 0001389

Problem

To be honest we have had the capability to recover deleted active directory objects for ages. It’s just in Windows 2016 things look a bit neater.

Enable Active Directory Recycle Bin

From Server Manager > Tools > Active Directory Administrative Center ,> {Domain-Name} > Enable Recycle Bin.

OK

AD Recycle Bin Enable

Note: You may need to restart ADAC before you will be able to see the option greyed out.

Enable Active Directory Recycle Bin with PowerShell

From an administrative PowerShell window;

Enable-ADOptionalFeature ñIdentity 'CN=Recycle Bin Feature,CN=Optional Features,CN=Directory Service,CN=Windows NT,CN=Services,CN=Configuration,DC=domainx,DC=net' ñScope ForestOrConfigurationSet ñTarget 'domainx.net'

2016 PowerShell Enable AD Recycle Bin

Restore an AD Object From the Recycle Bin

I’ve deleted a user , and I want to restore him. From Server Manager > Tools > Active Directory Administrative Center > {Domain-Name} > Deleted Objects.

Restore AD object from Recycle Bin

Locate the deleted object > Restore.

Restore AD user from Recycle Bin

Restore an AD Object From the Recycle Bin with PowerShell

First let’s make sure the item is there to restore!

Get-ADObject -filter {displayname -eq "Pete Long"} -includedeletedobjects

006

Now we’ve found our deleted user, to restore them, use the same command but ‘pipe’ it to a Restore-ADObject commandlet.

Get-ADObject -filter {displayname -eq "Pete Long"} -includedeletedobjects | Restore-ADObject

Recover AD user With PowerShell


Related Articles, References, Credits, or External Links

NA

Hyper V: Add a VM as a Cluster Resource

$
0
0

KB ID 0001390

Problem

If you have a Hyper  V cluster, then you should add virtual machines with ‘Failover Cluster Manager’ but if someone does not, (i.e. they add them directly to a host), then you wont see them in the list! So how do you add them in?

Solution

In Cluster Failover Manager > Right Click the failover node > Configure Role.

Add VM to Cluster

Next.

Cluster HA Wizard

Scroll down and select Virtual Machine > Next.

Cluster HA Wizard Add VM

Non clustered VM’s will be shown select the VM(s) as required > Next.

Cluster HA Wizard Add Virtual Machine

Next.

Cluster Wizard Add Virtual Machine Confirm

Finish

Add Virtual Machine Sucess

Related Articles, References, Credits, or External Links

NA

Windows 10: Why Can’t I Launch MMC?

$
0
0

KB ID 0001391

Problem

Usually if I’m in Windows I’m on a server, and if I need a Microsoft Management Console, I simply type mmc, and away we go. On my new work Windows 10 laptop, when I do that and this happens;

No MMC Windows 10

Solution

I’ve also always assumed it was mmc.msc, but a search round on my laptop discovered that, (on Windows 10 anyway) it’s an exe file.

MMC in Windows 10

So if you search for that it works?

MMC Windows 10

You can still launch it straight from the run box (Windows Key+R) though?

MMC Windows Run

And you can still launch it straight form command line, using mmc or mmc.exe

MMC Windows CMD

Related Articles, References, Credits, or External Links

NA

Windows Server: Connecting to iSCSI Storage Using MPIO

$
0
0

KB ID 0001392

Problem

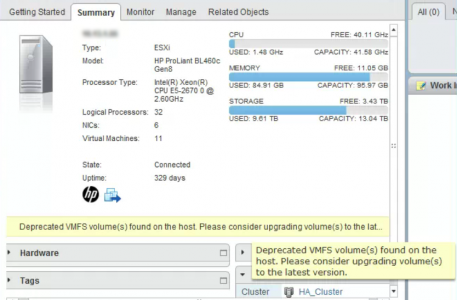
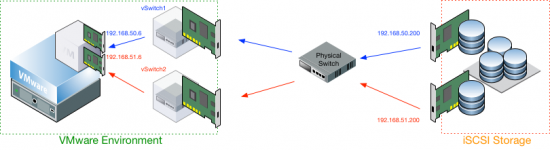
In my scenario my Windows Server is a VMware virtual machine. To enable MPIO (Multipath I/O) I’m going to need two network cards, connected to the two iSCSI networks. 

MPIO-iSCSI

Above I’ve shown both iSCSI networks in  different colours 192.168.51.0/24 and 192.168.50.0/24 in production I would also have these in their own VLANs, (or even separate physical networks).

This article is not about setting up your iSCSI Target/Storage, I’m assuming you have this up and running with the correct IP addresses connected to the correct networks ready to go.

Note: I’m also NOT using iSCSI authentication, and I’m also assuming you have allowed either the two IP addresses of the Windows server, (or more likely its iSCSI iqn address), access to the storage.

Solution

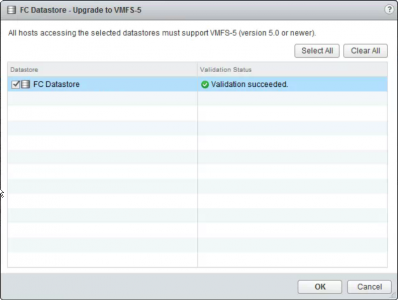
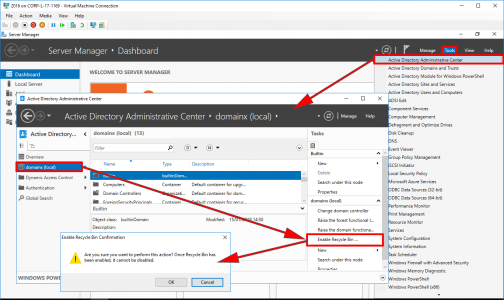
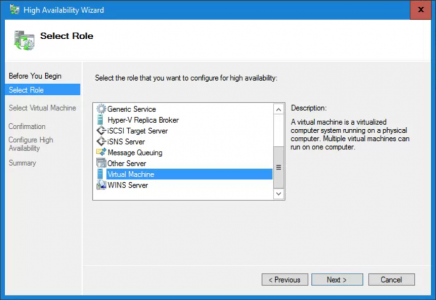
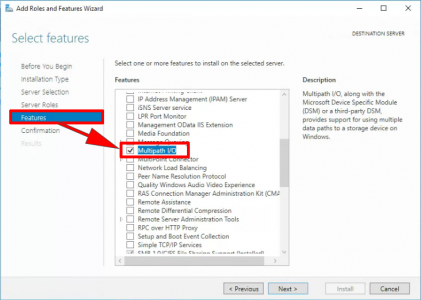
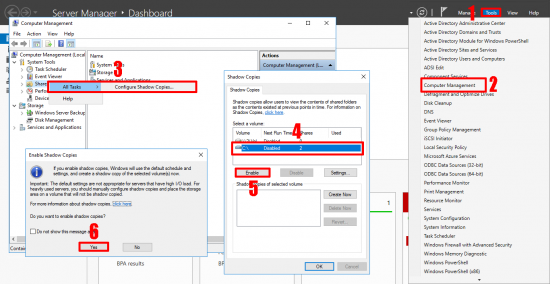
Firstly MPIO is NOT enabled or installed by default, you need to add it. Open Server Manager > Manage > Add Roles and Features > Follow the wizard all the way to ‘features’ > Enable Multipath I/O > Complete the Wizard.

 Install MPIO 2016

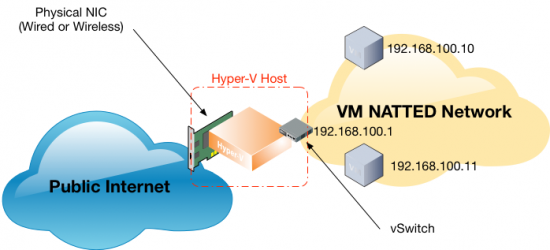
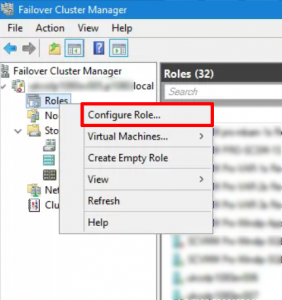
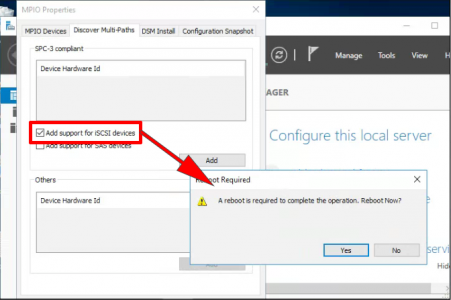
Back in Server Manager > Tools > MPIO > Discover  Multi-Paths > Add support for iSCSI devices > Yes  > Let the server reboot.

Enable MPIO For iSCSI

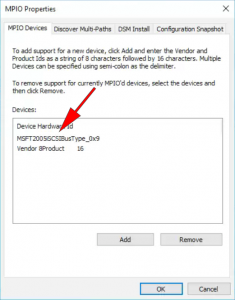
After the reboot go back into the MPIO properties, and make sure iSCSI is now listed, (MSFT2005iSCSIBusType_0x9). You can close the MPIO properties now.

Enable MPIO For iSCSI

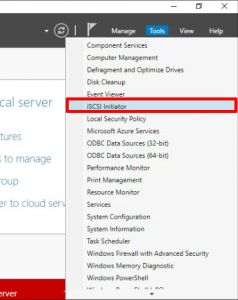
Now back in Server Manager > Tools > iSCSI Initiator.

Launch iSCSI Initiator

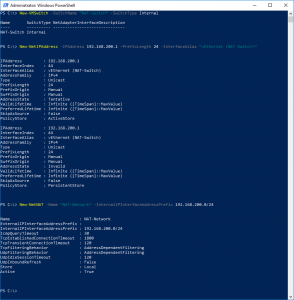
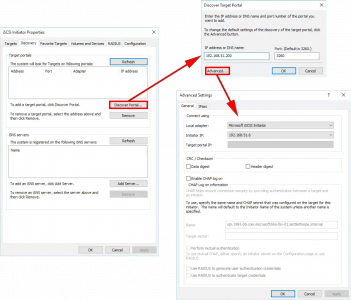
First task is to add the TWO iSCSI Target IP’s (192.168.50.200 and 192.168.51.200) > Discovery > Discover Portal > Put in the first iSCSI Target IP > Advanced > Local Adapter = Microsoft iSCSI Initiator > Initiator IP = The Servers NIC that’s on the same iSCSI network as this target, (i.e. 192.168.50.6 or 192.168.51.6) > OK > OK > Apply > OK.

Add iSCSI Discovery Portal

NOW REPEAT THE PROCEDURE FOR THE SECOND iSCSI TARGET

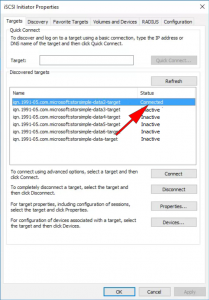
Assuming your iSCSI and networking setup are correctly, you should start to see the storage appearing on the ‘Targets’ tab. Select the first piece of storage you want to attach > Connect > Tick ‘Enable Multi-path’ > Advanced > Local Adapter = Initiator IP (either 192.168.50.6 or 192.168.51.6)  > Target Portal IP  = (The iSCSI Target IP that corresponds to the IP you have just set, either 192.168.50.200 or 192.168.51.200) > OK > OK > Apply > OK.


Connect To iSCSI Storage

The status should change to connected.

iSCSI Storage Connected

NOW REPEAT THE PROCEDURE A ‘SECOND TIME’ FOR THE SAME PEICE OF STORAGE, BUT CONNECT TO IT FROM THE OTHER iSCSI IP ADDRESS, TO THE OTHER iSCSI TARGET IP. THERE YOU CONNECT TO EACH ONE ‘TWICE’ (ONCE OVER EACH iSCSI NETWORK).

If you now look in the properties of the storage, you will see it has two identifiers and two IPv4 Portal groups.

iSCSI MPIO Paths

At this point you would need to go into ‘Disk Management’ (Server Manager > Tools > Computer Management > Disk Management). You will see the storage presented but ‘Offline’ you will need to bring the drive online > Create a partition on it, (if it does not already have one),  and you can also assign a new drive letter. Note: Look in the Properties here, and you can prove MPIO is working and change the MPIO policy (if you require).

iSCSI Prove MPIO is working

Related Articles, References, Credits, or External Links

NA

Windows: Enable ‘Previous Versions’

$
0
0

KB ID 0001393

Problem

Anyone who’s ever trashed a spreadsheet, or saved a file over the top of one that they shouldn’t, will appreciate previous versions. It’s done by a technology we have had since Windows XP (and Server 2003) called ‘shadow copy’. If you are familiar with virtualisation it’s a bit like taking ‘snapshots’ of files.

It’s also great for sysadmins, as users can ‘restore’ their own files if they break them. The problem is, the first time you need it, its probably not turned on!

Solution

You enable shadow copies at a ‘volume’ level, Server Manager> Tools> Computer Management > Share Folders > Configure Shadow Copies > Select the Volume > Enable.

Enable Previous Versions

It will use up to 10% of the drive to store its copies, you can change this if you require (Settings), you can also change the schedule that copies are taken (Settings > Schedule).

Configure Shadow Copies

Related Articles, References, Credits, or External Links

NA


VMware Fusion: Windows 10 ‘Lost’ Mapped Drive to the Host

$
0
0

KB ID 0001394

Problem

My Windows 10 VM decided it was going to do a major update last night, so I let it get on with it. However today I can no longer access the ‘shared’ drive that it had back to the host (my MacBook).

VMware Fusion Windows 10 Shared Folder Missing

Solution

I’m pretty sure this is the second time this has happened, so after berating myself for not documenting the fix last time, this is the fix. Run Regedit (Windows Key+R > regedit {Enter})

Navigate to: HKEY_LOCAL_MACHINE > SYSTEM > CurrentControlSet > Control > NetworkProvider > Order

Locate the PROVIDERORDER entry;

VMware Fusion Network Provider Order

Move the ‘vmhgfs‘ entry, so that it is the first one in the list > OK > Exit the registry editor.

VMware Fusion Restore shared Drive

That’s it, no reboot or anything, your drive should start working again.

VMware Fusion Restore Windows shared Drive

Related Articles, References, Credits, or External Links

NA

Stop Edge Hijacking PDF Files

$
0
0

KB ID 0001395

Problem

This question appeared in my inbox today, ‘Edge’ has a nasty habit of assigning itself the default PDF reader, particularly after a round of updates!

Solution

First I went and had a look at my old Experts Exchange Buddy Ramesh’s site (www.winhelponline.com) who had done the heavy lifting and worked out the registry keys;

PDF File Association Edge

Note: I’m only concerned with .pdf files, if you want to block .htm and/or .html files, then just repeat this process using the the REG_SZ values from above;

The solution for a single machine is to create the following two registry string values;

HKEY_CURRENT_USER\Software\Classes\AppXd4nrz8ff68srnhf9t5a8sbjyar1cr723
REG_SZ Name = NoOpenWith
REG_SZ Name = NoStaticDefaultVerb

NoStaticDefaultVerb

Then set the correct file associate like so;

Set file associations

Which is fine for one machine but what if you have hundreds of complaining users! Then we need to employ some Group Policies. But there’s a few hoops to jump though first. On your client machine, the one you have just tested the procedure on, export your file association to an XML file. Open an administrative command window, and execute the following command;

Dism /Online /Export-DefaultAppAssociations:C:\Windows\Temp\DefaultApps.xml

Export File Associations

If you take a look at the a file you will see, (providing you did it right) the Adobe/PDF file association.

File Accociations XML file

Now copy the file to a location all your domain clients can see, in my case I’m going to drop it in the sysvol directory.

Central location default apps

Crete a new Group Policy linked to the computers you want to apply the change to, then edit it.

GPO Default Programs


Navigate to;

Computer Configuration > Policies> Administrative Templates > Windows Components > File Explorer > Set default associations configuration file  >Enable > Put in the path to your .XML file

Set File association via Group Policy

Save and exit the, group policy, now create a SECOND POLICY linked to your USERS.

Navigate to;

User Configuration > Preferences > Windows Settings > Registry > New > Registry Item

Note: Ive already created the registry values on the machine I’m configuring the policy on, (you can export the key and import it on a domain controller to make things easier for you). Close and exit the policy editor.

Set User File association via Group Policy

Then wait, or Force Group Policy.

Related Articles, References, Credits, or External Links

NA

Deleting Folders With ‘Long Filenames’ (Source Path Too Long)

$
0
0

KB ID 0001396

Problem

Source Path Too Long

Source Path Too Long
The source file name(s) are larger than is supported by the file system. Try moving to a location which has a shorter path name, or try renaming to shorter name(s) before attempting this operation.

“Have you come across a problem deleting folders with long filenames?” I got asked this question twice in the first week at a new job. In a former role my colleague did a lot of work in schools and was forever coming across this problem when doing file migrations.

As it transpired this was a problem at, yes you’ve guessed it a school that was a client. The little darlings had got hold of a script that recursively created nested folders, and as obviously this is hilarious it had happened multiple times.

I didn’t have a solution of the top of my head, but I thought I’d try and recreate the problem, and see if there was a simple solution.

Solution

The most difficult part was replicating the script. Windows is pretty good at protecting itself. But thanks to the good folk at Experts-Exchange’s assistance, I was good to go, attempting to move or delete the file generated the error you see above.

Method One: Use Robocopy

Robocopy has been built into windows for a while, you can use it with the /MIR flag to remove all your subfolders.

MD C:\DELETE-ME
robocopy C:\DELETE-ME C:\{path}\{The Top Level Folder To Delete} /s /mir

Cannot delete path too long

Then you can simply delete the two remaining empty folders

rd C:\DELETE-ME
rd C:\{path}\{The Top Level Folder To Delete}

Delete Long File Path

Method Two: Use a GUI Tool

I’m always suspicious of third party tools, and if you Google this problem two pieces of software will jump out, one’s brilliant does not have any spamware or malware in it, the other one’s, well not free and annoying.

The Good

Delete Long File Path GUI

DeleteLongPath by BackupChain simple and does exactly what you expect. Take some time to look a their backup software as well!

The Bad

Message boards are spammed with people saying how great this piece of software is, probably by the clowns who make it! Long Path Tool, they just want your money don’t bother.

Dont Buy Long Path Tool


Related Articles, References, Credits, or External Links

NA

Exchange 2016 Setup Error “Server-Gui-Mgmt-Infra” Isn’t Installed

$
0
0

KB ID 0001397

Problem

During the Exchange 2016 Setup Readiness Checks;

The Windows component Server-Gui-Mgmt-Infra isn’t installed on this computer and needs to be installed before Exchange Setup can begin

Solution

This is a known problem when installing Exchange 2016 on Server 2016, and was fixed in Exchange 2016 (Cumulative Update number 4). You are probably installing Exchange 2016 from the RTM media, (downloaded from Microsoft.)

You need to download a newer version of the Exchange 2016, install media, CU4 or newer. Use the following link;

Updates for Exchange 2016

Note: The update, is the full install media, (It might just look smaller, because it does not have every language pack in it!)

Related Articles, References, Credits, or External Links

NA

VMWare vCenter: Cant Remove ‘Orphaned’ VMs

$
0
0

KB ID 0001398

Problem

I noticed I had a VM that was ‘Orphaned’ in my vCenter web console. It was not a production server or anything, I just wanted to delete it. However the option to Delete or Remove from Inventory was not available.

Solution

It turns out, you just need to ‘dig a little deeper’. All Virtual Infrastructure Action > More Uncategorized Actions > Remove from inventory.

vCenter Delete Orphaned VM

Related Articles, References, Credits, or External Links

vSphere – Guest VM is shown as (Orphaned)

VMware – Cannot Delete an ‘Orphaned’ Replica

Viewing all 790 articles
Browse latest View live