Quantcast
Channel: PeteNetLive
Viewing all 790 articles
Browse latest View live

MRS Proxy Error ‘The connection to the server could not be completed’

$
0
0

KB ID 0001358

Problem

When attempting a cross forest mailbox migration, When specifying the ‘Remote MRS Proxy Server address’ you get the following error;

MRS Error-The connection to the Server Could Not Be Completed

error

the connection to the server ‘server-fqdn‘ could not be completed

Solution

This tripped me up for quite a while, (it kept saying access denied). I’d tested this previously and everything was working. Note: If you have never had it working, ensure that the name you are using is resolvable in DNS and it’s the name on the certificate of the MRS Proxy server, (or at least a subject alternative name) See this link for how to set it up properly.

Assuming, (like me) everything is OK and the MRS proxy service is running etc, then I found the root cause of my problem by running;

Get-MigrationEndpoint | fl

MRS Error Get-MigrationEndpoint

I saw the problem straight away, it was using ‘cached credentials for an admin user who had changed their password, now all I had to do was work out how to replace the credentials!

Within the the Exchange admin center > Recipients > Migration > {Ellipsis} > ‘Migration Endpoints’.

Exchange Migraiton Endpoint Settings

Update.

Migration Endpoint Credentials

Enter the new (correct credentials)  > Save > Save.

Change Migraiton Endpoint Settings

Now retry your ‘batch’ migration.

Related Articles, References, Credits, or External Links

NA


Cisco ASA: Prioritise RDP Traffic

$
0
0

KB ID 0001359

Problem

I have a client who had two sites, one didn’t have a particularly good internet connection, (which is the actual problem that needed to be solved). But in the interim, he wanted me to prioritise RDP traffic, as his staff were constantly complaining about the speed of their connections.

Prioritise RDP Traffic Cisco ASA

Note: They may be a myriad of reasons why user experience is bad for an RDP session, this was quite simply a bandwidth issue.

The client requested I prioritise RDP traffic on the link. We were not really sure if that would cure the problem, but they have not complained since!

Solution

On the main site, (with the RDP server(s) on), create an ‘access-list‘ to match our interesting traffic. (I’m just using ‘any’ as the source.)

Main-Site# configure terminal
Main-Site(config)# access-list ACL-RDP-Traffic extended permit tcp any eq 3389 172.16.0.0 255.255.0.0

Create a ‘priority-queue‘ on the outside interface.

Main-Site(config)# priority-queue outside
Main-Site(config-priority-queue)#  exit

Create a ‘class-map‘ that matches our ‘access-list‘.

Main-Site(config)# class-map CM-RDP-Traffic
Main-Site(config-cmap)#  match access-list ACL-RDP-Traffic
Main-Site(config-cmap)#  exit

Create  ‘policy-map‘ that uses the ‘class-map‘ and assigns it priority.

Main-Site(config)# policy-map PM-RDP-Traffic
Main-Site(config-pmap)#  class CM-RDP-Traffic
Main-Site(config-pmap-c)#   priority
Main-Site(config-pmap-c)#   exit
Main-Site(config-pmap)#  exit

Apply the ‘service-policy‘ to the ‘outside interface‘.

Main-Site(config)# service-policy PM-RDP-Traffic interface outside
Main-Site(config)# end

You can ensure it has worked with  the following command;

Main-Site# show service-policy interface outside priority

Interface outside:
  Service-policy: PM-RDP-Traffic
    Class-map: CM-RDP-Traffic
      Priority:
        Interface outside: aggregate drop 0, aggregate transmit 0
Main-Site#

Then, do the mirror image on the remote site, (where the clients are). Note: I’ve made this access list a little more specific.

Remote-Site# configure terminal
Remote-Site(config)# access-list ACL-RDP-Traffic permit tcp 172.16.0.0 255.255.0.0 192.168.1.0 255.255.255.0 eq 3389
Remote-Site(config)# priority-queue outside
Remote-Site(config-priority-queue)#  exit
Remote-Site(config)# class-map CM-RDP-Traffic
Remote-Site(config-cmap)#  match access-list ACL-RDP-Traffic
Remote-Site(config-cmap)#  exit
Remote-Site(config)# policy-map PM-RDP-Traffic
Remote-Site(config-pmap)#  class CM-RDP-Traffic
Remote-Site(config-pmap-c)#   priority
Remote-Site(config-pmap-c)#   exit
Remote-Site(config-pmap)#  exit
Remote-Site(config)# service-policy PM-RDP-Traffic interface outside
Remote-Site(config)# end

Don’t forget: To save the changes with a ‘write memory‘ command when you’re happy.

Related Articles, References, Credits, or External Links

NA

Exchange Exporting Mailboxes to PST Files

$
0
0

KB ID 0001360

Problem

Applicable To: This procedure works on all versions of Exchange Newer than Exchange 2010 SP1 (update rollup 8). If your Exchange server is OLDER than that you will need to use the following link;

Exchange 2007 / 2010 (Pre SP1)- Export Mailbox’s to PST files

The following procedure exports a user mailbox to a PST file on a network share.


Solution

Not Even ‘Exchange Organisation Administrators” have the right to import / export mailboxes, you need to grant those rights to your user object, (or a better approach would be to create an admin account just for this purpose, then delete it when you are finished).

New-ManagementRoleAssignment –Role “Mailbox Import Export” –User {username}

http://www.petenetlive.com/wp-content/uploads/2017/10/001-Grant-Mailbox-Export-To-PST-Permissions-2010.png

Note: This grants import and export rights.

Create a file share on a drive with plenty of space, ensure the Exchange Trusted Subsystem has read / write access. And ensure the SYSTEM account has full control.

PST-Export-Folder-Permissions

To create the ‘Export Request’

New-MailboxExportRequest -Mailbox “mailbox-alias” -FilePath \\server-name\share\file-name.pst

Export-Shared-Mailbox-To-PST

Note: Add “-IsArchive” to the end of the command for Archive Mailboxes.
Note2: If the export repeatedly fails, add -BadItemLimit 200 to the end and try again, you can also use the -AcceptLargeDataLoss in exceptional circumstances

To view progress;

Get-MailboxExportRequest OR Get-MailboxExportRequest | Get-MailboxExportRequestStatistics

View-Mailbox-Export-To-PST-Progress

When complete, you need to remove the move request(s);

Get-MailboxExportRequest | Remove-MailboxExportRequest OR (If you still have movement requests running) Get-MailboxExportRequest -Status Completed | Remove-MailboxExportRequest

Remove-Mailbox-Export-Requests

Using Content Filters

You can specify a content filter to only export emails after a certain date all mail received after 01/01/17 e.g.

New-MailboxExportRequest -Mailbox {mailbox-alias} -ContentFilter {(Received -lt ’01/01/2017’)} -FilePath \\{server-name}\{folder}\{file-name}.pst

Using IncludeFolders (and Exclude Folders)

You can specify IncludeFolders (or ExcludeFolders) to only export emails from certain folders, e.g.

Only export Inbox (and sub-folders) and Sent Items;

New-MailboxExportRequest -IncludeFolders “#Inbox#/*”,”#SentItems#” -Mailbox {mailbox-alias} -FilePath \\{server-name}\{folder}\{file-name}.pst

Don’t Export Sent Items and Deleted Items;

New-MailboxExportRequest -ExcludeFolders “#SentItems#”,”#DeletedItems#” -Mailbox {mailbox-alias} -FilePath \\{server-name}\{folder}\{file-name}.pst

Export ALL Mailboxes to  PST

foreach ($Mailbox in (Get-Mailbox)) { New-MailboxExportRequest -Mailbox $Mailbox -FilePath “\\{server-name}\{folder-name}\$($Mailbox.Alias).pst” }

Related Articles, References, Credits, or External Links

Exchange 2000 / 2003 – Exporting Mail to .pst files with ExMerge

Exchange (2010 Post SP1 and Newer) Bulk Importing Mail From PST Files

Exchange: Apply Email Address Policy to All Distribution Groups

$
0
0

KB ID 0001361

Problem

While doing a migration I needed to update all of a clients ‘Distribution’ groups with an additional mail domain. This is not normally a problem we can do that with an Email address policy, well yes you can if all the groups have ‘update email addresses based on policy’ ticked, (which is the default!) However this client  had done everything manually. So that wasn’t an option.

Solution

Yes there’s only three below, but this client had over a hundred, and I wasn’t going to do them one by one. List all the Groups and their policy status by running the following command;

Get-DistributionGroup | select Name,EmailAddressPolicyEnabled

Distro-Group-Policy-Enabled

As you can see (above,) they are all set ‘False’ i.e. policy not enabled. To change that;

Get-DistributionGroup | Set-DistributionGroup -EmailAddressPolicyEnabled $true

Enable Address Policy In Distribution Group

Now if you recheck, they are all enabled.

Exchange Apply Address Policy to All Distribution Groups

Related Articles, References, Credits, or External Links

Exchange 2016 / 2013 Adding a New Email Domain

WordPress: Inserting ‘Anchor’ Links (Internal Hyperlinks)

$
0
0

KB ID 0001362

Problem

Back when I did the website in Dreamweaver, this was a simple task, there was an ‘insert anchor’ button*. If you have a long webpages and you want your readers to be able to ‘navigate’ around it using hyperlinks, then ‘anchors’ are for you.

*In WordPress there is still a GUI option, on the insert menu, so you can still ‘insert anchor’ (see below).

What’s an anchor? Its simply a piece of code in a webpage that lets you ‘jump to / hyperlink’ to it, so you can get there from within the same web page, or straight to a specific part of a page, from another webpage. (like this)

Solution: Insert Anchor 

Here I’m simply placing the anchor and nothing will be visible. If you are linking to a specific price of text you can use that as the anchor also;

Wordpress Insert Anchor

Examples;

Anchor with no text: <a id=”{anchor-name}”></a>

Anchor text: <a id=”{anchor-name}”>{test-to-display}</a>

To Enter via the ‘visual editor’ in WordPress

From the ‘insert menu’ choose ‘Anchor’ and supply a name.

How To Hyperlink to an ‘Anchor’

Normally when writing web pages/articles you will hyperlink to the URL of a web page, when linking to an anchor, the procedure is the same, but you supply the anchor on the ‘end’ of the URL and you specify it with a ‘#’ symbol. e.g. http://domain/page#anchor, but in WordPress you simply need to enter the anchor name and WordPress will understand that the link is within the same page.

like so;


Wordpress Internal hyperlink to anchor

Note: If the anchor is in ‘another’ web page, you will need to enter the full URL including the anchor text.

Related Articles, References, Credits, or External Links

NA

Cisco FirePOWER (On-Box / ASDM) Change the Time Zone

$
0
0

KB ID 0001363

Problem

At first this was just a bug, now it’s annoying, I don’t know why Cisco have not got round to fixing this, it’s still a problem in the latest (6.2.2 at time of writing,) version.

Solution

Configuration > ASA FirePOWER Configuration > Local > System Policy > Time > Synchronisation > Manually > Save Policy and  Exit.

FirePOWER Manual Time Setting

Deploy > Deploy FirePOWER Changes > Deploy.

Deploy FirePOWER Changes

To View Task Progress: Monitoring > ASA FirePOWER Monitoring > Ensure the policy has applied successfully, (go and have a coffee).

Check FirePOWER Tasks

Configuration > ASA FirePOWER Configuration > Local > Configuration > Time > Select the time zone ‘Hyperlink’ > Set the correct zone > Save > Done.

FirePOWER Change Time Zone

Configuration > ASA FirePOWER Configuration > Local > System Policy > Time > Synchronisation > Via NTP From… > Type in a public NTP Server  > Save Policy and  Exit.

FirePOWER NTP Time Setting

Deploy > Deploy FirePOWER Changes > Deploy.

Deploy FirePOWER Changes

Related Articles, References, Credits, or External Links

Special Thanks to Craig Paolozzi for this article, because he asks me how to do it, every 27 days.

Mac High Sierra – Telnet and FTP Missing?

$
0
0

KB ID 0001364

Problem

Why have Apple removed Telnet and FTP, yes they are old, yes they are insecure. For remote management you should be using SSH and for  file transfers you should be using SFTP or FTPS. However what if I want to telnet to a mail server on port 25 and test email flow? What if I need to connect to a Cisco switch that does not have a K9 operating system, and only supports Telnet?

Mac Telnet and FTP Missing

-bash: telnet: command not found
-bash: ftp: command not found

Well I can install Secure CRT, (or use the Excellent Royal TSX.) But, I’m stuck in my ways and want it back where it belongs, i.e. in my Terminal Window!

Solution

Download the Executables ‘Here‘.

Extract the files and make sure they are ‘executable’, i.e. they look like this;

Mac High Sierra Telnet and FTP Missing

If not, you can use ‘chmod +x’ to make them executable;

Mac Make File Executable

Copy the files to: /user/local/bin

reinstall telnet and ftp

All working again.

Related Articles, References, Credits, or External Links

NA

Meraki Block Page http://wired.meraki.com:8090 ‘Not Found’

$
0
0

KB ID 0001365

Problem

If you have a Meraki Security device and have enabled ‘Content Filtering’, instead of a nice ‘block-page’ informing you why you are being blocked you may see this;

Meraki Blocked Page URL not Found

http://wired.meraki.com:8090

This is happening because your Corporate DNS is resolving ‘wired.meraki.com’ to 54.241.7.184, which you can also see if you look at the URL you are trying to connect to it on port 8090. A quick nmap of that IP will tell you port 8090 is not open,  (only port 80 and port 443 are).

This is happening because if you were to use your Meraki Device for DNS forward lookups, it would ‘DNS Doctor’ the return DSN packet and insert its own IP address in there instead. That’s fine but most corporate networks don’t want to use their Meraki devices for DNS forward lookups. 

The easiest way to resolve the problem, is with your own corporate DNS servers.

Solution

First you need the inside IP of your Meraki device(s). You can get these from the Meraki Dashboard (Security Devices > Addressing and VLANS). If you browse to that IP, you should se something similar to below;

Meraki Internal IP

Armed with that information, go to one of your DNS Servers, and create a new forward lookup zone.

Meraki Internal DNS Zone

Next > Primary zone > Next > To all DNS Servers… > Next.

Wired Meraki Internal DNS Zone

Zone Name = wired.meraki.com > Next > Allow only Secure… > Next > Finish.

Create Wired Meraki Internal DNS Zone

In the newly created zone, create a ‘New Host (A or AAAA) record.

DNS A Record Create

Enter the Inside IP or your MX device (only) > Add Host > Repeat for each Meraki device, if you have more than one.

DNS A Record Meraki

Now you will receive a slightly more friendly blocked page.

Meraki Blocked Page

Related Articles, References, Credits, or External Links

NA


Cisco ASA 8.2 Upgrade to 8.3

$
0
0

KB ID 0001366

Problem

I can’t believe I’m writing this, it’s been so long since 8.3 was released (7 Years!) And still there’s firewalls out there running old code?

ASA Feature

Why is the 8.3 upgrade important? This update made some very major changes to the way we did NAT, and also the way we wrote ACL’s. It was a big change. I remember keeping my client firewalls on 8.2 for a while until I fully understood the changes. And even then if there was anything ‘complicated’ I’d build them with 8.2 and then upgrade them!

So why am I writing this now? Well I’ve done a LOT of these, and every time I’ve got another one to do I check my notes. I was upgrading a clients 5510 today, so I thought I’d polish my notes and publish them for anyone else that has a ‘teal coloured dinosaur’ that needs an upgrade.


Solution

Make sure your firewall has enough RAM! To upgrade to/install 8.3 (or above) needs a larger amount of RAM than was installed in the 5500 firewall range before Feb 2010. Cisco RAM is expensive! I suggest a trip to eBay e.g. memory for my 5510 cost me £15.00 and memory for my 5505 cost me $6.00. Ive already written about the memory requirements, see the article below;

ASA – Memory Error (Post upgrade to version 8.3)

Performing the Upgrade 

Step 1: A Few Days Before

Before you do anything, take a full backup of the Firewall. The amount of time I’ve asked ‘You did back it up first didn’t you?’ and the answer is an awkward silence, is far to high!

1. Disable NAT Control (This is a throwback to version 6, when we had to have NAT to pass traffic between interfaces)

You may have it enabled

Petes-ASA# show run all nat-control
nat-control

To disable it;

Petes-ASA# conf t
 Petes-ASA#(config)# no nat-control

Will it break anything? I’ve not seen it break anything.

2. Disable ‘names’: I was never a fan of these anyway, they seemed like a good idea, then made everything difficult to troubleshoot, I routinely disable ‘names’ when I’m troubleshooting things.

Petes-ASA# conf t
 Petes-ASA#(config)# no names

Will it break anything? Absolutely not!

3. Look at all your NAT statements: Their syntax is about to change A LOT, make sure you know what each one is doing, and why it’s there. Study the differences to the NEW NAT commands, and if you have enough time, convert them offline in notepad, then you have the commands ready to post in if there’s a drama. See the following article;

Cisco PIX/ASA 8.3 Command Changes{NAT / Global / Access-List}

Step 2: Performing the upgrade

Note: During the upgrade the Pre 8.3 config is saved as disk0:/{version-number}_startup_cfg.sav, (i.e. disk0/:8_2_5_59_startup_cfg.sav). This will be critical if there’s a problem and you need to ‘roll-back’. Another handy file is upgrade_startup_errors_{time-stamp}.log (i.e. disk0:/upgrade_startup_errors_201711151046.log). But only look in there if you actually have a problem, because there will always be things in this file, and you will only panic needlessly!

The actual upgrade is the same process for any ASA upgrade. My recommendation is to go from 8.2 to 8.4(6), then you can perform further upgrades from there (as required).

Basic upgrade commands;
copy tftp://192.168.50.2/asa846-k8.bin flash
no boot system disk0:/asa825-59-k8.bin
boot system disk0:/asa846-k8.bin
write men
reload

Cisco ASA5500 Update System and ASDM (From CLI)

Post Install Problems?

VPNs Don’t Work? Make sure the upgrade has NOT added the keyword ‘unidirectional‘ to the NAT statements for the VPN tunnel, (bug if you upgrade straight to 8.3(2))

ACL’s Don’t Work? I’ve seen the upgrade process fail to change the IP address from the Public IP to the Private IP in the ACL.(Post 8.3 ACL Statements are written to allow traffic to the internal (pre-tranlslated) IP rather than the external/public (post-transtaled IP,) like you had to do BEFORE version 8.3. This is most common on ACLs applied to the outside interface.

I need to downgrade the ASA back to 8.2!!

To downgrade;

downgrade {image} {config}
e.g.
downgrade disk0:/asa825-59-k8.bin disk0/:8_2_5_59_startup_cfg.sav

Related Articles, References, Credits, or External Links

NA

ASA5505 –‘This Licence Does Not Allow Configuring Of More Than 2 Interfaces’

$
0
0

KB ID 0001367

Problem

When attempting to bring up a ‘3rd VLAN’ on an ASA 5505 firewall you see an error like this;

Petes-ASA# configure terminal
Petes-ASA(config)# int vlan 3
Petes-ASA(config-if)# nameif DMZ
ERROR: This license does not allow configuring more than 2 interfaces with
nameif and without a "no forward" command on this interface or on 1 interface(s)
with nameif already configured.
Petes-ASA(config-if)#

Or if you work in the ASDM;

ASA 5505 2 Functioning Interfaces

Or on much older versions;

nameif no forward error


Solution

This is because you have a ‘licence limitation’. The BASE licence on an ASA 5505 firewall lets you have three VLANS, BUT the 3rd vlan can only be accessed from OUTSIDE which gives it the name ‘DMZ Restricted’. It was designed for that very reason, (to let you host a DMZ.)  You can see that, by simply issuing a ‘show version‘ command’;

Petes-ASA(config)# show version
——Output removed for the sake of brevity——

Licensed features for this platform:
Maximum Physical Interfaces  : 8
VLANs                     : 3, DMZ Restricted
Inside Hosts                 : 50
Failover                     : Disabled
VPN-DES                      : Enabled
VPN-3DES-AES                 : Enabled
VPN Peers                    : 10
WebVPN Peers                 : 2
Dual ISPs                    : Disabled
VLAN Trunk Ports             : 0
AnyConnect for Mobile        : Disabled
AnyConnect for Linksys phone : Disabled
Advanced Endpoint Assessment : Disabled
UC Proxy Sessions            : 2

This platform has a Base license.

——Output removed for the sake of brevity——

Or in the ASDM > Home  > Licence.

ASA 5505 DMZ Restricted

So if you need more VLANS, and you don’t simply want a DMZ, then you are going to need to upgrade the licence. But if you do need  a DMZ read on….

At command line you simply need to define the interface, (VLAN) that you want to BLOCK FORWARDING FROM. (i.e. the inside vlan, which is usually vlan1)

Petes-ASA(config)# interface vlan 3
Petes-ASA(config-if)# no forward interface vlan 1
Petes-ASA(config-if)# nameif DMZ
INFO: Security level for "DMZ" set to 0 by default.
Petes-ASA(config-if)# no shutdown
Petes-ASA(config-if)# ip address 192.168.100.254 255.255.255.0
Petes-ASA(config-if)# interface ethernet 0/3
Petes-ASA(config-if)# switchport access vlan 3
Petes-ASA(config-if)# no shut

Note: Above I’m allocating VLAN 3 to the physical interface labelled 3 on the firewall.

In the ASDM, you need to do this on the ‘Advanced‘ tab when creating the interface, like so;

ASA 5505 block traffic from interface


Note: If you ever try and remove the block, (without purchasing a licence.) You will see this error;

ASA 5505 Block Cannot Be Removed

Related Articles, References, Credits, or External Links

NA

Exchange : ‘Message Exceeded The Maximum Size Limit’

$
0
0

KB ID 0001368

Problem

When attempting to send an email from Outlook via Exchange, (In this case Exchange 2106). You see a message like the one below;

The following files weren't attached

The following files weren’t attached because adding them would cause the message to exceed the maximum size limit of {Size} MB: {File-Name}

Solution

There are a few places this can be set, lets deal with the most common ones first;

TransportConfig: This has a maximum send and a maximum receive size, to view yours use the following command;

Get-TransportConfig | fl MaxSendSize, MaxReceiveSize

Exchange Transport Message Size Limits

If one of them is tripping you up, you can change the sizes with the following command;

Set-TransportConfig -MaxSendSize 100MB -MaxReceiveSize 100MB

Change Exchange Transport Message Size Limits

SendConnector: This has a maximum message size, to view yours use the following command;

Get-SendConnector | ft Name, MaxMessageSize

Change Send Connector Message Size Limits

To change the limit, use the following command;

Set-SendConnector “{connector-name}” -MaxMessageSize 100MB

ReceiveConnector: This has a maximum message size, to view yours, use the following command;

Get-ReceiveConnector | ft Name, MaxMessageSize

Change Send Connector Message Size Limits

You will have many, the one you probably want to change is called “Default Frontend {Server-name}” To change the limit, use the following command;

Set-ReceiveConnector “{connector-name}” -MaxMessageSize 100MB

I’ve Done All This And It Still Wont Work? 

Some times the settings above don’t take effect until all the AppPools in IIS (on the CAS servers) have been restarted, an IISRESET command should solve the problem, (or a reboot if you can handle the downtime.) However even then in some cases you will continue to see the same error message. There are three places that it can still be misconfigured.

OWA Config File

Open the File located at;

%ExchangeInstallPath%ClientAccess\owa\web.config

Locate and set the maxRequestLength (NOTE: the value is in Kilobits)

OWA config Message Limits

EWS Config File

Open the File located at;

%ExchangeInstallPath%ClientAccess\exchweb\ews\web.config

Locate and set the maxRequestLength (NOTE: the value is in Kilobits)

EWS config Message Limits

ActiveSync (Sync)  Config File

Open the File located at;

%ExchangeInstallPath%ClientAccess\Sync\web.config

Locate and set the maxRequestLength (NOTE: the value is in Kilobits)

Active Sync config Message Limits

Having changes these values, perform an IISRESET;

IISRESET

Repeat for any additional CAS Servers.

Related Articles, References, Credits, or External Links

Message Size Limits on Exchange 2003

Exchange – Message Not Sent ‘Because there are too many recipients’

VMware: Windows VM – No Mouse & Cannot Install VMware Tools

$
0
0

KB ID 0001370

Problem

Every time this happens to me I have a rant about it, and everyone looks perplexed, surely this does not only happen to me? Using ESX6.5 I build a new Windows VM, and theres no mouse, web client has nothing, try the VMRC then I get a mouse pointer, but it’s as responsive as trying to play chess with a firehose! 

Once you install VMware tools it’s fine, but here’s the problem – try installing VMware tools with no mouse! Now before you all start typing ‘We didn’t always used to have mice, learn to use a keyboard doofus’ comments. Let’s be clear, I’m a keyboard ninjutsu legend, I can navigate with Tab and Spacebar!

And when I can get a command windows open, I can launch VMware tools install from CLI- Yay! Then when the installer re-opens the install window and it’s not the active window, Alt+Tab wont work – I swear louder.

Solution

Don’t forget to present the VMware Tools disk to the virtual machine before you start! 

OK this is more of a work around than a solution. First challenge is to get logged in. That’s simple; just keep pressing ‘Tab’ and the first letter of your password until you start seeing the password appear.

Log in VMware no mouse

Now you are in, get a command window open, by either pressing ‘Tab’ until you see the ‘start button’ highlighted, then press {Enter}, you can then type cmd {Enter}. OR, if you have a Windows keyboard press the ‘right click/menu’ key and create a shortcut for ‘cmd’.

At command execute the following command;

setup64.exe /s /v”/qn reboot=n”

VMware Tools Silent install

It will look like nothing is happening, go and have a cup of coffee, in fact have two. When you return reboot the VM. Use ‘reboot -r -f’ if you’re still at command line. When the VM reboots, VMware tools will be installed, and all will be well with the world.

Related Articles, References, Credits, or External Links

NA

Microsoft Outlook: Creating a New Profile

$
0
0

KB ID 0001371

Problem

There are times when a problem with your Outlook profile can manifest itself in many ‘annoying’ ways. Sometimes the simplest thing to do is to put your Outlook profile to one side, and create a fresh new one.

Solution

Ensure Outlook is closed, open Control Panel > Set the view to ‘Small icons’ > Mail > Show Profiles.

Outlook View Mail Profile

Add > Give the new profile a sensible name > OK.

Outlook Create New Mail Profile

Configure you mail account, (if using Exchange, it should auto-configure for you) > Finish

Outlook Secondary Mail Profile

Change the settings to ‘Prompt for a profile to be used’ > Apply > OK.

Outlook Prompt For Profile

Open Outlook and select the new profile.

Choose Outlook Profile

Make sure everything loads up and syncs correctly > Close Outlook again.

Outlook Loaded Correctly

Once you’re happy, go back to the ‘Mail’ Settings, and change it to always use the new profile. You can delete the old profile if you wish > Apply > OK.Manually Set Profile

Related Articles, References, Credits, or External Links

NA

Outlook: ‘Exchange Administrator has Made a Change That Requires You Quit’

$
0
0

KB ID 0001372

Problem

Lastt week I had a client report that ‘some’ of his users were getting this popup repeatedly, every time they launched Outlook.

Requires you Quit and Restart Outlook

The Microsoft Exchange administrator has made a change that requires you quit and restart Outlook


This popup is usually seen during migrations, when mailboxes are being migrated, (or have just been migrated.) But you should only ever see it once.

Solution

I had recently retired the client’s old Exchange Server (Exchange 2007)  So I assumed something must have been pointed at the old server,  the client also reported that Recreating the Outlook profile also cured the problem. Which added weight to my theory.

I guessed (correctly as it happens) that the problem was the Public Folders on the old server. The client wasn’t using them, but I thought, the migrated users might still be trying to connect to them, I tried to cure the problem by forcing the clients NOT to look for Public Folders with the following registry key;

HKEY_CURRENT_USER > Software > Microsoft > Exchange > Setup

Create 32 Bit DWORD: HasPublicFolders

Value: 0 (Zero)

Unfortunately that didn’t fix the problem, (in my case, however, some people reported it did solve theirs). I know from experience that public folders settings used to be defined, on the mailbox database, so I checked all the mailbox database attributes, and found the problem.

To view your Mailbox Database Attributes you need to look pretty deep into Active Directory, which means using ADSIEdit. When launched, connect to the ‘Configuration’ context.

Adsiedit Exchange

Configuration > CN=Services > CN=Microsoft Exchange > CN=your organisation name > CN=Administrative Groups > CN=Exchange Administrative Group > CN=Databases > CN=your database name > Properties > Locate MSEXCHHomePublicMDB, and remove any value set.

Remove Legacy Public Folder Settings

At this point I rebooted the Exchange Server, and the affected clients, and the problem was resolved.

Related Articles, References, Credits, or External Links

NA

Windows Server – User Account Control Will Not Disable

$
0
0

KB ID 0001373

Problem

While doing some work for a client, I was constantly getting nagged by User Account Control prompts like so;

It’s been a while since I spoke about UAC, (and how to turn it off) see the link below;

Windows – How to Disable ‘User Account Control’

As I’ve said UAC is a good thing, it’s there for a reason, but in this case I was logged onto a clients domain servers, with an administrative account, doing administration! Every time I tried to open regedit, Active Directory Users and Computer, or even a command line window, I was getting prompted.

Solution

Even if you have disabled UAC, there are some times when it does not properly ‘go-away’. To make it stop you need to edit the following registry key;

HKLM > SOFTWARE > Microsoft > Windows > CurrentVersion >Policies > System

Locate the ‘EnableLUA’ Value and change it to 0 (zero).

Reboot the server, problem solved

Related Articles, References, Credits, or External Links

Thanks to Paul Sanderson for pointing this out to me.


PowerShell: Restart Fails ‘Other Users Logged On’

$
0
0

KB ID 0001374

Problem

If you intend to shutdown, or restart a remote computer using PowerShell, you may see the following error message;

PS C:\> Restart-Computer “Computer-name
Restart-Computer : This command cannot be run on target computer(‘Computer-name’) due to following error: The system shutdown cannot be initiated because there are other users logged on to the computer.
At line:1 char:1
+ REstart-Computer “Computer-name
+ ~~~~~~~~~~~~~~~~~~~~~~~~~~~~~~~~~
+ CategoryInfo : InvalidOperation: (Computer-name:String) [Restart-Computer], InvalidOperationException
+ FullyQualifiedErrorId : RestartComputerFailed, Microsoft.PowerShell.Commands.RestartComputerCommand

Solution

You need to add the -Force flag to the command like so;

PowerShell Restart Users Logged On

Related Articles, References, Credits, or External Links

NA

The Remote Computer Requires Network Level Authentication (NLA)

$
0
0

KB ID 0001375

Problem

Seen when attempting to connect to a remote machine via Remote Desktop;

Cannot RDP Because of NLA

The remote computer that you are trying to connect to requires network level authentication (NLA), but your windows domain controller cannot be contacted to perform NLA. If you are an administrator on the remote computer, you can disable NLA by using the options on the remote tab of the System properties dialog box.


Solution

Well the clue is in the error massage, RDP is enabled but it requires NLA authentication. e.g. This box has been selected.

RDP Enable NLA

Now, if you want NLA thats fine, make sure your RDP client has been updated, and you, and the target are domain authenticated, and can see a domain controller. But what if that computer is on a remote site, and you need to get on it? Or it’s in the server room downstairs and you’re lazy like me!

Well the simplest way to get on is to use a LOCAL account on that machine, (if you know the username and password for a LOCAL account,) like so;

RDP with LOCAL credentials

Disable NLA Remotely (via Registry)

The drawback of this method is it usually requires a reboot (which we can do remotely, but if it’s a production server that will mean some downtime).

Open Regedit > File > Connect Network Registry > Search for and select your target machine > OK.

Connect to Remote Registrypng

Navigate to;

HKLM  >SYSTEM > CurrentControlSet > Control  >Terminal Server > WinStations > RDP-Tcp

Locate the following two values, and set them to 0 (zero)

  • SecurityLayer
  • UserAuthentication

Disable NLA Though Registry

Give it a try now, but I found I needed to reboot the target first, using the ‘restart-computer’ PowerShell Commandlet.

Reboot Computer With PowerShell

Disable NLA Remotely (via PowerShell)

I prefer this method as it works instantly, and can be reversed just as quick! Open an administrative PowerShell command window. Execute the following two commands;

$TargetMachine = “Target-Machine-Name

(Get-WmiObject -class “Win32_TSGeneralSetting” -Namespace root\cimv2\terminalservices -ComputerName $TargetMachine -Filter “TerminalName=’RDP-tcp'”).SetUserAuthenticationRequired(0)

Disable NLA Though PowerShell Remotely

Disable NLA Remote Desktop Requirement Through Group Policy

If you want to ‘blanket disable’ NLA then group policy is the way to go;

Computer Configuration > Administrative Templates > Windows Components > Remote Desktop Services > Remote Desktop Session Host > Security

Disable NLA Though Group Policy

Locate the ‘Require user authentication for remote connections by using Network Level Authentication’ and set it to disabled.

Disable NLA Though GPO

Then Force a Domain Group Policy Refresh,

Related Articles, References, Credits, or External Links

NA

Exchange Mailbox Moves: ‘FailedOther’ Stops at 95%

$
0
0

KB ID 0001376

Problem

If you don’t see this happen at least once in a migration I would be surprised!

Exchange-Mailbox-Move-FailedOther-95-Percent

  • StatusDetail: FailedOther
  • PercentComplete: 95%


Solution

 You can remove the move request and start it again, with both a BadItemLimit and AcceptLargeDataLoss flag, (these might seem scary, but I’ve migrated many thousands of mailboxes, and never seen a problem.)

But the mailbox is massive and it had been moving for hours! OK, we can change the parameters, and resume the move as well!

Option 1 (Remove and Restart the Move)

Remove-MoveRequest -Identity user-name

New-MoveRequest -Identity “user-name” -TargetDatabase “target-mailbox-database” -BatchName “user-name” -BadItemLimit “200” -AcceptLargeDataLoss

Option 2 (Resume Existing Mailbox Move)

Get-MoveRequest | ?{$_.DisplayName -eq “user-name“} | Set-MoveRequest -BadItemLimit 200 -AcceptLargeDataLoss

Get-MoveRequest | ?{$_.DisplayName -eq “user-name“} | Resume-MoveRequest

PowerShell - Resume Move Request

The move should now restart/resume.

Exchange-Mailbox-Move-Statistics-Percent

Related Articles, References, Credits, or External Links

NA

Cisco ASA: Updating and Copying files from USB

$
0
0

KB ID 0001377

Problem

Cisco ASA firewalls have had USB sockets on them for a while, but a dig into the documentation only yielded, ‘for use in future releases’. Well they are working now!

Cisco ASA Upgrade from USB

Note: Firewall shown is a 5516-X (running version 9.8(1))

Solution

Your drive needs to be formatted as FAT (not NTFS), I’m going to update/install some AnyConnect client software, but there’s nothing to stop you uploading a new IOS or ASDM images.Cisco ASA Formatted USB

Your drive will get mounted as ‘Drive1’ (unless you have a secondary flash drive onboard already).

PetesASA(config)# show disk1
--#--  --length--  -----date/time------  path
  394  20130794    Sep 13 2017 10:52:40  anyconnect-linux64-4.5.01044-webdeploy-k9.pkg
  395  4096        Dec 05 2017 09:40:28  ._anyconnect-linux64-4.5.01044-webdeploy-k9.pkg
  396  22997589    Sep 13 2017 10:53:14  anyconnect-macos-4.5.01044-webdeploy-k9.pkg
  397  4096        Dec 05 2017 09:40:36  ._anyconnect-macos-4.5.01044-webdeploy-k9.pkg
  398  35122744    Sep 13 2017 10:54:12  anyconnect-win-4.5.01044-webdeploy-k9.pkg
  399  4096        Dec 05 2017 09:40:46  ._anyconnect-win-4.5.01044-webdeploy-k9.pkg

2004582400 bytes total (1926103040 bytes free)
PeteASA(config)#

You can then copy the files to the main flash (disk0).

PeteASA(config)# copy disk1:/anyconnect-linux64-4.5.01044-webdeploy-k9.pkg disk0:

Source filename [anyconnect-linux64-4.5.01044-webdeploy-k9.pkg]? {Enter}

Destination filename [anyconnect-linux64-4.5.01044-webdeploy-k9.pkg]?{Enter}

Copy in progress...CCCCCCCCCCCCCCCCCCCCCCCCCCCCCCCCCCCC
CCCCCCCCCCCCCCCCCCCCCCCCCCCCCCCCCCCCCCCCCCCCCCCCCCCCCCC
INFO: No digital signature found
20130794 bytes copied in 1.560 secs (20130794 bytes/sec)
PetesASA(config)#

To prove the file is in the main ‘flash’.

PetesASA(config)# show flash
--#--  --length--  -----date/time------  path
   96  104489760   Sep 13 2017 14:11:34  asa981-lfbff-k8.SPA
   97  26916068    Sep 13 2017 14:11:54  asdm-781.bin
   98  33          Dec 05 2017 02:29:03  .boot_string
   11  4096        Sep 13 2017 14:15:24  log
   13  500         Dec 05 2017 01:59:00  log/asa-appagent.log
   21  4096        Sep 13 2017 14:16:16  crypto_archive
   22  4096        Sep 13 2017 14:16:18  coredumpinfo
   23  59          Sep 13 2017 14:16:18  coredumpinfo/coredump.cfg
   99  41848832    Nov 15 2017 07:01:54  asasfr-5500x-boot-6.2.2-3.img
  408  20130794    Dec 05 2017 02:44:59  anyconnect-linux64-4.5.01044-webdeploy-k9.pkg

7365472256 bytes total (3948736512 bytes free)

Related Articles, References, Credits, or External Links

NA

vSphere – Adding iSCSI Storage

$
0
0

KB ID 0001378

Problem

iSCSI storage is nice and cheap, so adding iSCSI storage to your virtual infrastructure is a common occurrence. I had to do this for a client this week to present an IBM Storagewize v3700 SAN into vSphere 6.5. It’s been so long, (i.e. back in the trusty FAT VMware client) that I did this so I thought I’d document it for next time.

Solution

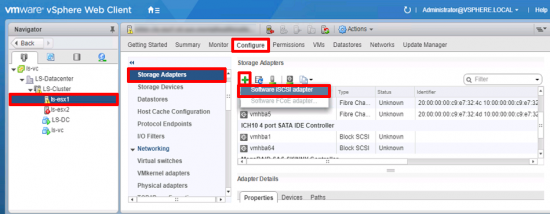
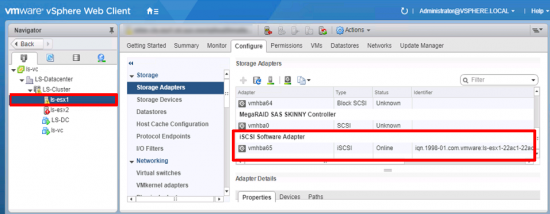
Add a Software iSCSI Adaptor: Select the host > Configure > Storage Adaptor > Add > Software iSCSI adaptor.

After a few seconds you should see it appear at the bottom of the list.

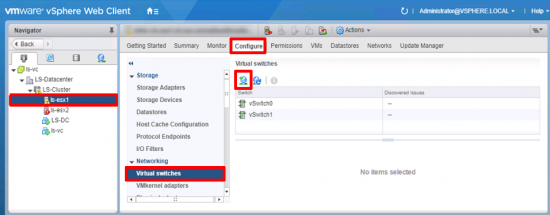
Create a vSwitch and VMKernel:If you already have this configured you can skip this section, but basically you need a vSwitch, with a VMKernel interface (that has an IP address on it that can ‘see’ your iSCSI device), and then you need to connect a physical NIC from that vSwitch the the iSCSI network (or VLAN).

Note: You can add a port group to an existing switch, (or use a distributed switch!) Here I’m using a standard vSwitch and keeping my storage on it’s own vSwitch.

With the host still selected > Configure > Virtual Switches > Add.

 vCenter Add vSwitch iSCSI

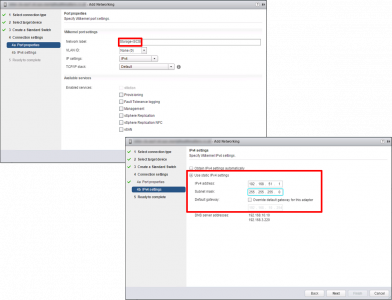
VMware Kernel Adaptor > Next > New Standard Switch > Next > Add in the Physical NIC tha’ts connected to your iSCSI network > Next.

ESX 6.5 Add iSCSI Switch

Give the VMKernel port a name (i.e. Storage-iSCSI) > Next > Put in the IP details* > Next > Finish.

*Note: You may need to add a gateway if your iSCSI device is on another network.

ESX 6.5 Add iSCSI Kernel

Jumbo Frames Warning: Edit the properties of the switch and set it’s MTU to 9000 to allow for jumbo frames.

VMware vSwitch MTU

Make sure the physical switches you are connecting to also support Jumbo Frames. Each vendor will be slightly different in my case the switches are Cisco Catalyst 3750-X’s so I just need to enable jumbo frames universaly on the switch (which requires a reload/reboot!)

Allow Jumbo Frames Cisco Catalyst 3750-X

Execute the following commands;

Petes-Switch#configure terminal
Enter configuration commands, one per line.  End with CNTL/Z.
Petes-Switch(config)#system mtu jumbo 9198
Changes to the system jumbo MTU will not take effect until the next reload is done

Then Reboot/Reload the Switch and Check

Petes-Switch#show system mtu

System MTU size is 1500 bytes
System Jumbo MTU size is 9198 bytes
System Alternate MTU size is 1500 bytes
Routing MTU size is 1500 bytes

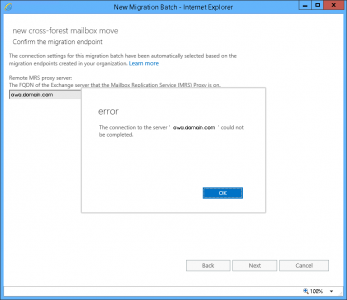
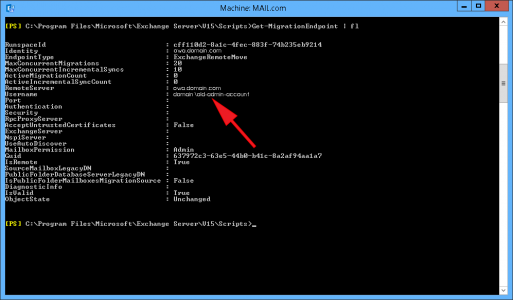
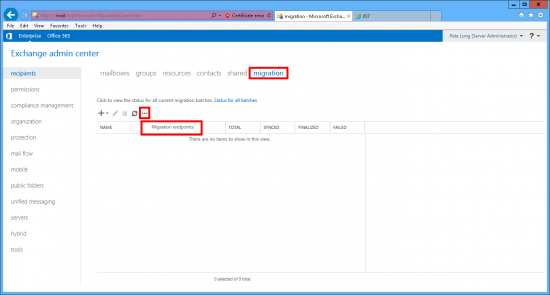
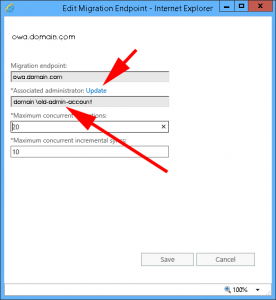
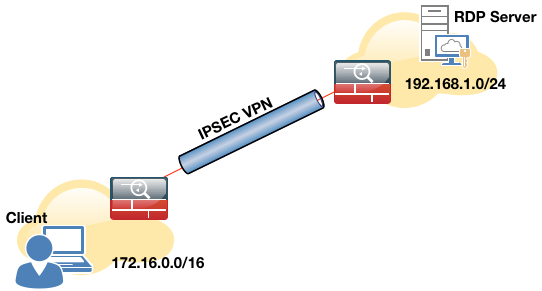
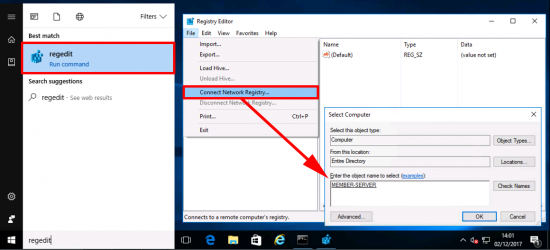
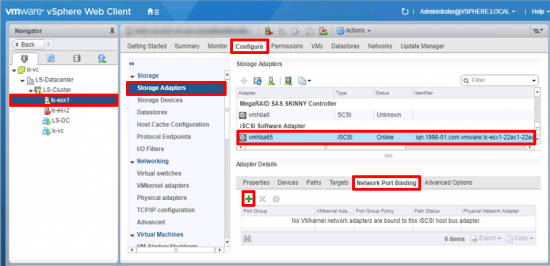
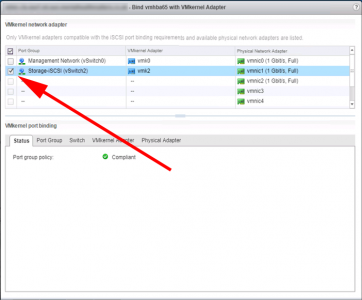
vSphere Configure iSCSI: Back on your vCenter, we need to ‘Bind’ the VMKernel port we created above, to out Software iSCSI adaptor. With the host selected > Configure > Storage Adaptors > Select the iSCSI Adaptor > Network Port Binding > Add.

VMware add iSCSI Port Binding

Select the VMKernel Port  > OK.

iSCSI Bind NIC and Port Group

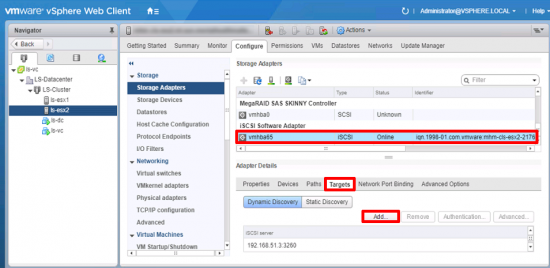
Add an iSCSI Target to vSphere: With the iSCSI Adaptor still selected > Targets Add.

vCenter add iSCSI Target

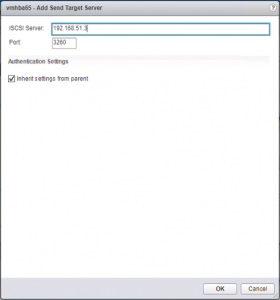
Give it the IP address of your iSCSI device.

ESX iSCSI Target IP

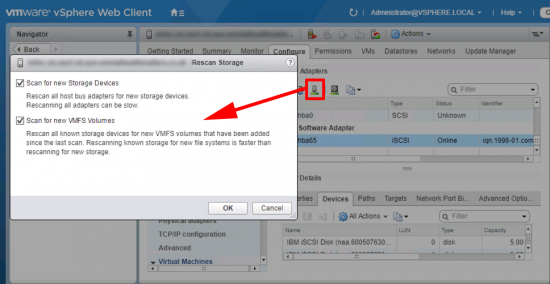
At this point, I would suggest you perform a ‘Storage Rescan’.


vSphere - Rescan Storage controllers

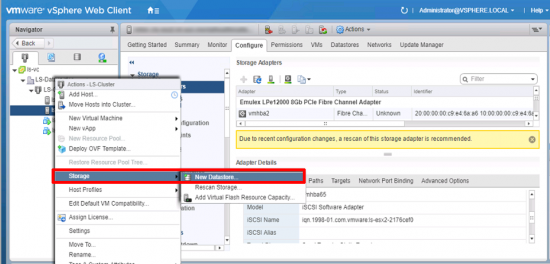
Ensure ALL HOSTS, have had the same procedure carried out on them. Then (assuming you have configured your iSCSI device), presented the storage, and allowed access to it from your ESX hosts. Right click the Cluster > Storage > New Datastore > Follow the instructions.

vSphere Rescan Controllers

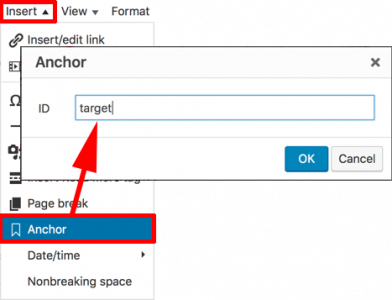
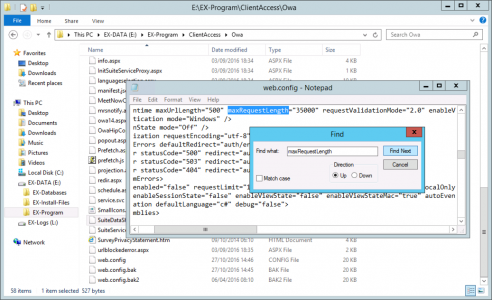
IBM Storagewize v3700 iSCSI 

This article is really just for configuring the VMware side, but just as a placeholder, (and to jog my memory if ever I put in another one.) The process is;

1. iSCSI IP addresses, Note: these are under Settings > Network > Ethernet Ports. (Not iSCSI confusingly.) 

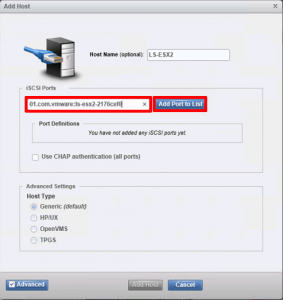
2. Create the Hosts (Note: you can copy the iqn in from vCenter).

Storewize v3700 Add Host Ports

3. Create MDiscs (RAID groups,) from the available disks, Note: Global Spares are allocated here.

4. Create a Pool, I dont really see the point of these, but you need one to create a volume.

5. Create the Volumes, which you will present to the Hosts, then create host mappings.


Related Articles, References, Credits, or External Links

vSphere ESX – Configure Buffalo Terastation 5000 as an iSCSI Target

Viewing all 790 articles
Browse latest View live