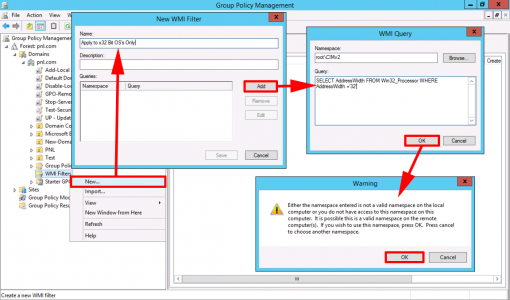
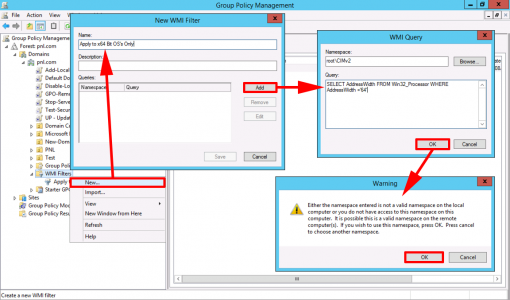
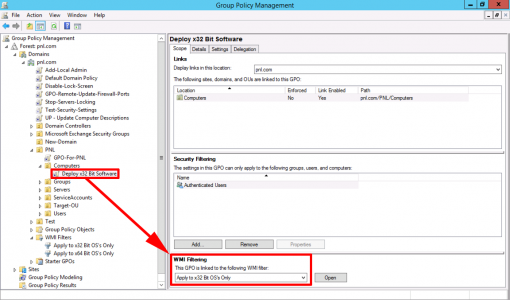
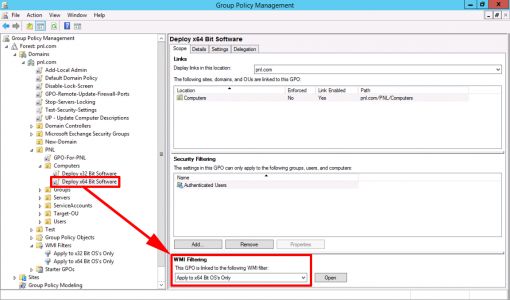
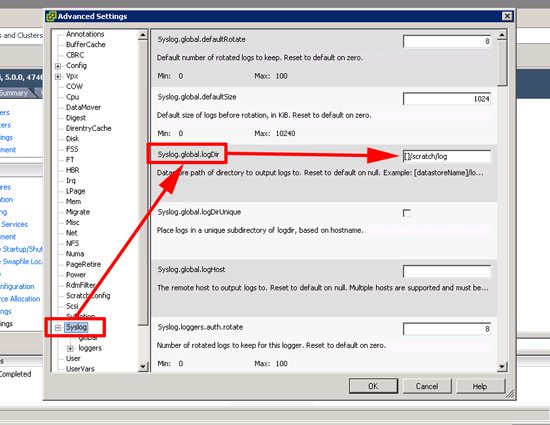
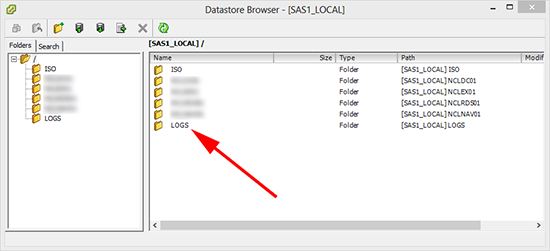
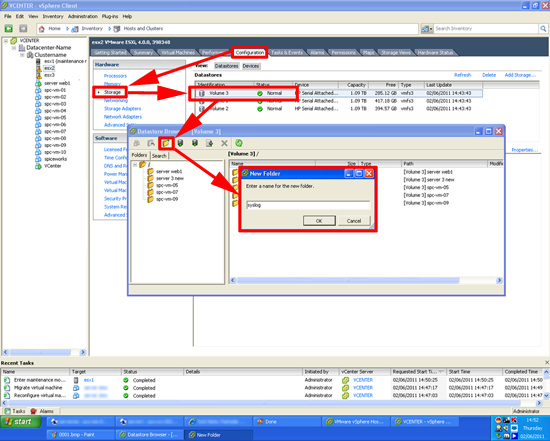
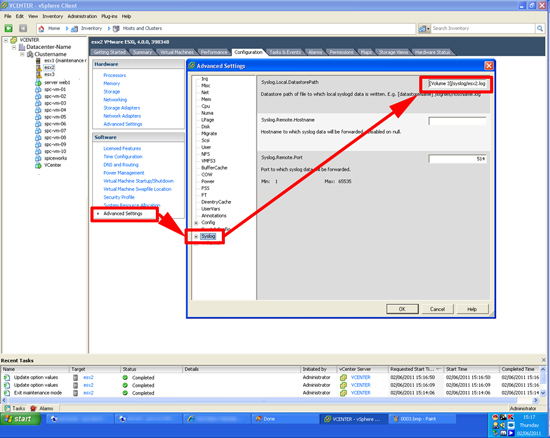
KB ID 0001356
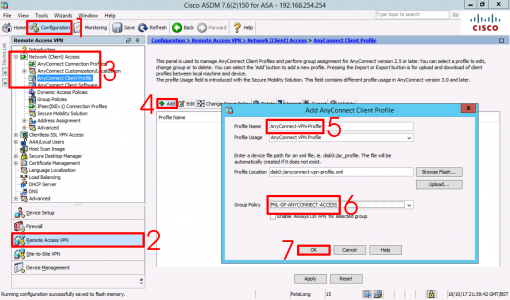
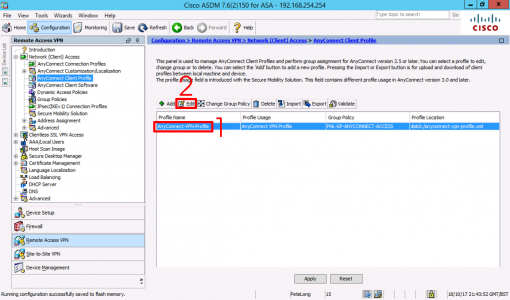
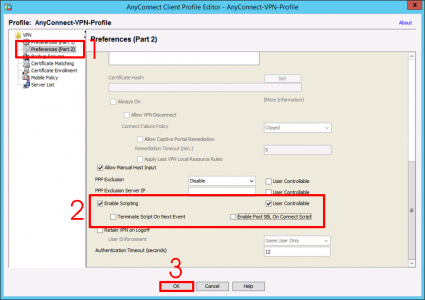
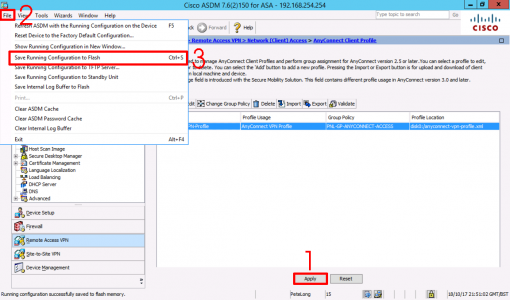
Problem
PeteNetLive is full of Exchange Migration walkthroughs, going all the way back to Exchange 2003. But what if you are migrating to another forest? Well for small migrations you can of course export mail from the old Exchange Server, and them import it into the new mailbox in the new domain/forest (usually via .PST files). I’ll provide links at the bottom of the page, if that’s what you would prefer to do.
Earlier this year, I got involved with a client that was migrating many domains into one, and this method seemed a better fit for them. The process/screenshots below are taken from my testin,g and proof of concept for this project.
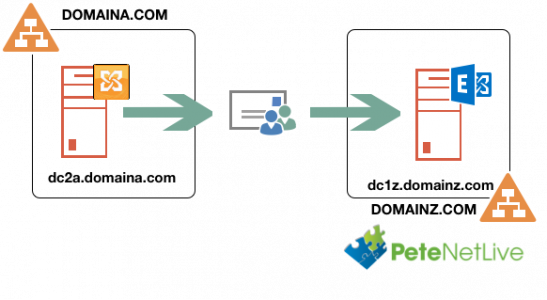
![Cross Forest Mail Migrate]()
As you can see, (above) I’ve got a source Exchange server, (Running Exchange 2010) in domaina.com, and I’ve got a target Exchange server, (Running Exchange 2016) in domainz.com
Note: You may guess from the server names, these are also domain controllers, (this is not recommended in a production environment!) My old Exchange server is also running Certificate Services, which will become apparent below.
Solution
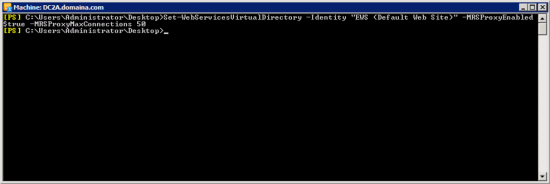
The service that does all the ‘heavy lifting’, is the Microsoft Exchange Mailbox Replication Service. Out fist task is to get is running on the legacy Exchange server. Open the Exchange Shell and execute the following command;
Set-WebServicesVirtualDirectory -Identity “EWS (Default Web Site)” -MRSProxyEnabled $true -MRSProxyConnections 50
![Enable MRSPRoxy Exchange 2010]()
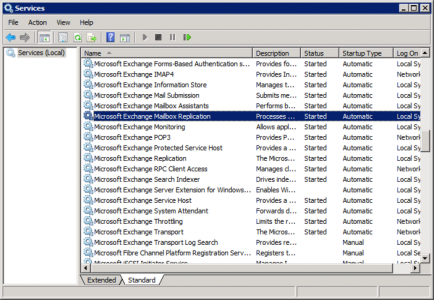
Ensure the service is running;
![MRSPRoxty Exchange 2010 Running]()
The front end of the MRS service is presented via IIS, and it’s secured with HTTPS, so it will use the certificate you have presented, (i.e the same one for OWA). Therefore the new (Target Exchange Server) needs to trust that certificate. If you have a publicly signed certificate from a third party vendor, then you don’t need to import anything you can skip this step.
The World is Full of People Who are Scared of Certificates! I have no idea why? For a certificate to work, you need to TICK TWO BOXES;
- BOX ONE: You need the trust the Certificate Authority who issued the certificate, (this is printed onto the certificate, and in most cases can be extracted from the web certificate as well. This is the CA Certificate of the issuer, NOT the certificate you see in OWA.
- BOX TWO: The certificate will have a name on it, it will be either the common name, or a subject alternative name (within the certificate), it will look something like, owa.your-domain.com, or *.your-domain.com for example. This must be resolvable via DNS, and also be the hostname you are looking at.
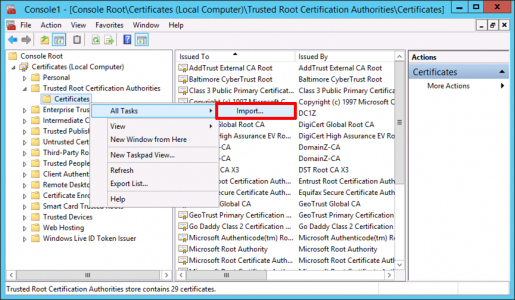
Below, I’m simply importing the Root CA Certificate, from DomainA into my Exchange server on DomainZ.
Note: Start > Run > mmc.msc > File > Add/Remove Snap-in > Certificates > Local Computer.
![Import Trusted Root Cert]()
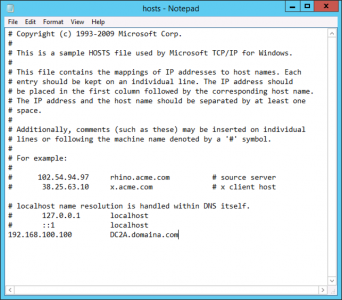
In production, I’d setup conditional forwarding between the two domains to handle DNS, but in this case I’m being lazy and just putting the FQDN of the Exchange 2010 server in the Exchange 2016’s hosts file, (old school eh!)
To Setup Conditional Forwarding; Take a look at the first three steps in this article.
![Exchange Hosts File]()
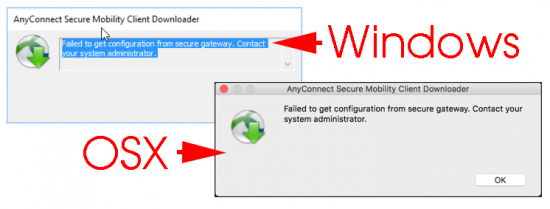
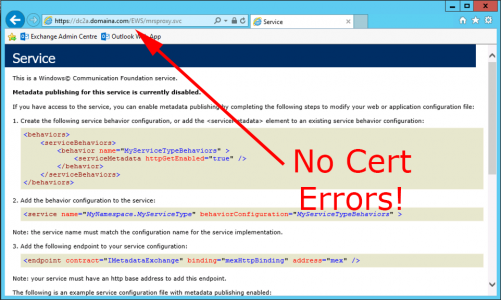
Providing you have done everything correctly, you should be able to ‘browse’ from Exchange 2016, to Exchange 2010, to the following URL, and not receive any certificate errors, it should look like this;
https://servername.domain-name.com/EWS/mrsproxy.svc
Note: If you get any certificate/untrusted errors, fix them before proceeding.
![MRSProxy Certificate Errors]()
Pre-Staging the Cross Forest MailBox Migration
Actually moving the mailboxes is a ‘two-step‘ procedure, first you pre-stage the move, this creates a Mail User* in the new domain.
*Note: A Mail User is an a little bit like a Contact insofar as they both have external email addresses (i.e ‘username@domaina.com’, while the mail user is in domainz.com, (until the mailbox is migrated). The difference between a Mail user and a contact is, a mail user has a logon name and a password. Once migrated the Mail User is converted into a User Mailbox in the new domain, and the User Mailbox back in old domain gets converted into a Mail User with an email address of username@domainz.com for the mail user in domaina.com. This (while being cool,) allows mail flow between the domains during migration. (Assuming your DNS is all setup correctly, of course).
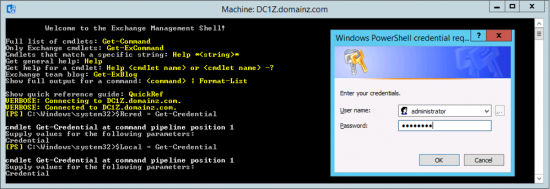
The following procedure is carried out on the new Exchange server, open an Exchange Shell Window and execute the following command;
Then supply an administrative account in the SOURCE, (remote) domain.
![Cache Exchange Credentials]()
Repeat the procedure, but this time use Lcred;
Then supply an administrative account in the TARGET, (local) domain.
![Cache Exchange Credentials Local]()
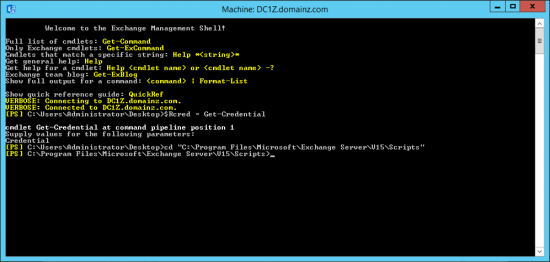
Exchange has a script to do the do the staging for you, it’s in the Exchange install directory, in the ‘scripts’ folder. Mine is in the C: drive, but the path to yours may be different, (depending on how you installed Exchange). But once located, you need to change to the directory that the Prepare-MoveRequest.ps1 script is in i.e.;
cd “c:\Program Files\Microsoft\Exchange Server\V15\Scripts”
Note: V15 denotes Exchange 2013 and 2016.
![Change to Scripts Directory]()
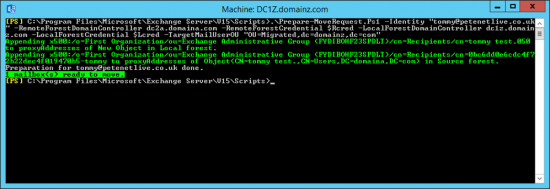
Now execute the following command, (this is all one command if it gets wrapped);
.\PrepareMoveRequest.ps1 -Identity “username@domaina.com” -RemoteForestDomainController dc2a.domaina.com -RemoteForestCredential $Rcred -LocalForestDomainController dc1z.domainz.com -LocalForestCredential $Lcred -TargetMailUserOU “OU=Migrated,DC=domainz,DC=com“
Note: This assumes you have created the OU to migrate into! And, (as you can see in the example below,) I’m using the public email address of my user, not the internal one, (it doesn’t matter).
![Prepare Cross Forest Mailbox Move]()
Execute Cross Forest Mailbox Migration
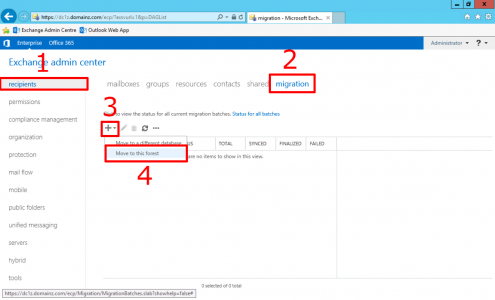
Now the mailboxes are ‘pre-staged’ we can select them for migration, in the new Exchange environment, Recipients > Migration >Add > Move to this forest.
![Cross Forest Mailbox Move]()
Add.
![Cross Forest Migration Batch]()
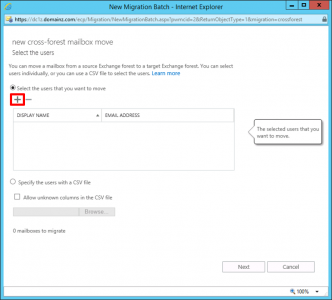
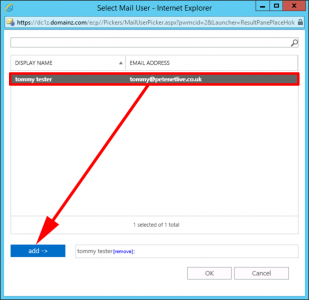
Select the User(s) > Add > OK.
![Exchange Cross Forest Migration Batch]()
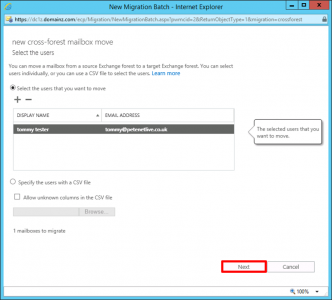
Next.
![Exchange 2016 from 2010]()
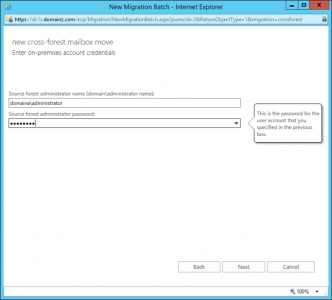
Enter the administrative credentials for the source domain > Next.
![Migration source domain credentials]()
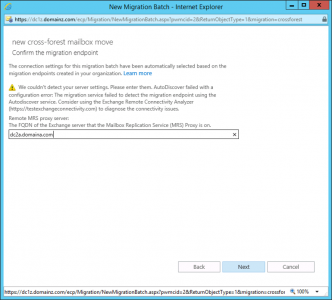
Enter the FQDN, of the legacy server, (use the SAME NAME that’s on the certificate) > Next.
![Cross Forest Mailbox Source]()
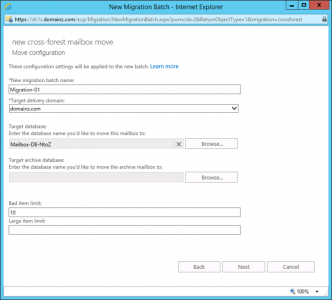
Give the migration ‘Batch’ a name > Set the ‘target’ email domain > Select the target Exchange Database, (and Archive database if applicable) > Next.
Note: If you keep getting failed migrations, that say ‘FailedOther‘ then you can raise the bad item limit, and large item limits.
![Cross Forest Mailbox Settings]()
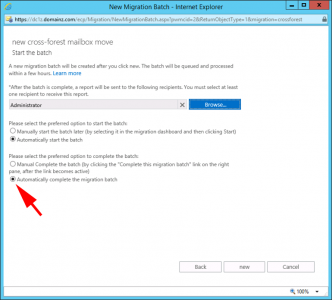
Select a user to get the mail notification > Select ‘Automatically Complete Migration Batch’ (or it will stop at 95% and you will have to complete this manually) > New.
![Cross Forest Mailbox Move]()
You can now view progress in the ECP, (a big buggy and slow to update,) or by running ‘Get-MoveRequest | Get-MoveRequestStatistics‘
If there’s a problem, both the ECP (Exchange Control Panel) and EMS (Exchange Management Shell) should give you a clue. You can remove and rerun a migration on a failed user and nothing will break! Sometimes you need to raise the bad item limit or make sure the source mailbox isn’t too large before proceeding for example. (Use the search box at the top of the page, I’ve posted a lot of Mailbox Move problems).
Related Articles, References, Credits, or External Links
Exchange 2007 / 2010 – Export Mailbox’s to PST files
Exchange 2003 – Exporting Mail to .pst files with ExMerge
Exchange (2010 Post SP1 and Newer) Bulk Importing Mail From PST Files