Quantcast
Channel: PeteNetLive
Viewing all 790 articles
Browse latest View live

Nginx Error – 413 Request Entity Too Large

$
0
0

KB ID 0001325 Dtd 05/07/17

Problem

A few weeks ago I did a series on setting up a new WordPress site, shortly after I had some problems uploading my caching plugin (wp-rocket). This was the error I got;

413 Request Entity Too Large

413 Request Entity Too Large
nginx/1.10.3 (Ubuntu)

Anyway, I fixed the error, and a few days later I got an email from someone with the same problem, so I thought this time I would document the fix.


Solution

Note: I’m going to raise the limits to 100Mb this might be far to large for you, 20 or 50Mb might be more sensible for most sites.

Firstly you need to make an entry in the nginx.conf file

sudo nano /etc/nginx/nginx.conf

If you’re unused to working in these config files, you are looking for the http section, just before this sections ends (i.e. before the end curly bracket ‘}’), insert the following text.

client_max_body_size 100M;

Exit and Save the file (ctrl+x, then ‘y’ {Enter}.

Worpress Raise Upload Limit

Restart nginx.

sudo service nginx restart

You will also need to enter the new values in the php.ini file.

sudo nano /etc/php/7.0/fpm/php.ini

Change the following values, like so;

upload_max_filesize = 100M
post_max_size = 100M

PHPRaise Upload File Size Limit

Wordpress Raise Post Size Limit

Exit and save the file, then restart PHP.

sudo service php7.0-fpm restart


Related Articles, References, Credits, or External Links

NA


Mailbox Move Error ‘Active Directory property ‎’homeMDB‎‘ is not writeable’

$
0
0

KB ID 0001326 Dtd 11/07/17

Problem

I was migrating some mailboxes form Exchange 2007 to Exchange 2013 today, when once again this happened;

Error: MigrationPermanentException: Active Directory property ‎’homeMDB‎’ is not writeable on recipient ‎’petenetlive.com/Migration/Users/Pete.Long’. –> Active Directory property ‎’homeMDB‎‘ is not writeable on recipient

Solution

I can’t believe there’s no fix for this yet! This is being caused by exactly the same problem as we had back with Exchange 2007 and Exchange 2010 (see link below)

Exchange Mailbox Move Error – (INSUFF_ACCESS_RIGHTS)

So to fix, open ‘Active Directory Users and Computers’ > View > Advanced Features.

DSA Advanced View

Security tab (if you can’t see it, advanced features is not on) > Advanced.

User Security Tab

Enable inheritance > Apply.

User Security Allow Inheritance

Yes > OK > OK.

Allow Inheritable Permissions

Now retry your mailbox move.

To Find out who else will be affected: Run the following command;

Get-ADuser -Filter {admincount -gt 0} -Properties AdminCount | select name

 PowerShell find Users AdminCount

Related Articles, References, Credits, or External Links

NA

Exchange AutoDiscover Errors – Creating an AutoDiscover SRV Record

$
0
0

KB ID 0001184 Dtd 12/07/17

Problem

Ages ago I wrote the following article;

Outlook Error “The name of the security certificate is invalid or does not match the name of the site.”

You used to see this error a lot if your internal, and external domain names were different, and the ‘public’ domain name was on the certificate, in those cases I’d also setup split DNS like so;

Windows – Setting Up Split DNS

But you can simply create a DNS SRV record that your clients will use for Autodiscover.

Solution

Note: Before proceeding MAKE SURE you DON’T have an A record in your domain, for “autodiscover.{your-domain}”. or a CNAME record for autodiscover that points back to your Exchange. We want an SRV record ONLY.

Within your domain DNS, create a new ‘Other‘ record.

SRV record Autodiscover

Choose service location (SRV) > Create Record.

SRV Record Exchange Autodiscover

Your domain name will be entered automatically, set the following;

  • Service: _autodiscover
  • Protocol: _tcp
  • Port number: 443
  • Host offering this service: {The FQDN of your CAS/Exchange server}.

SRV Record Fix Autodiscover Errors

You will need to expand the _tcp folder to see the record.

SRV Record _Autodiscover

I Use Split DNS?

No problem, in your internal DNS, the forward lookup zone (that matches your public address space.) Create an SRV record as well, when you are finished, (if you have set it up properly),  you will see a tcp sub folder appear below the forward lookup zone.

What About My Public DNS Settings?

Exactly the same! Remove any A or CNAME records, and create an SRV record, how you do this, varies from DNS host to DNS host. Some oddities I’ve found;

  • Some public DNS vendors wont let you set a priority of ‘0’ Zero, on an SRV record, just use 1 (unless you have multiple ones!)
  • Some public DNS vendors SRV records don’t work, unless you put a ‘full stop’ at the end of the domain name. (In fact all domain names have a full stop at the end of them, it’s just you can’t normally see them!)

As an example, here’s me creating an SRV record on my DNS hosting provider (Vidahost)

So when it’s created it will look like this;

I’ve got Multiple Public E-Mail Domain names running from the same Server?

Again not a problem, for each domain, delete the A and CNAME records for autodiscover. Then point your SRV record to the DNS name that is actually presented by the Exchange server (even if that’s with another DNS vendor).

Why Does This work?

Well I’m glad you asked! When outlook looks for Autodiscover the first thing it does is look for the Autodiscover SCP point in your Active Directory. You can see this in your  ‘AD sites and services’, (you need to add in the Service node from the view options before you can see it).

SCP Autodiscover Domain Sites and Services

If it can’t get a response from there, it takes your domain name and tries the following locations;

https://{domain-name}/autodiscover/autodiscover".fileExtension
AND
https://autodiscover.{domain-name}/autodiscover/autodiscover".fileExtension

Note: The file extension is usually .xml but it can be .svc

If it STILL can’t get a response it tries the following;

http://autodiscover.{domain-name}/autodiscover/autodiscover.xml

Note: If you are wondering that the difference is, that’s on port 80 not port 443.

If it STILL can’t get an answer then to looks for the SRV record in DNS you created above.

How To Test the AutoDiscover SRV Record

It’s a DNS record so we can query it with nslookup to make sure its OK.

nslookup -q=srv _autodiscover._tcp.{domain-name}
OR

nslookup
set q=srv (or you can use SET TYPE=SRV)
_autodiscover._tcp.{domain-name}

Like this;

Testing  SRV Record _Autodiscover

Or if you use macOS or Linux;

Why Do I have to remove my A and CNAME Records for Autodiscover

If they exist they will get used before the SRV record, you may think that’s fine but it may lead to all sorts of horrible Outlook Setups and errors about certificate names. 

Outlook Error “The name of the security certificate is invalid or does not match the name of the site.”

Related Articles, References, Credits, or External Links

Outlook – Constantly Prompts for a Password

Original article written: 12/05/16

Exchange – Slow Mailbox Migration?

$
0
0

KB ID 0001327 Dtd 13/07/17

Problem

I had a problem recently during an Exchange 2007 to 2013 migration, (client can’t support 2016 yet!) Where the mailbox migrations were taking ages. 

Solution

1. Disable Microsoft Replication Service Throttling

On the ‘Target’ server > Open ‘regedit’ > Navigate to;

HKEY_LOCAL_MACHINE\SYSTEM\CurrentControlSet\services\MSExchange ResourceHealth

Locate the MRS REG_DWORD Value and change it to 0 (Zero)

Disable Throttling Mailbox Moves

Note: This wont take effect until the service is restarted, but don’t do that yet.

2. Change Microsoft Replication Service Defaults

Edit the MsExchangeMailboxReplication.exe.config file, you will find  it at the following location;

{Drive-Letter}:\ProgramFiles\Microsoft\Exchange Server\V15\Bin

Note: Run Notepad as administrator, or it might not let you save the changes!

Change the following settings;

MaxActiveMovesPerSourceMDB=”50″
MaxActiveMovesPerTargetMDB=”50″


ExportBufferSizeKB=”10240″

Mailbox Migration Slow

Below the line (above,) add the following (only if target is Exchange 2013 SP1 (Thats CU4!) and above);

ExportBufferSizeOverrideKB=”7500″

Exchange Mailbox Migration Slow

Change the following to 20 minutes;

DataImportTimeout=”00:20:00 />

Exchange Mailbox Migration Very Slow

Save and close the file.

Note: This wont take effect until the service is restarted, but don’t do that yet.

3. Disable Indexing on the ‘Target’ Database

Execute the following command;

Set-MailboxDatabase “Target-Database-Name” -IndexEnabled:$False

4. Restart the Mailbox Replication Service


Mailbox Migration Replication Restart

Can I Restart the Mailbox Replication Service While Migrating Mailboxes?

For safety reasons I would say no, but yes you can actually restart the service during a migration, the individual moves then get flagged as;

StalledDueToMailboxLock

Mailbox Migration StalledDueToMailboxLock

I simply left it for a while, and they all reverted back to ‘Copying Messages’.

DON’T FORGET

When you have finished remember to re-enable indexing and throttling on the target datastore.

Related Articles, References, Credits, or External Links

NA

Windows 10 – Disable / Remove OneDrive

$
0
0

KB ID 0001328 Dtd 17/07/17

Problem

Microsoft have done a good job of embedding OneDrive into Windows 10. While Ive got nothing against OneDrive, for some admins the thought of users storing data out of their networks is quite worrying. So how do you ‘un-couple’ OneDrive from Windows 10?

OneDrive icon Windows Explorer

Solutions

Option 1: Remove OneDrive ‘Quick and Dirty’

Open ‘Regedit’ and navigate to;

HKEY_CLASSES_ROOT > CLSID > {018D5C66-4533-4307-9B53-224DE2ED1FE6} > System.IsPinnedToNameSpaceTree 

Change its value to 0 (zero).

Option 2: Remove OneDrive with Local Group Policy

Press ‘Windows Key + R’ > gpedit.msc {Enter} > Navigate to;

Policies > Administrative Templates > Windows Components > OneDrive

Locate ‘Prevent usage of OneDrive for file storage’.

Enable > Apply > Close the policy editor > Reboot.

Prevent the use of OneDrive Group Policy

Option 3: Remove OneDrive Access through the Registry

Press ‘Windows Key + R’ > regedit {Enter} > Navigate to;

HKLM > Software >Policies > Microsoft > Windows

Create a New Key called OneDrive.

Disable the use of OneDrive Registry

In the new key, create a new DWORD called ‘DisableFileSyncNGSC‘ set its value to 1 (one).

Disable the use of OneDrive Windows 10 Home

Option 2: Remove OneDrive Through Domain Group Policy

On a domain controller  > Administrative Tools > Group Policy Management.

Domain Group Policy Management Console

Create a new GPO linked to the OU that contains your computers > Give it a sensible name > OK.

GPO OneDrive

Edit it.

Domain GPO OneDrive

Navigate to;

Policies > Administrative Templates > Windows Components > OneDrive

Locate ‘Prevent usage of OneDrive for file storage’.

Domain GPO block OneDrive

Enable it > Apply > OK > Close the Group Policy Management console.

Block OneDrive with Group Policy

Then either wait, or force a group policy update.

Windows – Forcing Domain Group Policy

Note: On ‘Home Edition’s‘ of Windows 10, you can remove OneDrive from ‘add/remove programs’ > ‘Enable/Disable Windows features’.

Related Articles, References, Credits, or External Links

NA

CentOS / Redhat / Fedora – VMware VMXNET3 Adapter Not Working

$
0
0

KB ID 0001329 Dtd 18/07/17

Problem

This has tripped me up a couple of times, and if you Google the problem, you find a load of posts saying ‘Just install VMware tools that will fix the problem’

It Wont!

And I’ll tell you why, run ifconfig

ifconfig VMXNET3 VMware

You will notice you have a network card, but you will also notice that it’s got a strange name ‘ens160’ not eth0 as you would normally expect? Anyway let’s prove it’s not a driver issue by issuing a dhclient -v command. This basically forces the NIC up and makes it get a DHCP address, (assuming your NIC is connected to the correct network, and you have DHCP running of course!)

Linux Force DHCP Request

So this tells me it’s not a driver issue, and that installing VMware tools probably wont cure the problem.

It Didn’t!

Also if you reboot, you will find it’s not working again!

Solution

I’m going to use nano in a minute, (other editors are available), so I’ll install that first. (I’m logged in as root, you may need to prefix the following command with sudo if you are not).

yum install nano

Linux Install nano

Remember my network card had a ‘funny name’, well change directory to the /etc/sysconfig/network-scripts directory, and you will see it’s config file, so let’s edit that, (change the text in red, to reflect your interface name, from the ifconfig command earlier);

cd /etc/sysconfig/network-scripts
nano ifconfig-ens160

Edit VMXNet3 Interface Linux

Make sure;

BOOTPROTO=dhcp

ONBOOT=yes

VMXNet3 Enable DHCP

Now if you reboot your VM, it should come back up with networking enabled.


Related Articles, References, Credits, or External Links

NA

Linux – Install VMware Tools

$
0
0

KB ID 0001330 Dtd 19/07/17

Problem

Note: This is to install the VMware Tools NOT the OPEN-VM-TOOLS.

I’ve had to do this a few times now, and every time I Goolge how to do it, I get pages of instructions on how to install the open vm tools. When what I really want is to install the VMware Tools.

Solution

I’m using vSphere ESX, but even if you are using VMware Workstation or VMware Fusion, you can still select ‘Install/Upgrade VMware tools’, this presents a DVD image to the virtual machine.

Present VMware Tools DVD

The install for VMware tools uses Perl, so you will need to have that installed.

yum install perl

Install Perl

Now we are going to mount the virtual CDROM/DVD drive into a folder, (called/mnt). Then when we have a look inside this folder, you will see the VMwareTools-{version}.tar.gz (take a note of this).

mount /dev/cdrom /mnt
cd /mnt
ls
TAKE NOTE OF THE VERSION!

Linux Install VMware Tools

Unzip those files into the /tmp directory, then run the installer.

cd /tmp
tar zxf /mnt/VMwareTools-9.10.0-2476743.tar.gz
cd vmware-tools-distrib
./vmware-install.pl

Linux Install ESX VMware Tools

Keep pressing {Enter} to accept the defaults, when complete the mounted VMware tools DVD will be ejected.

VMware Tools On Linux


Related Articles, References, Credits, or External Links

NA

Setup RANCID and ViewVC (Part One)

$
0
0

KB ID 0001331 Dtd 19/07/17

Problem

There are couple of good posts out there on setting up Rancid (Really Awesome New Cisco Config Differ). Some even show you how to set it up with ViewVC (Formally ViewVCS, basically a nice web based GUI front end, that does version control and highlights differences). It does this using a system called CVS (Concurrent Version System, hence the original name.)

Then I had to do some more searching to get it to back up my Cisco ASA firewalls and get the whole thing automated, which Ill cover in Part Two.
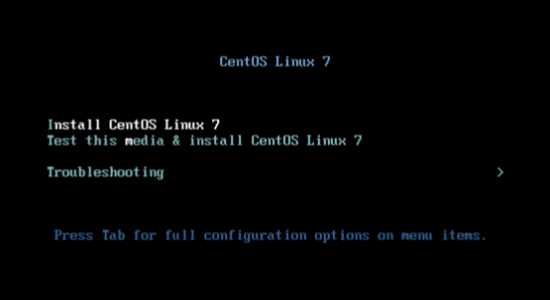
OS: CentOS 7 x64

Rancid: 3.4.1

ViewVC: 1.1.24

Solution

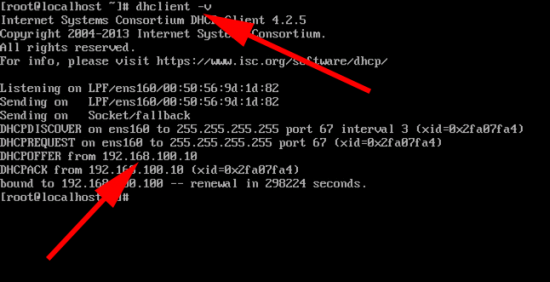
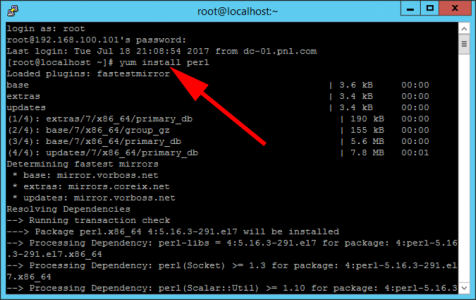
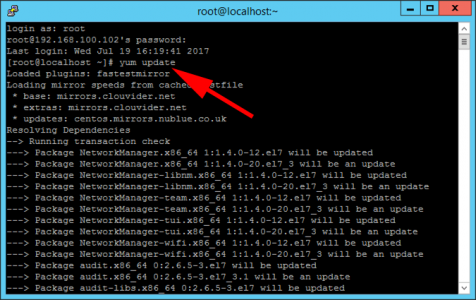
Once it’s built, let’s update our server;

yum upgrade
yum update
Answer any questions with 'y' for yes.

Update CentOS

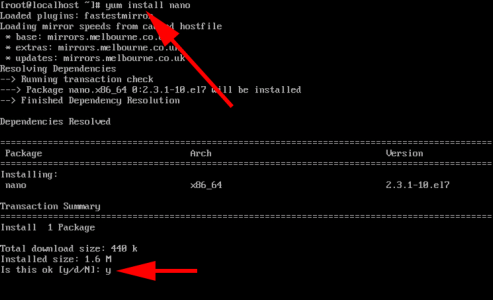
Lets install all the components we need;

yum install nano wget ftp telnet mariadb-server mariadb perl tcl expect gcc cvs rcs httpd autoconf php-common php-gd php-pear php-pecl-memcache php-mysql php-xml mod_ssl MySQL-python

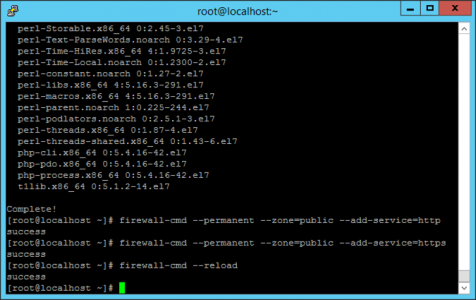
We only need a simple web server, so set the firewall accordingly (I’m opening http (TCP 80) and https (TCP 443) but we will only configure http in this example);

firewall-cmd --permanent --zone=public --add-service=http
firewall-cmd --permanent --zone=public --add-service=https
firewall-cmd --reload

Rancid Firewall Settings

We have already installed Apache (web server), so we need to start it up, then set it to ‘auto-start’ with the server. Then create a group, and a user (rancid), and place that user in the group we created. Finally create a directory for us to ‘unzip’ rancid into.

systemctl enable httpd.service
systemctl start httpd.service
groupadd netadm
useradd -g netadm -c "Networking Backups" -d /home/rancid rancid
mkdir /home/rancid/tar

Rancid User Settings

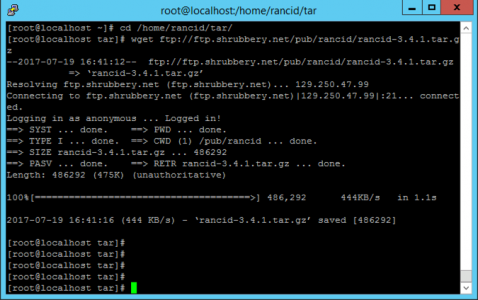
Move into the directory, we just created then download RANCID, unzip it, then install it.

cd /home/rancid/tar/
wget ftp://ftp.shrubbery.net/pub/rancid/rancid-3.4.1.tar.gz
tar -zxvf rancid-3.4.1.tar.gz
cd rancid-3.4.1
./configure --prefix=/usr/local/rancid
make install

Download Rancid

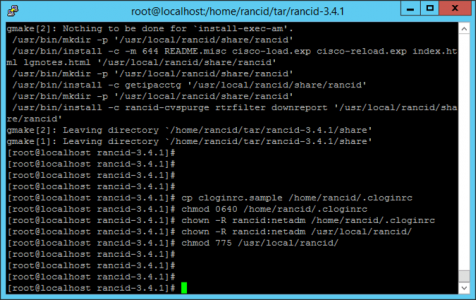
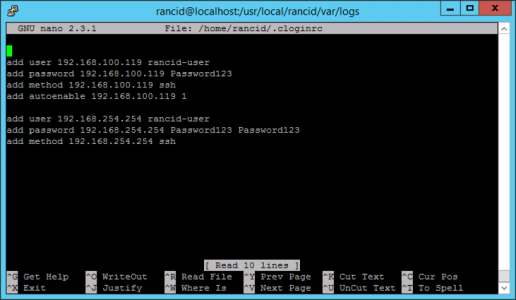
Copy over the ‘clogin’ file, (more on this later). Then set the ownership and and permissions on the rancid files and directories.

cp cloginrc.sample /home/rancid/.cloginrc
chmod 0640 /home/rancid/.cloginrc
chown -R rancid:netadm /home/rancid/.cloginrc
chown -R rancid:netadm /usr/local/rancid/
chmod 775 /usr/local/rancid/

Rancid User Permissions

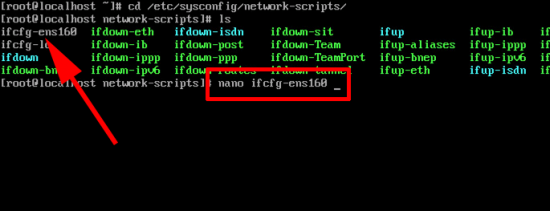
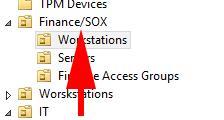
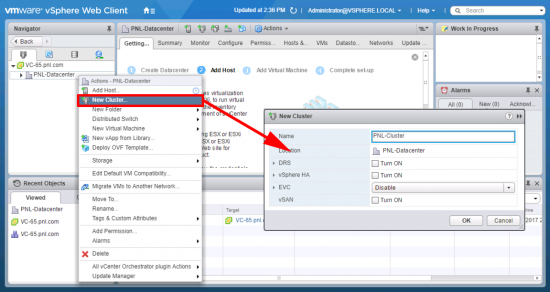
Now to set the ‘top level’ groups. Above I’ve got Firewalls and Switches, you might want to create a group for each customer you are backing up, or each site. (the design is up to you), but these are the ‘folder names’ you will see when you first log into the ViewVC web front end. Next you need to edit the main Rancid configuration file;

nano /usr/local/rancid/etc/rancid.conf

Uncomment and add your groups, i.e.
LIST_OF_GROUPS=”Firewalls Switches

Rancid Top Level Catagories

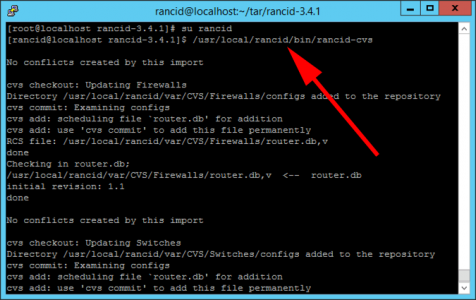
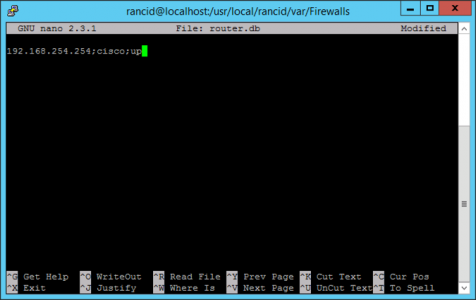
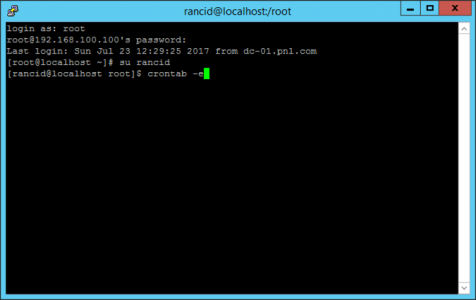
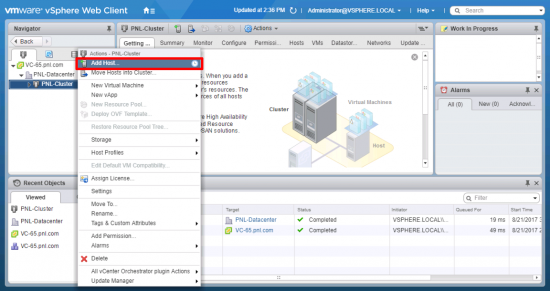
Save and Exit the file, (in nano that’s CTRL+X, then Y to save, and finally {Enter}.) Now we need to change to the rancid user we created earlier, (remembering to swap back to ‘root’ afterwards). We do this to create the folder structure for the groups we just created. Most importantly this creates the router.db file(s) which lives in each group/folder. This file specifies what the devices are, and where they are, that you will be backing up.

Rancid Add Catagories to Database

su -rancid

Or 'su rancid' if you are logged in as root

/usr/local/rancid/bin/rancid-cvs
su

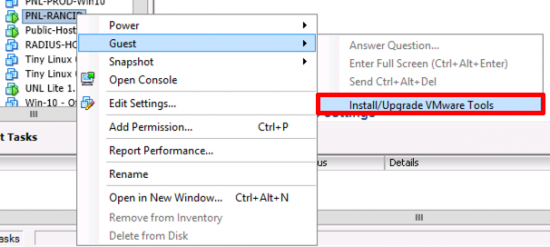
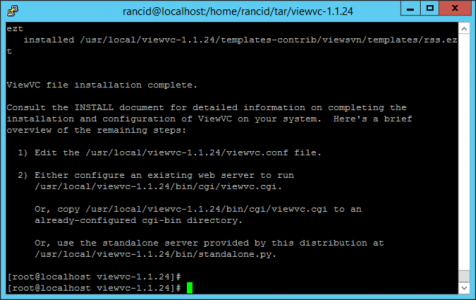
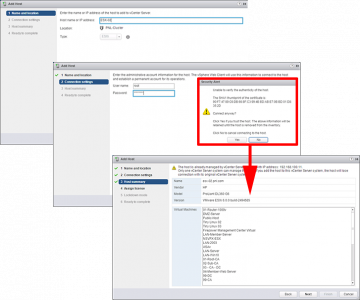
Download and install ViewVC.

Download ViewVC

Install ViewVC

cd /home/rancid/tar/
wget http://viewvc.tigris.org/files/documents/3330/49471/viewvc-1.1.24.tar.gz
tar -zxvf viewvc-1.1.24.tar.gz
cd viewvc-1.1.24
./viewvc-install

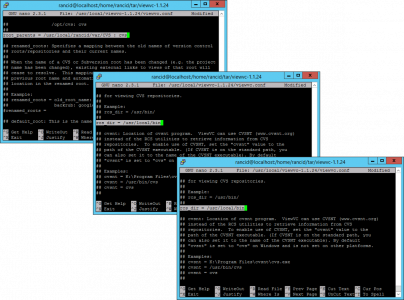
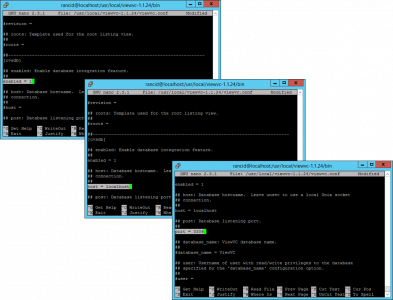
Open the ViewVC config file;


Edit ViewVC config

nano /usr/local/viewvc-1.1.24/viewvc.conf

Uncomment and change the values, (as shown above).

root_parents = /usr/local/rancid/var/CVS : cvs
rcs_dir = /usr/local/bin
use_rcsparse = 1

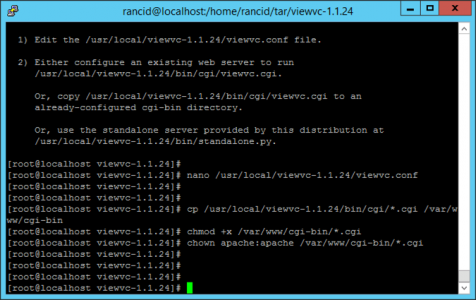
Now to enable ViewVC to work with Apache, we need to copy over some CGI, and set some permissions.

Apache Permissions ViewVC

cp /usr/local/viewvc-1.1.24/bin/cgi/*.cgi /var/www/cgi-bin
chmod +x /var/www/cgi-bin/*.cgi
chown apache:apache /var/www/cgi-bin/*.cgi

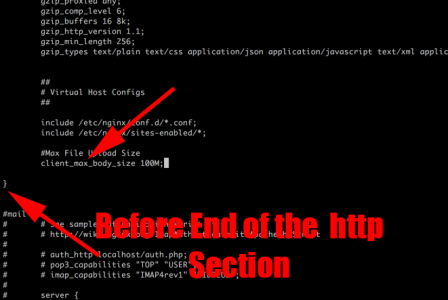
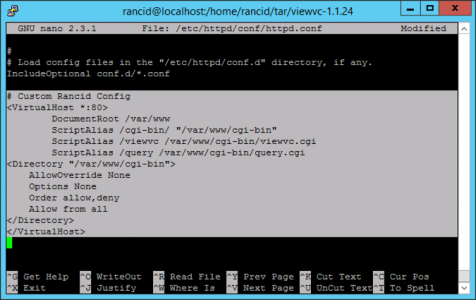
Then in the Apache config file, scroll to the end and add the following text, (don’t forget to save and exit the file).

Apache Config For ViewVC

nano /etc/httpd/conf/httpd.conf

Paste the following (at the bottom)

# Custom Rancid Config

<VirtualHost>
        DocumentRoot /var/www
        ScriptAlias /cgi-bin/ "/var/www/cgi-bin"
        ScriptAlias /viewvc /var/www/cgi-bin/viewvc.cgi
        ScriptAlias /query /var/www/cgi-bin/query.cgi
<Directory "/var/www/cgi-bin">
    AllowOverride None
    Options None
    Order allow,deny
    Allow from all
</Directory>
</VirtualHost>

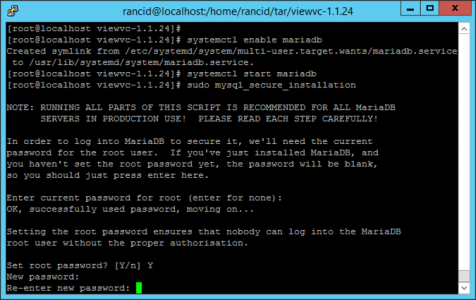
We already installed MariaDB, (similar to MySQL) earlier, we just need to start it up, then set it to auto start with the server. Out of the box, MariaDB is a little insecure, so there’s a process of hardening it called ‘mysql_secure_installation’.

Note: the first time you run the secure installation it will ask for a password, this is the root password for MariaDB NOT the Linux root password, this will be {blank} so just hit {Enter}, then Yes to set the password, and set the MySQL/MariaDB root password (NEVER LOSE OR FORGET THIS). You will need it in a minute anyway, for all the other questions simply press {Enter} to accept the defaults.

ViewVC and MariaDB

systemctl enable mariadb
systemctl start mariadb
sudo mysql_secure_installation

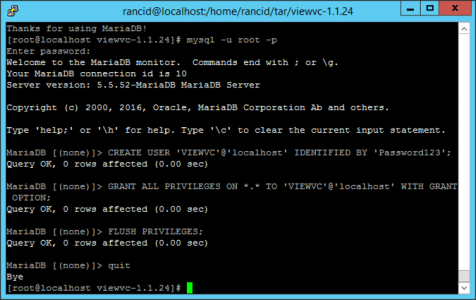
Now that MariaDB is installed, we need to create a user in SQL that ViewVC will use, to do that we need to log into SQL using the root password you just setup.

Configure MariaDB for ViewVC

mysql -u root -p
Enter your SQL root password
CREATE USER 'VIEWVC'@'localhost' IDENTIFIED BY ‘Password123’;
GRANT ALL PRIVILEGES ON *.* TO 'VIEWVC'@'localhost' WITH GRANT OPTION;
FLUSH PRIVILEGES;
quit

Note: sometime it does not like you copying and pasting the first ‘CREATE USER…’ line, (I don’t know why.) If it complains, type it out manually!

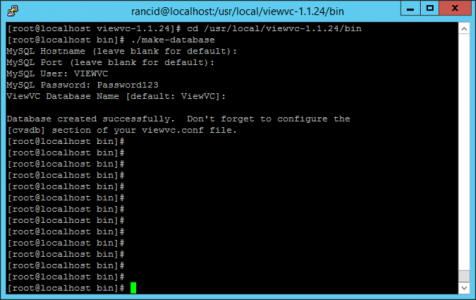
Now that is set up we can get ViewVC to create its database.

Configure ViewVC for MariaDB

cd /usr/local/viewvc-1.1.24/bin
./make-database

Use the following settings when prompted;

MySQL Hostname (leave blank for default):{Enter}

MySQL Port (leave blank for default):{Enter}

MySQL User: VIEWVC

MySQL Password: Password123

ViewVC Database Name [default: ViewVC]:{Enter}

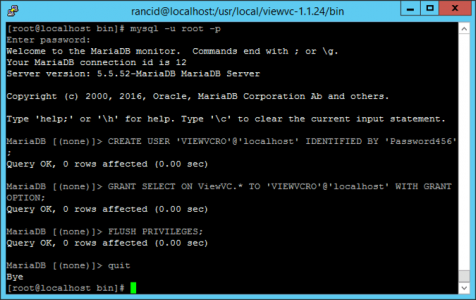
Then, (the same as you did earlier,) create another user in MariaDB, that will be a ‘read-only’ user.

Create ViewVC Read Only User

mysql -u root -p
Enter your SQL root password
CREATE USER 'VIEWVCRO'@'localhost' IDENTIFIED BY ‘Password456’;
GRANT SELECT ON ViewVC.* TO 'VIEWVCRO'@'localhost' WITH GRANT OPTION;
FLUSH PRIVILEGES;
quit

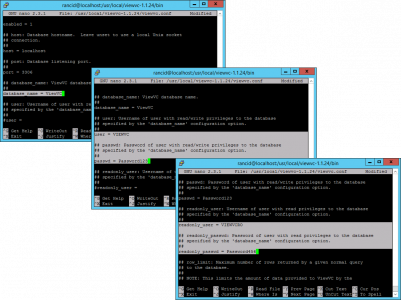
Edit the ViewVC configuration so that it uses all the parameters you have setup;

nano /usr/local/viewvc-1.1.24/viewvc.conf


Configure ViewVC Read OnlyUnConfigure ViewVC

Scroll down to the [csvdb] section, then uncomment and change the values shown (above,) so that look like.

enabled = 1
host = localhost
port = 3306
database_name = ViewVC
user = VIEWVC
passwd = Password123
readonly_user = VIEWVCRO
readonly_passwd = Password456

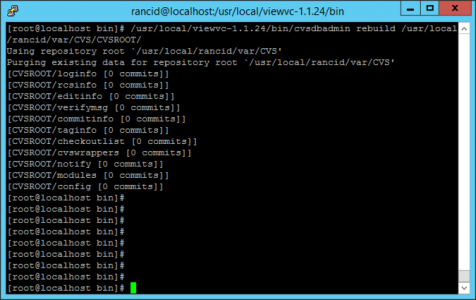
Then get ViewVC to ‘rebuild’ the database .

Build ViewVC Database

/usr/local/viewvc-1.1.24/bin/cvsdbadmin rebuild /usr/local/rancid/var/CVS/CVSROOT/

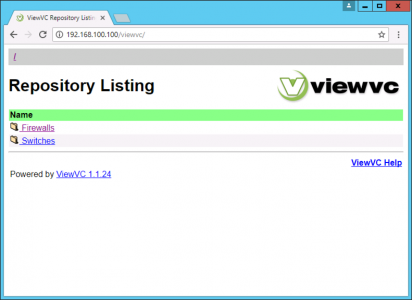
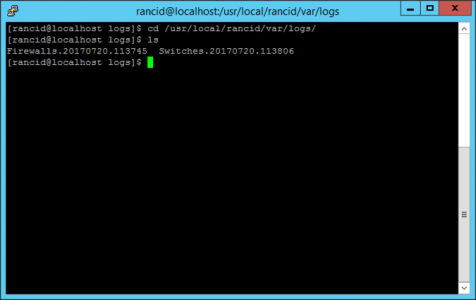
Reboot the server, and if you browse to http://{ip-or-hostname}/viewvc you should see something like this;

Rancid ViewVC GUI


In Part Two we will add some Cisco Devices (Switches and ASA Firewalls) and schedule the backups.

Related Articles, References, Credits, or External Links

NA


Exchange 2016 – Cannot Create a ‘Frontend Transport Receive Connector’

$
0
0

KB ID 0001333 Dtd 23/07/17

Problem

When trying to enable an IP to ‘Relay’ though my Exchange server, I found I was unable to select ‘Frontend TransportConnector’.

Exchange 2016 Cannot Create Frontend Receive Connector

Solution

Apparently this is a a bug first seen in CU2, the only current fix is to either create the connector as a Hub Transport connector, then convert it using PowerShell, or create the connector in the Exchange Management Shell, which is what I did.

New-ReceiveConnector -Name “Allow-Relay-Connector” -Bindings ("0.0.0.0:25") -RemoteIPRanges ("192.168.100.100”) -MaxMessageSize 20MB –TransportRole FrontendTransport -Usage Custom –Server PNL-MAIL

Exchange 2016 Create Relay Connector


Related Articles, References, Credits, or External Links

NA

VMware Linux VM –‘No DEFAULT or UI configuration directive found’

$
0
0

KB ID 0001334 Dtd 23/07/17

Problem

Last week while trying to create a Linux VM on a VMware ESX 6.5 server, I saw this;

Ne DEFAULT or UI configuration directive found

No DEFAULT or UI configuration directive found

Solution

Normally the error indicates theres something wrong with the install media, so I deleted it and uploaded it again, same error. So I downloaded the setup iso file again and checked its checksum, to make sure it was OK, (it was, but the problem persisted).

To fix the problem I simply had to connect to the host, using a different browser, (I used Firefox). Upload the .iso file and start again. Once I did that, hey presto;

Install CentOS

Related Articles, References, Credits, or External Links

NA

WordPress – HTTP Error

$
0
0

KB ID 0001335 Dtd 24/07/17

Problem

Quite a few times after I rebuilt my server, (and WordPress site), I saw the following when uploading images etc.

HTTP Error WordPress

HTTP Error

Solution

I was quite sure everything was setup OK, I had set the max file upload limits set, but it turns out I needed to add a ‘memory limit’ in my wp-config.php file before the error ceased. For completeness I’ll include the other usual suspects, in case yours is setup a little differently from mine.

Edit Your php.ini File

Note: If you are running an earlier version of php, your path may be different.

sudo nano /etc/php/7.0/fpm/php.ini

Ensure the following has been set;

upload_max_filesize = 50M
max_file_uploads = 20
post_max_size = 50M

Edit Your nginx.conf File

(Obviously don’t do this if you are running Apache!)

sudo nano /etc/nginx/nginx.conf

In the very bottom of the http section, (before the end ‘curly’ bracket ‘}’), add in the following;

client_max_body_size 100m;

Edit Your wp-config.php File

sudo nano /var/www/html/wp-config.php

Add the following to the very bottom of the file;

define('WP_MEMORY_LIMIT', '120MB');

Related Articles, References, Credits, or External Links

NA

Windows – Unable to Move an OU

$
0
0

KB ID 0001336 Dtd 26/07/17

Problem

I was doing some AD redesign work for a client this week, and I needed to move an Organisational Unit (OU). However the domain had other ideas;

Domain Unable to Move OU

Active Directory Domain Services

Windows cannot move object {OU-Name} because: Access is denied.

It wasn’t a rights issue, (I was an Enterprise Administrator). 


Solution

As it turns out, it was the same problem I’d had back when Server 2008 first came out deleting an OU. Make sure you have enabled advanced features in Active Directory Users and Computers (View > Advanced Features). Then untick the following option;

Unable to Move OU

You can now move the OU (Don’t forget to re-tick that option, once you’ve got it where you want it!)


Related Articles, References, Credits, or External Links

NA

Using LDP to Find an Objects ‘Distinguished Name’ in Active Directory

$
0
0

KB ID 0001337 Dtd 27/07/17

Problem

There are a few occasions when you need to know an objects ‘Distinguished Name’ (DN). For me it’s usually when I’ve got a device that needs to do LDAP/LDAPS lookups, (RSA Appliance, Netscaler, Cisco FirePOWER, etc). Today someone needed to ‘bind’ a Checkpoint firewall to Active Directory, and asked me to create user, and give them the DN and password.

I’ve mentioned ldp.exe many times, but never dedicated a post to it, it’s a tiny executable, that was first seen in the server 2003 support tools.  With 2008 you needed to add the Active Directory Lightweight Directory Service Role to get it. With server 2012 and 2016 you will get it on any Domain Controller.

Solution

Windows Key+R > ldp {Enter} > Connection > Connect > select localhost, (if you are on the DC, or the FQDN of a DC if you are not). Normally port 389 is fine, but if you have enabled LDAPS, you might want to use port 636, and tick SSL also > OK.

LDP Connect to LDAP Server

Now you need to bind to LDAP, I’m using my logged on account, but if you want to test a user account can bind to Active Directory, then you can specify a username/password and domain > OK.

Note: To bind to, and read all objects in Active Directory, only  domain user is required.

LDP Bind to LDAP Server

Now to view anything > View > Tree > Select the root DN to view all of AD, (in my case DC=pnl,DC=com) > OK.

LDP View LDAP Tree

You can now browse your AD, and get the DN for any object.

Active Directory Find Users DN

Related Articles, References, Credits, or External Links

Windows Server 2012 – Enable LDAPS

Cisco FirePOWER Management Center Appliance – Allowing Domain Authentication

An Invalid Directory Pathname Was Passed

$
0
0

KB ID 0001338 Dtd 28/07/17

Problem

While attempting to delegate administration of an OU, I got this error;

An Invalid Directory Pathname Was Passed

Delegation of Control Wizard

The wizard cannot retrieve security information from the Active Directory. An invalid directory pathname was passed.

Solution

Took a while to figure out! The OU in question has a ‘slash’ in the name of it;

OU with Slash

Once I changed this to a hyphen, the error ceased.

Related Articles, References, Credits, or External Links

NA

Setup RANCID and ViewVC (Part Two) Adding Cisco Devices

$
0
0

KB ID 0001332 Dtd 23/07/17

Problem

Before on Part One we setup our RANCID and ViewVC server ready to start backing up our devices, now we will look at adding the devices, and automating the backup process.

Solution

To add a Cisco device you need to do TWO things*. Firstly you need to add and entry in the ‘router.db‘ file that lives in the ‘Group’ folder you created back in part one. Secondly you need to add the access details, you do this in the ‘.cloginrc‘ file.

*Note: There’s really three things, but we have already setup the rancid.conf file and created the groups.

I’m going to add my Cisco ASA firewall to the router.db file thats in the Firewalls group.

nano /usr/local/rancid/var/Firewalls/router.db

You enter devices in the following format;

{ip-or-hostname};cisco;up

OR

{ip-or-hostname};cisco;up; LOCATION: {Your test here}

Add Device to Rancid

Note: If you have a device that goes down for maintenance, or is retired but you want to retain its config you change the keyword up to down and Rancid wont try and back it up.

REMEMBER: I have Firewalls and a Switches (Groups) created, so I will add in my switch into the Switches router.db file exactly the same as I did above;

Add Switches to Rancid

For the system to access the remote devices, it needs to know how to gain access, (method}, and a username and password, these are setup in the .cloginrc file. This is the file Rancid uses for Cisco devices if you look in the folder that the file lives in, you will see other login files for other vendors.

nano /home/rancid/.cloginrc

Add Credentials to Rancid

Adding Cisco Device Logins

You will notice (screenshot above, and text below) I’ve used two different methods, the reason I have done this is because the first item (the device on 192.168.100.119) is a Cisco IOS device (it’s actually a CSR1000,) and when I logon as the rancid-user I am ‘automatically’ logged on in enable mode. Cisco ASA Firewalls (like the second entry) only very recently had the ‘auto-enable’ feature added to them (version 9.2(1)) so for older models, you have to login, and then go to enable mode, and then enter a second password. This is why the second entry has two passwords, usually they are the same, but if a specific enable password has been set on the firewall they will NOT be.

Cisco Router / Switch Example

# You can enter some sensible text here to define the device below
add user {ip-or-hostname} {username}
add password {ip-or-hostname} {password}
add method {ip-or-hostname} {ssh or telnet}
add autoenable {ip-or-hostname} 1
#

Cisco ASA Firewall Example

# You can enter some sensible text here to define the device below
add user {ip-or-hostname} {username}
add password {ip-or-hostname} {password} {enable-password}
add method {ip-or-hostname} {ssh or telnet}
#

Now we are pretty much setup, you can test your configuration by running the following command;

/usr/local/rancid/bin/rancid-run

Test Run Rancid

It wont return any output but if you browse to your ViewVC total you ‘should’ now see the configs have been added;

Rancid ViewVC GUI

Rancid ASA Firewall Backup

Rancid Cisco Switches Backup

Troubleshooting Rancid

If you do a test run and it appears nothing has happened then you can look at the logs to see what went wrong.

cd /usr/local/rancid/var/logs/
ls
nano {log-name}

Troubleshoot Rancid

Usually it will give you an error that will point you in the right direction, if the file is completely empty, (i.e. a start time and and end time and nothing else). This usually indicates an error in the router.db file.

Scheduling Rancid Backups

This is done with crontab, which means we need to edit it with vi (I don’t like vi either, see the following article for a 2 minute crash course).

Using the VI Editor (For Windows Types)

Crontab Timing Format

This can also get a bit confusing, to simplify things see the table below,

Requirement Entry/String
Run once a year 0 0 1 1 *
Run once a month 0 0 1 * *
Run once a week 0 0 * * 0
Run once a day 0 0 * * *
Run once an hour 0 * * * *

Note For ‘Human’ time you can specify minutes and hours e.g. 59 23 * * * means run every day at 59 minutes past 11.

So to schedule the Rancid job you first need to logon (or su to) the rancid user. And setup the crontab file using vi.

su rancid
crontab -e

Scheduling Rancid Backups

If you read my link above you will know how to edit in VI 

#
#Rancid Config File
#

#
0 0 * * * /usr/local/rancid/bin/rancid-run
#

#
59 23 * * * /usr/bin/find /usr/local/rancid/var/logs -type f -mtime +30 -exec rm -rf {} \;
#

Crontab Rancid Backups

You can check the crontab config at anytime with the following command

crontab -i

Display Crontab Settings


Related Articles, References, Credits, or External Links

NA


Setup up a Central ‘PolicyDefinitions’ Store (for ADMX files)

$
0
0

KB ID 0001339 Dtd 03/08/17

Problem

We have had ADMX files for group policies for ages now, they are the successor to the older ADM files. They only really trip you up if you have something unusual to do, (like roll out LAPS, or Forefront, or Customising Office Deployments.)

In most cases you will want to have a central store in your Windows domain, so the clients can see the ADMX files, (and ultimately enforce the policies within them). 


Solution

You probably already have ADMX files on your windows clients/servers,  look in C:\Windows\PolicyDefinisions. So if you have installed any new ADMX files, they will get put in this folder on your local machine, (or domain controller).

Do you already have a central PolicyDefinitions store? It’s easy  to find out, from any domain joined machine, run the following command;

\\{Your-Domain-Name}\SYSVOL\{Your-Domain-Name}\Policies

If theres a PolicyDefinitions folder already there, half your work has been done for you!

Copying Files to the Central PolicyDefinitions Store

ADMX Files are usually accompanied by an ADML file, while the ADMX files live in the PolicyDefinitions folder, the ADML files are ‘location specific’, if you look in your PolicyDefinitions folder you will see another sub folder for your ‘locale’. Below you can see mine is en-US (English US) your ADML files will live in here.

ADMX and ADML Files

IMPORTANT: As you can see, (below). I’ve navigated to the PolicyDefinitions folder ON A DOMAIN CONTROLLER, at the following path;

C:\Windows\SYSVOL\sysvol\{Your-Domain-Name}\Policies

DON’T Try and copy the folder, (or ADMX and ADML) files to the network path of SYSVOL, or you ‘may’ get permission errors, (see error below).

You can simply copy the entire PolicyDefitions folder across if it does not already exist, or copy individual ADMX/ADML files (to the folder locations outlined above).

Create Central PolicyDefinitions Store

Now on your domain controller, Administrative tools > Group Policy Management console, create (or edit and existing policy). If you are setup correctly you should see this;

Central PolicyDefinitions Store Setup Correctly

If something is wrong you will see this;

Local PolicyDefinitions Store

Copying PolicyDefinisions and ADMX/ADML Files: Access Denied

If this happens, you need to ensure you are NOT trying to copy folders or files to the network path of the SYSVOL folder, Open the LOCAL path to the SYSVOL folder directly on a domain controller.

PolicyDefinitions Access Denied

Related Articles, References, Credits, or External Links

NA

Server 2012 – Fails Installing .Net 3.5

$
0
0

KB ID 0000924 Dtd 04/08/17

Problem

I needed to add .Net 3.5 to a Windows Server for an application install, but when I added it as a ‘feature’ it failed.

.net fails on 2012

Installation of one or more roles, role services, or features failed.
The source files cannot be found. Try installing the roles, role services, or features again in a new Add Roles and Features Wizard session, and on the Confirmation page of the wizard, click “Specify an alternate source path” to specify a valid location of the source files that are required for the installation. The location must be accessible by the computer account of the destination server
.

Solution

1. Open a command Window (Run as Administrator)

Run cmd as administrator 2012

2. Insert the Server 2012 Install DVD >Execute the following command;

Dism /online /enable-feature /featurename:NetFx3 /All /Source:D:\sources\sxs /LimitAccess

Where D: is the DVD Drive Letter

Manually Install .net 3.5

That Didn’t Work?

I had this problem again this week at a clients site. They were running Server 2012 R2 and needed .Net 2.0 for an application they used. However, when I tried to install it (as above) this happened;

Net Framework error install Server2012

Microsoft Windows [Version 6.3.9600]
(c) 2013 Microsoft Corporation. All rights reserved.
C:\Windows\system32>dism /online /enable-feature /featurename:NetFx3 /ALL /Source:D:\sources\sxs /LimitAccess
Deployment Image Servicing and Management tool
Version: 6.3.9600.17031
Image Version: 6.3.9600.17031
Enabling feature(s)
[===========================66.2%======                    ]
Error: 0x800f081f
The source files could not be found.
Use the "Source" option to specify the location of the files that are required to restore the feature. For more information 
on specifying a source location, see
 http://go.microsoft.com/fwlink/?LinkId=243077.
The DISM log file can be found at C:\Windows\Logs\DISM\dism.log
C:\Windows\system32>

Error: 0x800f081f

So I tried via PowerShell and got this;

Net error Server2012

Windows PowerShell
Copyright (C) 2014 Microsoft Corporation. All rights reserved.
PS C:\Windows\system32> Install-WindowsFeature -name NET-Framework-Core -source D:\sources\sxs

Install-WindowsFeature : The request to add or remove features on the specified server failed.
Installation of one or more roles, role services, or features failed.
The source files could not be downloaded.
Use the "source" option to specify the location of the files that are required to restore the feature. For more
information on specifying a source location, see http://go.microsoft.com/fwlink/?LinkId=243077. Error: 0x800f0906
At line:1 char:1
+ Install-WindowsFeature -name NET-Framework-Core -source D:\sources\sxs
+ ~~~~~~~~~~~~~~~~~~~~~~~~~~~~~~~~~~~~~~~~~~~~~~~~~~~~~~~~~~~~~~~~~~~~~~
    + CategoryInfo          : InvalidOperation: (@{Vhd=; Credent...Name=localhost}:PSObject) [Install-WindowsFeature],
    Exception
    + FullyQualifiedErrorId : DISMAPI_Error__Cbs_Download_Failure,Microsoft.Windows.ServerManager.Commands.AddWindowsF
   eatureCommand
Success Restart Needed Exit Code      Feature Result
------- -------------- ---------      --------------
False   No             Failed         {}

PS C:\Windows\system32>

Error: 0x800f0906

If you are having similar problems, try running the install from Server Manager > Manage > Add/Remote Roles and features, then specify a different source;

Net Install Specify Different Source

Or you can try using the Microsoft .Net Framework Repair Tool;

Net Framework fix utility

There is a ‘known problem’ That is caused by Window update 2966828.

To see if you have it installed, run the following command;

Get-Hotfix | Where HotfixID -match "2966828"

Net-Framwork Status

Above you can see I DON’T have it installed, if you do, then remove it.

Another ‘known problem’ is, if your server has multiple language packs installed, run ‘lpksetup’ and remove any other language packs, (you can add them back afterwards.) So it looks like this;

Net error Language Packs

None of the above worked for me, what I did was download a new ISO image for Server 2012 R2, then I copied the ‘sources’ directory from the ISO to the servers C: drive, then ran the following command;

dism /online /enable-feature /featurename:NetFx3 /ALL /Source:C:\sources\sxs /LimitAccess

Related Articles, References, Credits, or External Links

Server 2012 Instaling .Net with PowerShell

Cisco FirePOWER User Agent – Use With the FirePOWER Management Console

$
0
0

KB ID 0001179 Dtd 14/08/17

Problem

FirePOWER Management Center, will give you a wealth of information on traffic/threats etc. Usually it will tell you what IP the offenders are on, but if you want to know what a USER is doing, then that means you have to look though logs see who had what IP, at what time etc.

So you can install the FirePOWER User Agent on a machine, (this can be a client machine, though I usually put it on a member server). You then tell the the user agent to monitor your active directory server(s) and it keeps a record of which user is where, which it reports back to the FMC for its dashboards and logs.

Note: This is for Version 6.0.0

 You will need to create a user in your domain to query AD with, (just a member of domain users is fine). I typically use svc_firepower as the username.

Solution

Your first challenge is to find the software, you would think it would be with the firewalls or the appliance but no!

FMC AD Agent

In the FMC > System > Integration  >Identity Sources > User Agent  > New Agent > Supply the IP of the server that you are going to install the agent on > OK  > Save.

FMC User agent register

On the DOMAIN CONTROLLER(S) that you will point the agent at, make sure WMI is open on the firewall

Allow WMI on Server Firewall

On the DOMAIN CONTROLLER(S) that you will point the agent at, run wmimgmt.msc > WMI Control Local > Properties > Security > Root > cimv2 > Security.

Firepower Agent rights

Grant your firepower user Remote Enable > Apply > OK.

firepower agent rights

On the DOMAIN CONTROLLER(S) that you will point the agent at, run comexp.msc > Console root > Computers > My Computer > Properties > COM Security > ‘Launch and Activation Permissions’ Section > Edit Limits.

COM Security FirePOWER

Grant your FirePOWER account the Remote Launch and Remote Activation permissions > Apply > OK.

COM Rights FirePOWER AD User

On the Default Domain Controllers Group Policy  > Computer configuration >Policies > Windows Settings > Security Settings > Local Policies > User Rights Assignment > Manage Auditing and security log  >Add in your FirePOWER user.

Note: Allow time for the policy to apply, (or run ‘gpupdate /force‘, or simply force the policy from the GPMC.msc console, (if your domain is 2012)).

manage audit and security log

On the server/machine that you want to install the agent on, run setup.exe (1), if you run setup.msi (2) then only the agent is installed and it will error if you try and launch it.

FirePOWER user Agent

Open the agent and add in your domain controllers.

FirePOWER Monitor AD

Note: Sometimes, you may have the following problem;

FirePOWER Agent – Real-Time Status ‘Unavailable’

Then add in the FMC Management details, go and have a coffee, and check everything has gone green.

Add FMC to FirePOWER User Agent

Finally ensure in the FirePOWER Management Center > Policies > Network Discovery > Users  > Ensure all the methods are selected.

Then on the ‘Networks’ tab > Ensure that your rule has ‘Users’ selected.

Related Articles, References, Credits, or External Links

Original article written  27/04/16

Deploying and Configuring The vCenter Server Appliance

$
0
0

KB ID 0001146 Dtd 21/08/17

Problem

The vCenter Appliance used to be a simple to deploy from OVA, but now you need to deploy it from another machine, (and it has to be a Windows machine).

Solution

Before you attempt to deploy the appliance, ‘pre-create’ its host records in your DNS.

Assign vCenter Appliance Licences

Download the vCenter Appliance .ISO file and mount it on your Windows machine, navigate to the vcsa-iu-installer directory, and run the installer.exe file.

Install vCenter 6.5 Appliance

Install > Next > Accept the EULA > Next > Select Embedded Platform Services Controller* > Next.

*Note: For larger environments you can install the PSC on a separate appliance, and it handles things like single sign on, provisioning and certification etc.

http://www.petenetlive.com/wp-content/uploads/2017/08/003-Deploy-vCenter-6.5-Appliance.png

Enter the details for the ESX server the appliance is getting deployed on > Next > Enter the name for the VC and its root password > Next > Select the deployment type > Next > Select the storage you want to deploy to, and whether you want to use thin provisioning > Next.

Deploying vCenter 6.5 Appliance

Fill in the IP details for the new appliance, and its DNS settings > Next > Finish.

vCenter 6.5 Appliance IP Settings

The appliance will deploy > When completed, you can further configure the appliance > Next  > Enter your NTP settings > Next.

vCenter 6.5 Appliance NTP

Set the SSO configuration* > username  = administrator@vsphere.local > Password = {something complex}, (you will need it in a minute! (DON’T EVER LOOSE THESE CREDENTIALS!!)) > Next > I usually untick CIEP > Next > Finish

*Note: We will configure domain authentication later.

vCenter 6.5 Appliance SSO Settings

It will take while to reconfigure, when complete click the hyperlink > vSphere Web Client > Log on with the credentials you entered above.

Connect to vCenter Appliance

Join the vCenter Appliance to a Domain

You cannot perform domain authentication unless the appliance is a domain member, so first you need to join a domain.

Administration.

Join vCenter Appliance To Domain

System Configuration.

vCenter Appliance Join a Domain

Nodes > {VC name} > Manage > Active Directory > Join.

vCenter Appliance How To Join a Domain

Provide the domain name and an account, (with rights to add machines to the domain) > OK.

vCenter Appliance Domain

Nothing happens! This is normal don’t worry, you need to reboot the appliance, this can take a while (actually it reboots quite quickly, but it will be a while before you can login to the web console) > OK.

vCenter Appliance Reboot

Over in Active directory you will see a new computer object.

vCenter Appliance Domain Joined

The only indication you will see on the appliance, is now you have a domain name, and the ability to ‘Leave’.

vCenter Appliance Domain Joined Leave

Enable Domain Authentication

I’m simply going to add my Domain Admins group to the the administrators group on the Virtual Center, there are a number of different roles on ESX you can map to whatever domain groups you want to create.

Administration > Single Sign On > Configuration > Identity Sources > Add.

vCenter Domain Logon

Active Directory (Integrated Windows Authentication) > Next > You domain should be shown > Next > Finish. 

vCenter Add Domain Logons

Select you domain and set is as the default identity source.

vCenter Add Domain Accounts

Users and Groups > Groups > Administrators > Add.

vCenter Add Domain Administrators

Change the domain to yours, and add in the Domain Admins group > OK

Add Domain Administrators ESX

In ‘Hosts and Clusters‘ view > Select the Virtual Center > Permissions > Add.

Add Domain Authentication to vSphere

Select the Administrators ‘role’ > Then add the Domain Admins group in the same way you did above.

Add Domain Authentication to vCenter

Adding Licences to vCenter

Administration > Licensing > Licences > Licences > Add.

vCenter Appliance Add Licences

Add your licence code(s) > Next > Give them a sensible name > Next > Finish.

vCenter Appliance Licences

Assets Tab > Select the Virtual Center > Assign Licences > Select the appropriate licence > OK.

Assign vCenter Appliance Licences

Deployment, > System Configuration  >Nodes  > Manage  > Advanced > Active Directory > Join.

Note: If you have already added hosts you can assign their licences here also, I will assign the host licences when I add the hosts to the cluster.

Create a vSphere DataCenter

In hosts and Clusters view > Right click the vCenter > New DataCenter > Give it a name > OK

vCenter Appliance Create DataCenter

Create a vSphere Cluster

Right click the DataCenter you have just created > New Cluster > Give it a name > OK

Note: You can enable licensed features here, like DRS, HA, EVC etc. Bur I prefer to do this later.

vCenter Appliance Create Cluster

Adding ESX Hosts to your vSphere Cluster

Right click you cluster > Add Host.

vCenter Appliance Add Host to a Cluster

Enter the name or IP > Next > Enter the root account and password > Next (If you get a certificate warning click OK > Next.

VMWARE ESX Add a Host to a Cluster

Select an appropriate licence, (or select the evaluation licence if you have not yet added any licences) > Next > I always disable lockdown mode > Next > Finish.

VMWARE ESX Add a Host to vCenter


Related Articles, References, Credits, or External Links

Original Article Written 26/01/16

vSphere – Adding Domain Users/Groups to vCenter

VMware ESXi6 – Replacing the Default Certificates

$
0
0

KB ID 0001195 Dtd 22/08/17

Problem

This is pretty much part two of the last article I wrote, so make sure you have the vCenter CA setup as a Sub CA of your Microsoft Certificate Services Deployment. See the following article;

vSphere 6 vCenter Appliance – Replacing Certificates

Now we take the next step, and replace the certificates on the ESXi hosts.

Solution

Note: Joining the ESXi Hosts to the domain is not essential, it just makes things a little smoother. Ensure the host is set with the correct hostname and DNS settings.

ESXi6 Domain and DNS Details

Join the host to your domain.

vCenter 6.5

ESX 6.5 Join Domain

vCenter 6.0

ESXi Join Domain

Supply the domain name and suitable credentials.

ESXi Join AD Domain

Set the domain members to trust the vCenter CA Certificate. Back in part one we issued a SUB CA cert to the vCenter. Now I’m going to get a copy of this certificate, and get all my domain members to trust it, (and by definition all the certificates it issues). Browse to the vCenter https address > And open the certificate properties (click the padlock)  > Certificate path > CA  > View Certificate > Install Certificate.

VMCA Sub CA Certificate

Local machine.

Export CA Certificate

I’m going to put it in Intermediate Certificate Authorities.

Intermediate CA Certificate

Then open an MMC console, and add in the certificate snap-in for Local Computer > Intermediate Certification Authorities > Certificates > Locate the ‘CA’ Certificate.

View Intermediate CA Certificate

Export the certificate.

Export Intermediate CA Certificate

DER encoded is fine.

Intermediate CA Certificate settings

Save it on the root off the C: drive with a sensible name.

Save CA Certificate

Open an administrative command window, and issue the following commands;

certutil -dspublish -f C:\{certificate-name}.cer RootCA
certutil –addstore –f root C:\{certificate-name}.cer

Note: You can use SubCA instead of RootCA.

Add Certificate to Domain Trusted

Now you will see the domain members start to get the CA certificate, (either in Intermediate or Root, depending on the command you issued above).

Certificate Auto Added to Domain Members

Meanwhile back in vCenter Web Client > Right click each host > Certificates > Refresh CA Certificates > Then Refresh Certificate.

ESX Refresh CA Certificate

WARNING: You may see the error below; if you do, it’s a bug don’t panic, there is a fix published on VMware Support. But if you wait 24 hours and attempt to renew the certificates it will work without an error.

Certificate Time Error

A general system error occurred: Unable to get signed certificate for host: esx-host.your-domain.pri. Error: Start Time Error (70034).

You should see something like this;

ESXi View Certificates

If you browse to each ESXi host on https it should connect without errors or warnings.

ESXi Replace Certificates

Related Articles, References, Credits, or External Links

Original Article Written 26/05/16

Viewing all 790 articles
Browse latest View live