Quantcast
Channel: PeteNetLive
Viewing all 808 articles
Browse latest View live

NGINX Error: ’98: Address already in use’

$
0
0

KB ID 0001694

Problem

After an update, (WordPress – unrelated) yesterday, this website fell over! I rebooted the host, site was still down. I reluctantly restored to the previous evenings backup, and powered on the server. Alarmingly the site was still down!

I logged a call to my VPS provider, and attempted to troubleshoot the problem while I was waiting.

Very soon it was apparent my server appeared to be OK, but my web hosting platform (NGINX) was not running, and when I attempted to get it running this happened;

NGINX Wont Start - Address already in use

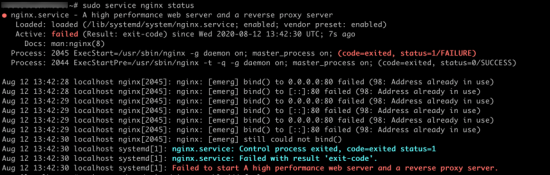
Aug 12 13:42:28 localhost nginx[2045]: nginx: [emerg] bind() to 0.0.0.0:80 failed (98: Address already in use)
Aug 12 13:42:28 localhost nginx[2045]: nginx: [emerg] bind() to [::]:80 failed (98: Address already in use)
Aug 12 13:42:29 localhost nginx[2045]: nginx: [emerg] bind() to 0.0.0.0:80 failed (98: Address already in use)
Aug 12 13:42:29 localhost nginx[2045]: nginx: [emerg] bind() to [::]:80 failed (98: Address already in use)
Aug 12 13:42:29 localhost nginx[2045]: nginx: [emerg] bind() to 0.0.0.0:80 failed (98: Address already in use)
Aug 12 13:42:29 localhost nginx[2045]: nginx: [emerg] bind() to [::]:80 failed (98: Address already in use)
Aug 12 13:42:30 localhost nginx[2045]: nginx: [emerg] still could not bind,()
Aug 12 13:42:30 localhost systemd[1]: nginx.service: Control process exited, code=exited status=1
Aug 12 13:42:30 localhost systemd[1]: nginx.service: Failed with result 'exit-code'.
Aug 12 13:42:30 localhost systemd[1]: Failed to start A high performance web server and a reverse proxy server.

Solution

A Google search kept pointing me towards my config files for NGINX being improperly formatted for port 80, but a) NIGINX has been running fine since the server was built, and b) I update things regularly! But nevertheless I wasted an hour and half going down that road. THIS WAS A BLIND ALLEY, MY NGINX CONFIG FILES WERE FINE! 

Other posts were, (more correctly) telling me something is using that port (TCP 80 or HTTP). So, to find out what;

sudo netstat -plant | grep 80

Ubuntu whats listening on port 80

BOOM! theres my problem Apache, what’s that doing running? I’m pretty sure I (stupidly) managed to install this a while ago, when updating my PHP to the latest version. I’m guessing that this had been a ticking time bomb and my WordPress update and reboot had caused it to explode! This would also explain why a restore didn’t fix the problem!

Lets stop and disable Apache;

sudo systemctl disable apache2 && sudo systemctl stop apache2

Ubuntu Stop and Disable apache

And then (fingers crossed) start NGINX;

service nginx start
sudo service nginx status


Fix NGINX Not Starting

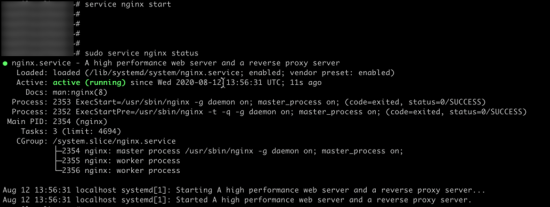
Site back up and running again (lesson learnt!)

Related Articles, References, Credits, or External Links

NA


EVE-NG: Committing / Saving Qemu Virtual Machine Settings

$
0
0

KB ID 0001695

Problem

I’ve been working on a load balancing lab in EVE-NG this last week or so. I created some web servers (in TinyCore Linux,) to act as the web servers in that lab. (Essentially they serve a different colour web page so I can test the load balancing is working OK).

Now I wanted to save the changes I made so that I could redeploy the configured servers to multiple labs. But when you deploy a qemu VM as a node in a lab, EVE-NG copies the VM to the lab, and the changes you make, only apply to the node, in the lab, in the pod, you are working on!

So I wanted to update the ‘Master‘ image in EVE-NG, with the one I configured. Here is how to do that;

Solution

Firstly you need to get your POD NUMBER, you can get that from the user management screen, below you can see my user, (you can see already logged on), is using pod number 1.

EVE-NG Pod Number

Now you need to get the LAB ID NUMBER. Open the lab > Shut down the machine that you want to save the changes from > Lab Details > Copy the lab ID number.

EVE-NG Lab Details

Lastly you need the NODE ID NUMBER. Either  select Nodes and take note of the number, or right click the node and the node ID is shown (in brackets).

EVE-NG Node Number

Armed with those three pieces of information, SSH into the EVE-NG host, and execute the following commands;

cd /opt/unetlab/tmp/POD-NUMBER/LAB-ID/NODE-ID/

for example;

cd /opt/unetlab/tmp/1/2277307f-b0bc-45a4-831f-a89a716b5841/3/

Now depending on the VM/Appliance in question, it may be called hda.qcow2, or virtioa.qcow2 (a quick ls command will tell you!) Take the name and commit the changes with the following command;

/opt/qemu/bin/qemu-img commit hda.qcow2

EVE-NG Commit VM Changes

Job done!

Yes but you wanted three different servers? Correct, I then copied the server (twice) edited the IP address, and the web page served on the two copies and committed the changes back to the original VMs!

Related Articles, References, Credits, or External Links

NA

TinyCore Linux: Build a ‘Persistent’ Web Server

$
0
0

KB ID 0001697

Problem

Recently I was building a lab for testing load balancing, and needed some web servers, I could have built three Windows servers, but I wanted to run them in EVE-NG, so they had to be as light as I could make them. I chose TinyCore Linux, (I know there are smaller options, but it’s light enough for me to run, and work with).

The problem occurs when you reboot the TinyCore host, it (by default) reverts back to its vanilla state, (that’s not strictly true, a couple of folders are persistent).

So I had to build a server that would let me SFTP some web content into it and allow me to reboot it without losing the web content, settings, and IP address.

Step 1: Configure TinyCore IP & Web Server

This is a two step procedure, firstly I’m going to give it a static IP.

sudo ifconfig eth0 192.168.100.110 netmask 255.255.255.0
sudo route add default gw 192.168.100.1

I don’t need DNS, if you do, then simply edit the resolve.conf file;

sudo vi /etc/resolv.conf
Add a value e.g.
Nameserver 8.8.8.8

If you are scared of  the VI editor see Using the VI Editor (For Windows Types)

To connect via SSH/SFTP you will need opnessh installing, and to run the website, we will use Busybox, to install those, do the following;

tce-load -wi busybox-httpd.tcz
tce-load -wi openssh

You will now need to set a password for the root account, (so you can log on and trasfer web files in!)

su
passwd
Type in, and confirm a new password!

Start the OpenSSH, and TFTP services;

cd /usr/local/etc/init.d/
./openssh start
cd /etc/init.d/services/
./tftpd start

Now create a basic web page, (index.html) which you can update later. Setup the website, then copy that file to a location that will be persistent (you will see why later).

cd /usr/local/httpd/bin
sudo ./busybox httpd -p 80 -h /usr/local/httpd/bin/
sudo vi index.html {ENTER SOME TEXT TO TEST, AND SAVE}
sudo mkdir /mnt/sda1/wwwsite/
sudo cp /usr/local/httpd/bin/index.html /mnt/sda1/wwwsite/index.html

At this point, (if you want) you can use your favourite SFTP client, (I recommend FileZilla or WinSCP) and copy in some live web content to /mnt/sda1/wwwsite/ But ensure the home/landing page is still index.html though!

Step 2: Make TinyCore Settings ‘Persistent’

There may be better ways to do this, this just worked for me, and made sense! There’s a shell script that is executed as the TinyCore machine boots (bootlocal.sh) so if you edit that file and put in the commands to configure the IP, copy the website files from the permanent mount folder, start the web server, then start SSH and TFTP, you end up with a server doing what you want, every time the server boots.

sudo vi /opt/bootlocal.sh

ADD THE FOLLOWING TO THE BOTTOM OF THE FILE;

sudo ifconfig eth0 192.168.100.110 netmask 255.255.255.0 
sudo route add default gw 192.168.100.1
cp /mnt/sda1/wwwsite/index.html /usr/local/httpd/bin/index.html
cd /usr/local/httpd/bin/
Sudo ./busybox httpd -p 80 -h /usr/local/httpd/bin/
cd /usr/local/etc/init.d/
./openssh start
cd /etc/init.d/services/
./tftpd start

Save and exit the file, then finally BACKUP THE CHANGES with the following command;

filetool.sh -b

Related Articles, References, Credits, or External Links

NA

The post TinyCore Linux: Build a 'Persistent' Web Server first appeared on PeteNetLive.

EVE-NG Deploying F5 BIG-IP

$
0
0

KB ID 0001696

Problem

I already had some F5 Images in my EVE-NG, but I wanted to run version 16.x. However, I didn’t think that was officially supported, so I thought I would try and get it running anyway!

Solution

Theres no need to scour the internet for ‘dodgy’ versions, F5 will quite happily give you the latest version, just sign up for a free account, and you can download the image. While you are there, you can apply for a trial licence, (or two if you want to test HA).

Important: I use FileZilla to upload images into EVE-NG, make sure your transfers are set for ‘binary’ I’ve seen this break things in the past, so mines already setup to use that by default;

Upload the image into EVE-NG, (I’ve shown the location, on the image below).

Upload BIG-IP to Eve-NG

Now, SSH into EVE-NG, extract/unzip the image, then copy/rename it to virtioa.qcow2, remove the ZIP file, and finally fix the permissions; (Change the values in bold (below) to match your version);

cd /opt/unetlab/addons/quemu/bigip-16.0/
unzip BIGIP-16.0.0-0.0.12.ALL.qcow2.zip
mv BIGIP-16.0.0-0.0.12.ALL.qcow2 virtioa.qcow2
rm BIGIP-16.0.0-0.0.12.ALL.qcow2.zip
/opt/unetlab/wrappers/unl_wrapper -a fixpermissions

Install F5 Big IP on EVE-NG

You can now add a BIG-IP LTM VE into your lab.

Deploy BIG-IP to Eve-NG

Select Version 16 > Scroll down.

Deploy F5 to Eve-NG

Change the Console to VNC > Save.

Deploy F5 to Eve-NG Console

Power it on.

F5 on Eve-NG

Log in, the DEFAULT USERNAMES AND PASSWORDS are;

Username: root Password:default

Username: admin Password: admin

You will be asked to change the passwords. (Note: The admin password may expire straight away so you will need to change it again when you log into the web console!)

F5 on Eve-NG default password

To ‘Get Access’ you will need to configure the Management Network on the F5, to do that run the config command.

F5 on Eve-NG Initial Setup

I don’t wish to insult your intelligence by walking though these steps, set an IP address and subnet mask on the management port.

F5 on Eve-NG MGMT Setup

In ‘Most” cases you wont want a default route on the management network, (normally that’s set on the ‘External‘ network).

F5 on Eve-NG No Default Route

Now browse to the appliance from a host on the management network, you will need to log on as the ‘admin‘ user, and (as I mentioned above), I needed to reset the password again!

F5 on Eve-NG Reset admin password

Now you can configure the appliance, when your trial licences, (unless you bought some lab licences,) come through.

F5 on Eve-NG Initial Setup

Related Articles, References, Credits, or External Links

NA

The post EVE-NG Deploying F5 BIG-IP first appeared on PeteNetLive.

F5: Setup Basic Web Load Balancing

$
0
0

KB ID 0001698

Problem

In past articles I’ve got my F5 BIG IP appliance up and running, and I’ve built some web servers to test load balancing. Now to actually connect things together and start testing things. Below is my lab setup, I will be deploying simple web load balancing (Static: Round Robin) between three web servers, each serving a simple HTTP web site.

F5 Lab Topology web load balance

Test F5 to Web Server Connectivity

For obvious reasons the F5 needs to be able to speak to the web servers, so it needs to be on the same network/VLAN and have connectivity. To test that we can log onto the the F5 console directly, and ‘ping’ the web servers.

F5 Ping Web Server

So connectivity is good, let’s make sure we can actually see the web content on those boxes, the best tool for that is to use curl, which will make a web request, and the wen server ‘should’ return some HTML.

curl http://10.2.0.11

F5 BIG-IP Load Balancing Terminology

Yeah I said ‘load balancing‘ and not ADC sue me! There are a number of building blocks that F5 uses, and you need to understand the terminology to put things together, firstly lets look at things BEHIND the F5 appliance;

F5 Nodes Pools and Pool Members

  • Node: An actual machine/appliance, (be that physical or virtual.) That provides some sort of service or a collections of services e.g. a web server, telnet server, FTP site etc.
  • Pool Member: Is a combination of a Node AND a Port/Service, e.g. 192.168.1.100:80 (IP address and TCP port 80 (or HTTP)).
  • Pool: A Logical collection on Pool Members, that provide the same service e.g a collection of pool members offering a website on TCP port 80.

F5 BIG-IP Adding Nodes

While connected to the web management portal > Local Traffic > Nodes > Create (Note: You can also press the green ‘add’ button on the Node pop-out on newer versions).

F5 Add Nodes

Specify a name > Description (optional) > IP address (or FQDN) > ‘Repeat‘ > Continue to add Nodes as required, then click ‘Finished‘.

F5 Add Nodes

F5 BIG-IP Adding Pools

Now we have our Nodes, We need to create a Pool. Local Traffic > Pools > Create, (again on newer versions theres a green add button on the pop-out).

F5 Add Pool

Add a Name > Description (Optional) > Add an applicable Health Monitor (in our case http) > Select the ‘Node List’ radio button > Select your first Node > Set the Port/Service  > Add  > Continue to Add the remaining Nodes.

Note: Here is where you add the IPs to the Port/Service and create the Pool Members.

F5 Add Web server to Pool

Sorry! Busy Screenshot

When all the Nodes are added > ‘Finished‘.

F5 Web Farm

Your web pool ‘should‘ show healthy, Note: that does not mean ALL the nodes are online!

F5 Healthy Web Pool

To make sure ‘all’ the Nodes are healthy > Go to the Members Tab.

F5 Pool Members Health

F5 BIG-IP Virtual Servers

I’m not a fan of using this term ‘Virtual Server‘ I prefer Virtual IP (or VIP,) but we are where we are! Above we’ve looked at things BEHIND the F5, now we need to present those services IN FRONT of the F5 (Note: I don’t say publicly, because we deploy plenty of BIIG-IP solutions inside  networks). So a Virtual Server is the outside IP address or FQDN of that a ‘consumer’ will connect to;

F5 Virtual Server

Local Traffic > Virtual Servers > Create.

F5 LTM Virtual Server

Supply a name > Description (optional)  > Destination Address (the ‘available outside’) IP address > Set the service/port > Scroll down to the bottom.

F5 LTM Virtual Server Address VIP

Set the ‘Default Pool’ to the pool you created (above) > ‘Finished‘.

F5 LTM Virtual Server Address Pool

For a brief overview or check what you have created  > Click Local Traffic > Network Map Note: This will look different on older versions of the F5.

F5 LTM Network Map

Then test the service form the outside, here each web server serves a different colour page so I can test it’s working properly.

My Web Page Does Not Change? If you keep seeing the same colour/page then it’s probably because you chose browser is ‘caching’ web content on your test machine, you may need to disable caching on your chosen web browser, for an accurate test.

F5 Test Load Balancing

So that’s Static Round Robin (Equal Ratio) Based Load Balancing. In the next article I’ll look at how you can manipulate the ratios, to better serve your hardware, and requirements.

Related Articles, References, Credits, or External Links

NA

The post F5: Setup Basic Web Load Balancing first appeared on PeteNetLive.

AnyConnect: Unauthorized Connection Mechanism

$
0
0

KB ID 0001699

Problem

I was assisting a colleague to setup some AnyConnect for a client this afternoon, when all of a sudden I was met with this;

VPN

Logon denied, unauthorised connection mechanism, contact your administrator

Solution

This was a confusing one, I replicated the problem on my own test firewall. All I had done was change the AAA method from LOCAL to LDAP? It took me a while to figure out what was going on?

The reason why this is happening is because the GROUP POLICY your AnyConnect PROFILE is using does not have SSL enabled. (This makes no sense as it was working with LOCAL authentication, but this is how I fixed it).

You will be either using a specific group policy or the DfltGrpPolicy

IF USING THE DEFAULT GROUP POLICY
Petes-ASA(config)# group-policy DfltGrpPolicy attributes
Petes-ASA(config-group-policy)# vpn-tunnel-protocol ssl-client ssl-clientless

IF USING A SPECIFIC GROUP POLICY (Remember to include any, that already exist! e.g. l2tp-ipsec)

Petes-ASA(config)# group-policy PNL-GP-ANYCONNECT-ACCESS attributes
Petes-ASA(config-group-policy)# vpn-tunnel-protocol ssl-client ssl-clientless l2tp-ipsec 

Or, if you really HAVE TO use the ASDM.

Configuration > RemoteAccess VPN > Network (Client) Access > Group Policies > Select the Group Policy you are using > Edit.

General > More Options > Tick the SSL Options > OK > Apply.

Don’t forget to save your changes! Then try connecting again.

Related Articles, References, Credits, or External Links

NA

The post AnyConnect: Unauthorized Connection Mechanism first appeared on PeteNetLive.

F5: Static Load Balancing (Ratios)

$
0
0

KB ID 0001700

Problem

In the previous post, we deployed a web load balanced solution with three web servers. Out of the box the BIG-IP solution will use Round Robin load balancing and it will treat all Nodes or Pool Members the same, (it assigns a RATIO OF 1).

F5- Node Ratio All 1

Everything gets weighted the same, and the F5 will send requests to the Nodes or Pool members one at a time.

F5- Node Ratio Equal

But what if one of those web servers was a beast of a machine, with much better CPU/RAM than all the others? How do you ensure that gets sent the ‘Lions share’ of the traffic?

Solution

Well you can simply alter the Ratio for that server, you can do that directly on the Node, or you can do it within the Pool on a Pool Member. (That’s why you can see 6 ratios in the examples I’ve posted).

What if I change the Ratios on Nodes AND Pool Members: You can do that, but the load balancing method uses one or the other. So they wont conflict.

So let’s say 10.2.0.11 is a brand new server and has ten times the processing power of the other two nodes like so;

F5- Node Ratio Uneven

Local Traffic > Nodes > Select the node in question > Change the Ratio accordingly > Update.

F5- Change Node Ratio

Nothing will happen until you change the load balancing method of the Pool. On the properties of the Pool, change the Load Balancing Method to Ratio (node) > Update.

F5 Change Pool Load Balance

If you reset the counters and wait a while, you can see now that the server is getting (more or less*) 10 times the amount of traffic.

*Note: The maths will never be perfect, and my web pages are all ‘very slightly’ different, which is amplified over time.

F5 Change Pool Ratio Testing

Changing F5 Pool Member Ratios

The process is similar, (if you are following along, you might want to change your Node value back to ‘1, not that it will affect anything, it’s just if you are like me you will forget!) So now let’s say we’ve got a new server and its 10.2.0.13, and we want to change the ratio on the Pool Member like so;

F5- Pool Member Ratio Uneven

Open the Pool > Select the Node from here.

F5- Change Pool Member Ratio

Change there ratio here > Update.

F5- Change Pool Member Ratio

Now change the Load Balancing Method to Node (member) > Update  >Note: Here, ratios are shown on the Pool page.

F5- Change Pool Balance Ratio

Reset your counters, and wait a while, you will see the other server is now getting most of the traffic.

F5- Change Pool Balance Ratio

In large production environments, you will probably want to use Dynamic Load Balancing methods, so I’ll look at those next.

Related Articles, References, Credits, or External Links

NA

The post F5: Static Load Balancing (Ratios) first appeared on PeteNetLive.

AnyConnect: ‘Quick and Dirty’ Duo 2FA

$
0
0

KB ID 0001701

Problem

Normally if I were deploying Duo 2FA with AnyConnect I’d deploy a Cisco RADIUS VPN on my LAN, (usually on my Duo Authentication Proxy). See the following article;

AnyConnect: Enable Duo 2Factor Authentication

However, last time I set this up, a colleague said ‘Oh by the way, you don’t need to do that, you can just point the firewall directly at Duo‘. I was initially skeptical but I tried it, and it worked. I thought no more about it until this week when another colleague asked me to help him setup Duo for AnyConnect.

As you can see the firewall queries Duo using LDAPS, but the Duo product I’m using is called ‘Cisco RADIUS VPN’. This makes my networking OCD itch tremendously! (RADIUS and LDAPS are completely different protocols!) But it works, so here we go.

Solution

Note: For this solution you don’t even need to sync your users to Duo, (but it’s OK if you do)! As long as the users exist there.

With Duo, you need to select ‘protect an application‘ and select ‘Cisco RADIUS VPN‘. If you are unfamiliar with Duo you need to take a copy of the Integration Key, the Secret Key and the API Hostname. (Note: Don’t try using these ones, they have been changed!)

On the Firewall > Configuration > Device Management > Users/AAA > AAA Server Groups > AAA Server Groups > Add > Call it ‘DUO-EXTERNAL’ > Select LDAPS > OK.

With your DUO-EXTERNAL group selected > In the bottom window > Add.

  • Interface Name: {Your outside interface name}
  • Servername: {Your Duo API Hostname}
  • Timeout: 60 
  • Enable LDAP over SSL: Enabled
  • BaseDN: dc={Your Integration Key},dc=duosecurity,dc=com
  • Naming Attribute: cn
  • Login DN: dc={Your Integration Key},dc=duosecurity,dc=com
  • Login Password: {Your Secret Key}

OK > Apply.

TO TEST: Press Test > Select Authentication > Use the username displayed in Duo > Type push into the password box, and your phone should then prompt for 2fa authentication. (If it fails: Make sure the time is correct on the ASA, and at least do some debugging before posting below!)

Now either create a new AnyConnect profile, and use this new AAA method, or simply change the AAA method for an existing AnyConnect profile, (like below).

A word of warning, when I did this, (both in production and on my test ASA,) I got a strange error, I’ve documented that and the fix, below.

AnyConnect: Unauthorized Connection Mechanism

Related Articles, References, Credits, or External Links

NA

The post AnyConnect: 'Quick and Dirty' Duo 2FA first appeared on PeteNetLive.


Hard Drive Full?

$
0
0

KB ID 0000012

Problem

The fact that I’m going back to re-write article 0000012, should tell you this is an omnipresent problem! Either very suddenly, or slowly over time you have a drive or a volume that’s full to bursting point. These days with laptops which have smaller SSD drives it’s a common problem.

I’ve seen literally hundreds of post in forums, most of them are answered with ‘Use WinDirStat’, or ‘Use TreeSize’. Techies seem to be a fan of one or the other, and stick with the tool that’s served them best.

What If There’s No Room To Install Either Of these?

Good point, then you can use PowerShell, I’ll cover that below also. Well I said everyone has a favourite solution, here’s mine,

WinDirStat

My weapon of choice, install it and give it the drive you want to analyse;

Hard Drive Full

When it’s finished, you will see something like this;

Hard Drive Filling up

So you get a graphical representation of the drive, and you can see TWO things straight away, firstly you can spot large files, click on them and it will tell you what they are. Secondly it groups ‘Types’ of files together, if you just look at folder sizes it can be misleading e.g. The ‘red’ files above are my MP3 Collection, I know that folder is massive and I expect it to have a lot of stuff in it. But in some cases this is great! e.g. If your IIS server is churning out logs and theres a folder with millions of them in it, you will spot it straight away.

Why Do I Prefer This? I prefer the graphical front end, I can send a screen shot to client, and they understand what’s happening, and it’s always been free. (There is a free version of TreeSize in fairness). I just like this one.

TreeSize

Once you’ve installed simply select the drive in question,

You can then drill down folders which are sized based on usage. One thing I do like about TreeSize is, it knows the difference between file size and actual size, and you can swap views accordingly. But I’ve included it here so every-time I post this article link in a forum, you can see both and make your own mind up.

PowerShell

This is really a PowerShell version of using the same approach TreeSize uses. You need a PowerShell plugin called PSFolderSize, then simply navigate to the the drive in question and run Get-FolderSize.

Install-Module PSFoldersize
cd {Drive-Letter}:
Get-FolderSize

PowerShell Hard Drive Full

You can then drill down {cd folder-name} one at a time repeating the same command.

PowerShell Diagnose Hard Drive Full


Related Articles, References, Credits, or External Links

NA

The post Hard Drive Full? first appeared on PeteNetLive.

Safari: Not Showing all Bookmarked Favourites

$
0
0

KB ID 0001702

Problem

Recently my Safari browser on my MacBook updated, somehow this managed to break Microsoft Edge, a reboot fixed that. The problem was, it was now only showing a ‘reduced‘ number of bookmarks from my favourites, (only 24 bookmarks) i.e.

Bookmarks Dissapeared Safari

Even if I clicked in the navigation bar, (only 12 bookmarks) from my favourites;

Safari not showing all bookmarks


Solution

A Google search didn’t turn up the answer, clicking on the setting logo on the home page didn’t offer any clues, neither could I find any settings in ‘Preferences’ that might have fixed it.

I found the answer quite by accident, there is an option to  ‘show more‘, but it’s hidden unless you hover over/near it. 

Safari show all bookmarks

And

Safari Show More Bookmarks

Everything is back where it belongs!

Related Articles, References, Credits, or External Links

NA

https://www.petenetlive.com/KB/Article/TechTerms#HERE!

The post Safari: Not Showing all Bookmarked Favourites first appeared on PeteNetLive.

Windows Server 2019 (&2016): Enable Flash

$
0
0

KB ID 0001484

Problem

Back in server 2012 this was an easy fix;

Windows Server 2012 – Enable Flash

However try and do that on Server 2019 or 2016 and this happens;

Windows PowerShell Copyright (C) 2016 Microsoft Corporation. All rights reserved.

PS C:\Users\administrator.PNL> Install-WindowsFeature Desktop-Experience

Install-WindowsFeature : ArgumentNotValid: The role, role service, or feature name is not valid: ‘Desktop-Experience’. The name was not found. At line:1 char:1 + Install-WindowsFeature Desktop-Experience + ~~~~~~~~~~~~~~~~~~~~~~~~~~~~~~~~~~~~~~~~~ + CategoryInfo : InvalidArgument: (Desktop-Experience:String) [Install-WindowsFeature], Exception + FullyQualifiedErrorId : NameDoesNotExist,Microsoft.Windows.ServerManager.Commands.AddWindowsFeatureCommand

Success Restart Needed Exit Code Feature Result ——- ————– ——— ————– False No InvalidArgs {}

PS C:\Users\administrator.PNL>

Solution

Note: You need Server Datacenter version to do this.

If you o to the flash website and it (wrongly,) thinks you are using Windows 10 (we it’s the same code, I’ll let them off,) and it also says “it’s already installed just enable it”, but it’s not there?

Flash Missing Server 2016

You need to install it with the following command;

Server 2019

dism /online /add-package /packagepath:”C:\Windows\servicing\Packages\Adobe-Flash-For-Windows-Package~31bf3856ad364e35~amd64~~10.0.17763.1.mum”

Install Flash on Server 2019

Server 2016

dism /online /add-package /packagepath:”C:\Windows\servicing\Packages\Adobe-Flash-For-Windows-Package~31bf3856ad364e35~amd64~~10.0.14393.0.mum”

Install Flash on server 2016

You will then need to reboot!

Post reboot, you will see Windows Server will now download updates for Flash, and it’s enabled.

Related Articles, References, Credits, or External Links

NA

The post Windows Server 2019 (&2016): Enable Flash first appeared on PeteNetLive.

Exchange 2019: How Many CALs/SALs Do You Need?

$
0
0

KB ID 0001703

Problem

At his point I’m going to assume you know that there are Standard Exchange CALs/SALs, and Enterprise Exchange CALs/SALs. And you know the difference! If you’re unsure see my comments here

With older versions of Exchange 2010/2007 etc. You could get this information from the GUI. Now you need to use some PowerShell.

Solution

The two commands you want to use are;

Find Out How Many Exchange Standard CALs / SALs Are Required

Get-ExchangeServerAccessLicenseUser -LicenseName (Get-ExchangeServerAccessLicense | ? {($_.UnitLabel -eq "CAL") -and ($_.LicenseName -like "*Standard*")}).licenseName | measure | select Count

Find Out How Many Exchange Enterprise CALs / SALs Are Required

Get-ExchangeServerAccessLicenseUser -LicenseName (Get-ExchangeServerAccessLicense | ? {($_.UnitLabel -eq "CAL") -and ($_.LicenseName -like "*Enterprise*")}).licenseName | measure | select Count

Sit back, light your pipe, and admire your handiwork!

Related Articles, References, Credits, or External Links

NA

The post Exchange 2019: How Many CALs/SALs Do You Need? first appeared on PeteNetLive.

VMware: Cannot Resize a VMs Hard Drive?

$
0
0

KB ID 0001704

Problem

One of the lads in support messaged me this week, he needed to raise the size of the hard drive on a VM, and the option was greyed out (not available). 

Solution

Now assuming you actually have the rights to do this, the problem is ‘nearly always‘ that the ‘disk’ in question has an active snapshot on it. Remove your snapshots first.

VMware Delete Snapshots

Now you can raise the size.

VMware Resize VM Drive

Don’t forget: In your OS you will then need to increase the volume size to accommodate the additional space!

Related Articles, References, Credits, or External Links

Resizing (Shrinking) Drives With VMware Standalone Converter

The post VMware: Cannot Resize a VMs Hard Drive? first appeared on PeteNetLive.

Which Firepower To Replace Your ASA 5500-X?

$
0
0

KB ID 0001705

Problem

Well (at time of writing) only the ASA5516-X remains on sale (officially.) You may be able to get stock of the remainder of the ASA5500-X series as people clear their shelves, or they may be available as ‘refurb’ stock but they are disappearing.

Replace ASA models with Firepower

So you would think that the replacements would be better documented? Well it’s sketchy at best, and when you look a the data sheets for the new FPR range the links on Cisco website go to the wrong place, or give you little or no guidance 🙁

Solution

I’ve put together the following to help, it’s not sanctioned by Cisco, (though I did engage Cisco Partner GVE to assist me. The following table shows FPR models that run ASA code, (not FTD code). I’m not a fan personally of the FTD solution, and I wont be deploying it anywhere for a client. But Standard Asa code keeps my support and network techs happy.

ASA models Compared to Firepower

If you disagree with any of my recommendations, please post below, and (providing your objection is valid,) and I’ll update it accordingly.

Related Articles, References, Credits, or External Links

NA

The post Which Firepower To Replace Your ASA 5500-X? first appeared on PeteNetLive.

Exchange – Move ‘ALL’ Mailboxes From One Database to Another

$
0
0

KB ID 0000864 

Problem

While replacing an Exchange Server on my test network last week, I needed to get all the mailboxes moved across to the new one. Exchange gets upset if you try and delete a mailbox database that has data in it.

Solution

1. Launch the Exchange Management Shell > Firstly lets get the names of my Databases, then I can simply copy and paste them into the move mailbox command.

Get-MailboxDatabase

Get-Mailbox -Database Source Database Name -ResultSize Unlimited | New-MoveRequest -TargetDatabase Target Database Name

Move All Mailboxes to Another Database

2. The Mailbox moves should then be queued, depending on how many there are, this can take some time to complete.

Remove all move requests

3. To check on progress issue the following command;

Get-MoveRequestStatistics -MoveRequestQueue Target Database Name


4. When complete you should remove the movement requests like so;

Get-MoveRequest | where {$_.status -eq “Completed”} | Remove-MoveRequest

Remove all move requests

5. That’s all the ‘user’ mailboxes, but your source database server may have system mailboxes in it. These will be either Arbitration mailboxes, or Archive Mailboxes (or both). I don’t have any archive mailboxes, but I do have Arbitration mailboxes. To find out for your databases, use the following commands;

Get-Mailbox -Database Source Database Name -Arbitration

6. To move Arbitration and Archive mailboxes, use the following commands;

Get-Mailbox -Database Source Database Name -Arbitration | New-MoveRequest -TargetDatabase Target Database Name

Get-Mailbox -Database Source Database Name -Archive | New-MoveRequest -TargetDatabase Target Database Name

Move Arbitration Mailboxes

7. You can monitor progress with the same command you used in step 3, and remove the move requests with the same command you used in step 4.

8. In addition you may also have some Auditlog mailboxes like so;

Get-Mailbox -Database Source Database Name -Auditlog | New-MoveRequest -TargetDatabase Target Database Name

Move Auditlog Mailboxes

9. Also you may have Monitoring Mailboxes, (In the screenshot below you can see I don’t have any archive mailboxes, as the command returns no results)

Get-Mailbox -Database Source Database Name -Monitoring | New-MoveRequest -TargetDatabase Target Database Name

Move Archive and Monitoring Mailboxes

10. When complete remove the move requests;

Get-MoveRequest -MoveStatus Completed | Remove-MoveRequest

emove Archive and Monitoring move requests

11. Finally on Exchange 2013 (and newer) you may also have Public Folder Mailbox(s).

Get-Mailbox -Database Source Database Name -PublicFolder | New-MoveRequest -TargetDatabase Target Database Name

Move Public Folder Mailboxes

Don’t forget to remove any outstanding move requests.

Related Articles, References, Credits, or External Links

NA

The post Exchange - Move 'ALL' Mailboxes From One Database to Another first appeared on PeteNetLive.


Can I ‘Shrink’ My Exchange Database?

$
0
0

KB ID 0001706

Problem

Saw this asked in a forum today, and my response was;

It never gets smaller, if you delete things out of it, it just creates more ‘whitespace’ within the database, unless you;

a) Take it offline, and defragment it using eseutil.
b) Move the mailboxes out of it, to another database and delete it.

Which is true, but even Microsoft say you should not need to defragment a database! Before you do anything make sure you have a good backup of Exchange and the mailbox databases!

Defragment an Exchange Database

Stop! Why are you doing this, if it’s because you are running out of room, then migrating mailboxes out of a database into another database, on another piece of storage with more room is what you should be doing, and does not involve long periods of downtime!

If you have just deleted hundreds of GB from a mailbox database, and you simply want to compress the DB, and you have a BIG window for downtime, (allow 1 hour for every 9GB of database size). Then you are in about the only use case scenario I can think of to want to do this!

Before You start: This process creates a temporary mailbox database, (you need to tell it where), if you are pressed for room, I suggest you add another volume/drive and put it there. (Though in my example I have room in the same folder). Allow for the entire database’s existing size plus ten percent to be on the safe side.

Let’s have a look, and see how  much room we might be able to reclaim (whitespace);

Get-MailboxDatabase -Status | Select Name, DatabaseSize, AvailableNewMailboxSpace

The database has to be dismounted before you can run Eseutil on it (downtime starts here).

Dismount –Database Database Name

Eseutil /d C:\Folder\DatabaseName.edb> /t T:\Folder\TempDB.edb>"

When complete, mount the datastore again, (downtime ends here).

Mount-Database Database Name

Mount Exchange Database

Hopefully you should see the whitespace has decreased.

Show whitespace Exchange after eseutil

Don’t forget to set off a full backup of the store as soon at it’s back online.

Move Mailboxes To Another Exchange Database (To Reclaim Space)

This is the much more elegant solution, create a shiny new database move everything  from the old database into the new one, and delete the old database.

Will This Impact My Users? Any user using their mailbox while it is getting moved wont be affected, until the move is complete then they will see a popup that looks like;

Administrator Change Restart Outlook

The Microsoft Exchange administrator has made a change that requires you quit and restart Outlook.

Cool eh! So lets start by creating a New Mailbox Database.

New-MailboxDatabase -Name New Database Name -EdbFilePath C:\Folder\DB-Name.edb -LogFolderPath C:\Folder\Folder\

Exchange Create New Database

Make sure you follow the advice and restart the information store, (yes you can mount the new DB and proceed, but Exchange does not allocate the resources correctly if you do this).

Restart-Service MSExchangeIS

Powershell Restart Information Store

Let’s move our ‘Normal’ mailboxes to the new DB.

Get-Mailbox -Resultsize Unlimited | New-MoveRequest -TargetDatabase Target Database Name

Move All Mailboxes to Another Database

Depending on how many (and how large) mailboxes there are this can take a while, (days for large databases!) When they’ve all completed you need to remove the  move requests, (if you have any failures, or speed issues use the search box above, I’ve had to cope with thousands of these things not working correctly in my time!)

Let’s assume we are all moved, so we want to remove the move requests.

Get-MoveRequest -MoveStatus Completed | Remove-MoveRequest

Remove all move requests

Now let’s see if we have any Arbitration Mailboxes, we do so let’s shift them;

Get-Mailbox -Database Source Database Name -Arbitration

Get-Mailbox -Database Source Database Name -Arbitration | New-MoveRequest -TargetDatabase Target Database Name

Move Arbitration Mailboxes

Again, when complete, remove the move requests.

Get-MoveRequest -MoveStatus Completed | Remove-MoveRequest

Remove Arbitration Mailbox move requests

Now let’s see if we have any Auditlog Mailboxes, we do so let’s shift them;

Get-Mailbox -Database Source Database Name -Auditlog

Get-Mailbox -Database Source Database Name -Auditlog | New-MoveRequest -TargetDatabase Target Database Name

Get-MoveRequest | Get-MoveRequestStatistics

Get-MoveRequest -MoveStatus Completed | Remove-MoveRequest

Move Auditlog Mailboxes

Now let’s see if we have any Archive Mailboxes, we do NOT so I will skip them, let’s check for Monitoring Mailboxes, we have those so let’s move them;

Get-Mailbox -Database Source Database Name -Archive

Get-Mailbox -Database Source Database Name -Monitoring

Get-Mailbox -Database Source Database Name -Monitoring | New-MoveRequest -TargetDatabase Target Database Name

Move Archive and Monitoring Mailboxes

And clean those up as before.

Get-MoveRequest | Get-MoveRequestStatistics

Get-MoveRequest -MoveStatus Completed | Remove-MoveRequest

emove Archive and Monitoring move requests

Finally let’s see if we have any Public Folder Mailboxes, we have one of those so let’s move that;

Get-Mailbox -Database Source Database Name -PublicFolder

Get-Mailbox -Database Source Database Name -PublicFolder | New-MoveRequest -TargetDatabase Target Database Name

Move Public Folder Mailboxes

We now need to remove the ‘Source‘ Database but first we need to dismount it.

Dismount-Database OLD Database Name

Remove-MailboxDatabase -Identity OLD Database Name

Dismount and delete Mailbox Database

I get an error message saying I cant delete the database.


Related Articles, References, Credits, or External Links

NA

The post Can I 'Shrink' My Exchange Database? first appeared on PeteNetLive.

Cannot Open Exchange Management Shell

$
0
0

KB ID 0001706

Problem

When attempting to open the Exchange Management shell you see the following;

Cannot Open Exchange Management Shell

         Welcome to the Exchange Management Shell!

Full list of cmdlets: Get-Command
Only Exchange cmdlets: Get-ExCommand
Cmdlets that match a specific string: Help **
Get general help: Help
Get help for a cmdlet: Help  or  -?
Exchange team blog: Get-ExBlog
Show full output for a command:  | Format-List

Show quick reference guide: QuickRef
VERBOSE: Connecting to {mail server}
New-PSSession : [{mail server}] Processing data from remote server {mail server} failed with the
following error message: [ClientAccessServer={mail server}BackEndServer={mail server},RequestId=f092f550-6451-
4dea-820d-20322101874a,TimeStamp=08/10/2020 09:24:58]
[AuthZRequestId=eb185d5f-6a49-471f-9267-ad0ce9231d0f][FailureCategory=AuthZ-CmdletAccessDeniedException] The user
"DOMAIN/{User-Name}" isn't assigned to any management roles. For more information, see the
about_Remote_Troubleshooting Help topic.

When this happens you may also see Event ID 258 get logged;

Event ID 258

Log Name:      Application
Source:        MSExchange RBAC
Date:          {date} {time}
Event ID:      258
Task Category: RBAC
Level:         Error
Keywords:      Classic
User:          N/A
Computer:      {Mail Server}
Description:
(Process 9680, PID w3wp.exe)"RemotePS Public API Func GetApplicationPrivateData throws Exception Microsoft.Exchange.Configuration.Authorization.CmdletAccessDeniedException: The user "{Domain/user-name}" isn't assigned to any management roles.

Solution

I’ve highlighted the most pertinent text in the error messages (above), that being;

The user “{Domain/User-Name}” isn’t assigned to any management roles.

For once Microsoft error messages are actually quite descriptive and helpful! The user that you are attempting to open the Exchange Management Shell with does not have the Exchanger administrative rights to do so! Typically to manage Exchange you need to be a member of the ‘Organization Management’ group, (my Englishness OCD hates that spelling!) Exchange Organizationla Managment

So, (obviously using your administrative account NOT you normal user account ;P ) Add yourself to that group.

Add User To Exchange Organizationla Managment

Remember, granting rights via a ‘group‘ means you will have to log off, and then back on again, before you actually get those rights.

Related Articles, References, Credits, or External Links

NA

The post Cannot Open Exchange Management Shell first appeared on PeteNetLive.

VMware: Find Connected ISO’s

$
0
0

KB ID 0001708

Problem

If you want to search your VMware estate to find VMs that have connected CD/DVD ISO files, then here are your best two options;

Option 1: Use PowerCLI

Whilst connected to your virtual infrastructure (Connect-VIServer) issue the following command;

Get-VM | FT Name, @{Label="ISO file"; Expression = { ($_ | Get-CDDrive).ISOPath }}

Option 2: Use PowerCLI

If you don’t already have RVTools then get it downloaded! One of the many cool things it does, is show ISO data. (On the vCD tab).

Ejecting All Connected VMware ISO files.

If you want to eject all those ISO files you can use the following PowerCLI syntax;

Get-VM | Get-CDDrive | where {$_.IsoPath -ne $null} | Set-CDDrive -NoMedia -Confirm:$False

Note This will not work if a VM is powered off, and you will see a “The operation is not allowed in the current state.” error.

Related Articles, References, Credits, or External Links

NA

The post VMware: Find Connected ISO's first appeared on PeteNetLive.

Adsense: ‘We’ve detected an error on your IAB TC string’

$
0
0

KB ID 0001709

Problem

A couple of weeks ago I logged into Adsense and saw this;

Adsense Issue on your IAV TC String

‘We’ve detected an error on your IAB TC string on one or more of your sites or apps. These errors may affect your ability to serve ads to European users. A detailed report is available for you on the EU user consent page’.

Solution

Well all of that made no sense to me, so I downloaded the report, which is a spreadsheet and it looked like this;

Adsense TCF Error Report

Erm OK, so what’s error 2.1a? well it’s this;

Erro 2.1a TCF

Everything I read didn’t make much sense, and a search of Google revealed a ton of things that made little or no sense to me.

Why Am I Seeing European IAM TC String Errors?

In short: People in Europe are protected by the GDPR. This says, (very basically) that website visitors should be ‘asked’ what their Ad preference, and tracking cookie preferences are, BEFORE the website can show them any ads, or attempt to embed tracking cookies, (like the ones Google uses), on their machines.

This is why you will notice most sites you go to now ask you about cookies and ads the fist time you visit,  you generally then tick a box that says ‘accept preferences‘, or ‘that’s fine‘, and you are bothered no more.

So that’s basically the root cause of the problem. Well I run my website on WordPress so “There will be a plugin for that right?” I tried a few and settled on UniConsent CMP. I installed it, and enabled cover for GDPR, (and CCPA compliance).

Note: Sign up for a free licence, then you can manage everything directly at UniConsent.

Extra Tip: Go To Consent Manager Version 2 > Manage > Fill everything in  > Enable GDPR (For European Countries) > Enable IAB TCF > Select Pop-up Box > Save and Exit (Top right).

Do You Cache Your Website? If so, don’t forget to ‘flush the caches’ at this point.

So That Fixed It Yes?

Sadly no, but because I now manage my CMP online they have a support/chat feature, and I was asked to do the following;

    1. A third party Ad agency I use has their own CMP I asked them to disable that, which they did, (don’t forget flush the caches again!)
    2. I had some embedded code with my Adsense ads that was calling this script;
script async src="//pagead2.googlesyndication.com/pagead/js/adsbygoogle.js

I had to remove each instance of that, and put the following code in my websites < HEAD > section; Download Code

The Adsense TCF Error Wont Go Away!

That’s because the errors stay on Google Adsense for 7 DAYS, even if you have fixed the errors, you need to wait 7 days for the errors to stop showing!

Related Articles, References, Credits, or External Links

NA

The post Adsense: 'We've detected an error on your IAB TC string' first appeared on PeteNetLive.

Windows Server – Disable ‘Defender’

$
0
0

KB ID 0001710

Problem

I got a call last night to help out a colleague, this involved using a ‘dubious’ piece of software that is very old, (I wont elaborate further). But to run it on a modern Windows Server is nearly impossible. The host detects the software as being infected (It may well be, but I’ve never suffered). So I need to keep the software in a password protected Zip file. And only extract it on a Virtual machine that I don’t mind sacrificing!

That’s great, but Defender was having none of this, so I needed to ‘temporarily‘ stop its real time protection.

Note: Standard warning, disabling Windows defender on a production machine is not a good idea, (without another 3rd party anti virus/anti malware product.)

Solution

To get defender stopped open an administrative PowerShell Window, and execute the following command;

Set-MpPreference -DisableRealTimeMonitoring $true

Disable Windows Defender

I could then get up to my ‘black hatted shenanigans‘, to re-enable simply use;

Set-MpPreference -DisableRealTimeMonitoring $false

Other Options To Disable Window Defender

You can disable Defender using the following group Policy;

Computer Configuration > Administrative Templates > Windows Components > Windows Defender Antivirus > Turn off Windows Defender Antivirus > Set to Enabled

Or by setting the following registry key;

HKEY_LOCAL_MACHINE\SOFTWARE\Policies\Microsoft\Windows Defender

Create a new DWORD (32 bit) called DisableAntiSpyware and set its value to ‘1’.

How To Remove Windows Defender

If you got here wanting to simply remove Windows Defender, then use the following command instead;

Uninstall-WindowsFeature Windows-Defender

Related Articles, References, Credits, or External Links

NA

The post Windows Server - Disable 'Defender' first appeared on PeteNetLive.

Viewing all 808 articles
Browse latest View live