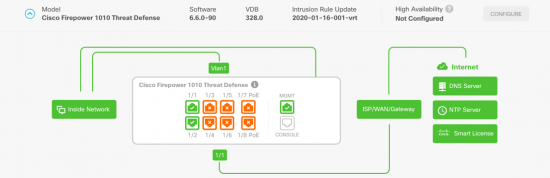
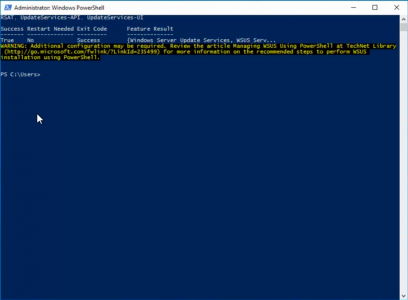
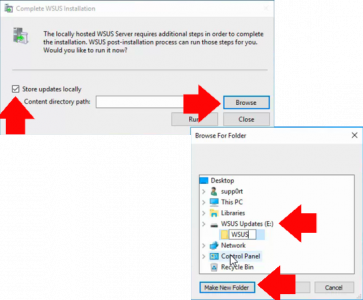
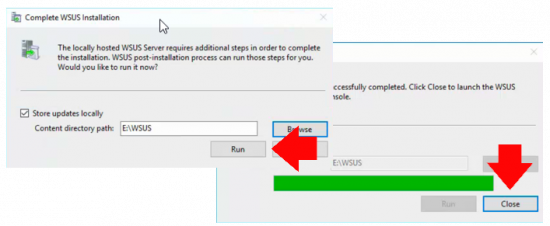
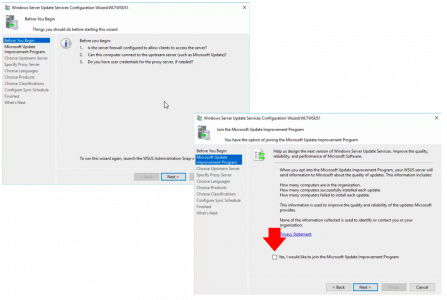
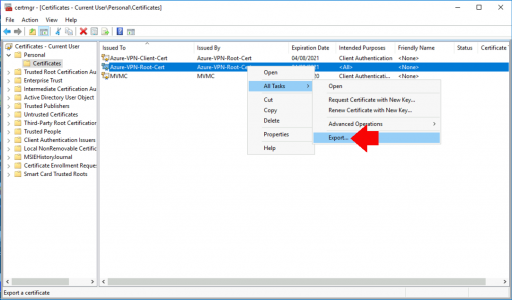
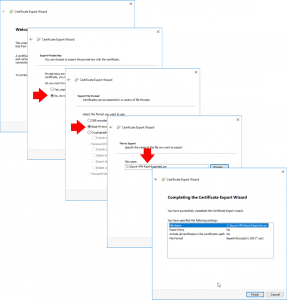
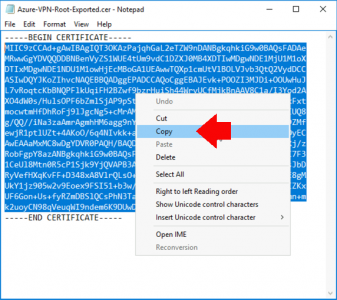
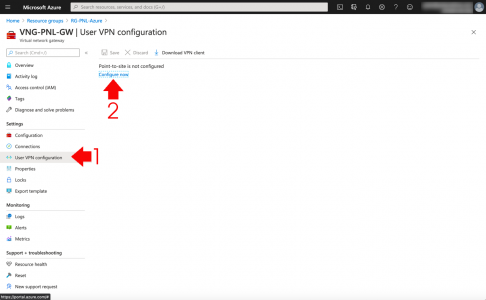
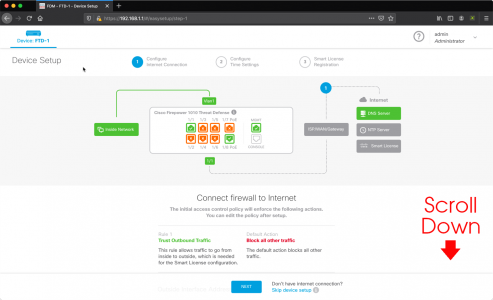
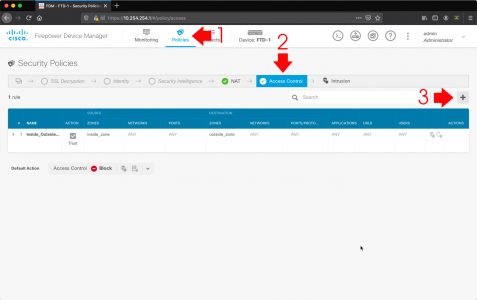
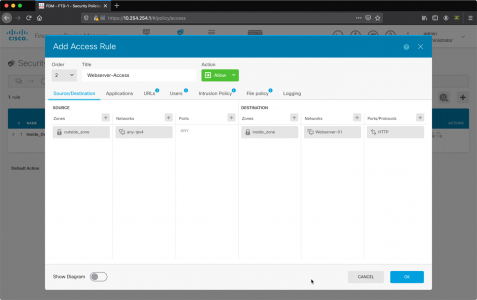
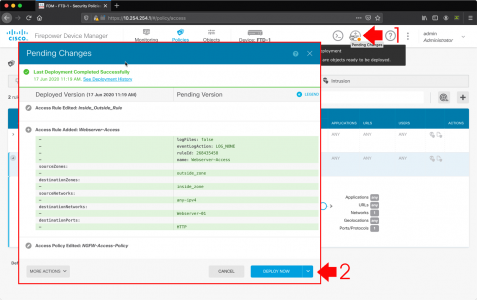
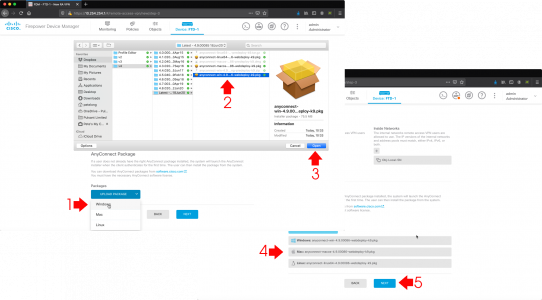
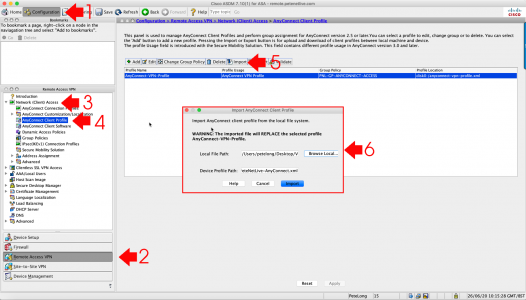
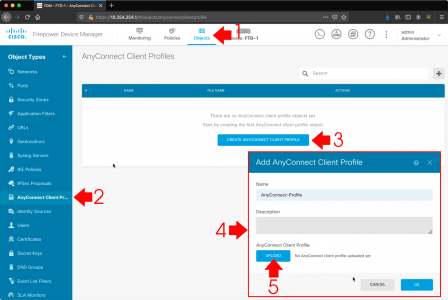
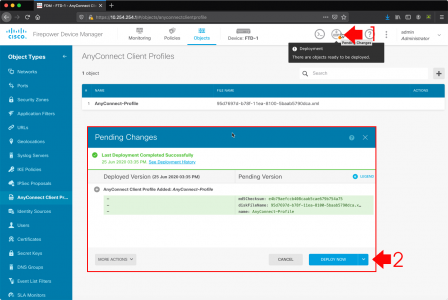
Quantcast
Channel: PeteNetLive
Viewing all 808 articles
Browse latest View live

Cisco: Getting a SKU (Product ID) From a Serial Number

$
0
0

KB ID 0001674

Problem

I had a situation a couple of weeks ago where I had the serial numbers for a bunch of Cisco switches, I needed to get some extended cover for them, but what I didn’t have were the Cisco SKU (Stock Keeping Unit) codes.

Solution

You will need to have a Cisco CCO login, once you have that go here > Add devices.

Cisco Switch Get Model Number

Give the device a name, (it does not matter what) > Paste in the serial number > Add.

Cisco Switch Get SKU

Boom, there’s your SKU (Product ID)

Cisco Switch Get SKU form Serial Number

Repeat as required.

Related Articles, References, Credits, or External Links

NA


Windows Server: Disabling SSL 3.0, TLS 1.0, and TLS 1.1

$
0
0

KB ID 0001675

What are these protocols?

Both SSL and TLS are cryptographic protocols designed to secure communications over a network (remember the internet is just a network). Originally we had SSL version 1 and version 2. But they were, (to be honest) ‘a bit bobbins’ and full of security holes, so never really took off. Version 3 however did and was widely supported. The problem with version 3 was, (again) that was also ‘bobbins’. All this came to a head with the Poodle exploit and people started getting rid of SSLv3.

So, what about TLS? Well TLS v1.0 was largely based on, (but not compatible with) SSLv3. TLS 1.1 replaced v1.0 (circa 2006). Problems with it prompted TLS 1.2 (circa 2008). Then that was the standard until TLS v1.3 (circa 2018).

However: Just because you use the newest protocols does not necessarily mean you are more secure: Most documentation you read says TLS 1.2 ‘Should’ be secure (that’s reassuring eh!) This is because these protocols are built on cryptographic ciphers and they are only as secure as those ciphers. You can corrupt a strong protocol with a weak cipher and render it less secure. In some cases, you may need to do this, or you might simply enable a web cipher to fix a ‘problem’ without understanding the consequences.

You are ‘Probably’ Reading this Because…

If you’ve had a security audit, or a company had scanned your network and produced a report that says you are running insecure protocols and you need to do something about it.

THINK: Security is a good thing, (I’m all for it,) BUT just rushing to turn things off, can cause you problems, where possible test any remediation in a test environment, many old legacy (for legacy read ‘applications that are business critical, and you can no longer update or get support on’) may still be using these old protocols. Simply disabling SSLv3.0, TLS v1.0,1.1, and/or 1.2 can have some negative effects, either on YOUR applications or in the browsers of your clients. Remember if you provide a web based service it will also need testing with any browser that your staff, or even the public may be using to access your web based platforms.

TLS 1.0 and TLS 1.1 might be ‘depreciated’ but it’s still widely used, disabling them will probably cause you more problems than the older SSL protocols, so test, test, and test.

ISOLATE: If you have old legacy applications and you need to retain them for compliance or financial reasons, then consider simply MITIGATING the risk by taking them off the local network, and running them in isolation.

DOCUMENT: If you need TLS 1.1 then that’s fine just because a scan picked it up, does not mean that you HAVE TO run to the server room and disable it. Most compliance standards are fine with you not fixing something, providing you document what it is and why it’s still enabled.

Windows TLS 1.2 Support: Clients from Windows Vista, and Servers from Server 2008 support TLS 1.2. but all the way to Windows 8.1 and Server 2012 R2 it requires an update, so make sure you are fully up to date before attempting to use TLS 1.2.

Exchange: Support for TLS 1.1 and 1.2 wasn’t added until Exchange 2013 (CU8) and Exchange 2010 (SP3 RU9). Beware Some (Older) Microsoft Outlook clients will only work with TLS 1.0

Windows Client (Internet Explorer) Disabling SSL3 and TLS 1.0, TLS 1.1

Before disabling protocols on the server, it’s good practice to disable those protocols on the clients, some time beforehand, the easiest way to do this is via Group Policy.

IE Disable SSLv3 Internet Explorer GPO

Windows Server Disabling SSL3 and TLS 1.0, TLS 1.1

Note: Before disabling anything enable TLS 1.2

Enable TLS 1.2

Execute the following PowerShell commands;

New-Item 'HKLM:\SYSTEM\CurrentControlSet\Control\SecurityProviders\SCHANNEL\Protocols\TLS 1.2\Server' -Force | Out-Null New-ItemProperty -path 'HKLM:\SYSTEM\CurrentControlSet\Control\SecurityProviders\SCHANNEL\Protocols\TLS 1.2\Server' -name 'Enabled' -value '1' -PropertyType 'DWord' -Force | Out-Null
New-ItemProperty -path 'HKLM:\SYSTEM\CurrentControlSet\Control\SecurityProviders\SCHANNEL\Protocols\TLS 1.2\Server' -name 'DisabledByDefault' -value 0 -PropertyType 'DWord' -Force | Out-Null    
New-Item 'HKLM:\SYSTEM\CurrentControlSet\Control\SecurityProviders\SCHANNEL\Protocols\TLS 1.2\Client' -Force | Out-Null
New-ItemProperty -path 'HKLM:\SYSTEM\CurrentControlSet\Control\SecurityProviders\SCHANNEL\Protocols\TLS 1.2\Client' -name 'Enabled' -value '1' -PropertyType 'DWord' -Force | Out-Null  
New-ItemProperty -path 'HKLM:\SYSTEM\CurrentControlSet\Control\SecurityProviders\SCHANNEL\Protocols\TLS 1.2\Client' -name 'DisabledByDefault' -value 0 -PropertyType 'DWord' -Force | Out-Null

Windows Server Enable TLS 1.2

What this actually does is create some registry settings;

Windows Server 2019 Enable TLS 1.2

Disabling SSL v2.0 and SSL v3.0

Note: SSL 2.0 is normally disabled by default on modern versions of Windows.

Execute the following PowerShell commands;

New-Item 'HKLM:\SYSTEM\CurrentControlSet\Control\SecurityProviders\SCHANNEL\Protocols\SSL 2.0\Server' -Force | Out-Null 
New-ItemProperty -path 'HKLM:\SYSTEM\CurrentControlSet\Control\SecurityProviders\SCHANNEL\Protocols\SSL 2.0\Server' -name 'Enabled' -value '0' -PropertyType 'DWord' -Force | Out-Null 
New-ItemProperty -path 'HKLM:\SYSTEM\CurrentControlSet\Control\SecurityProviders\SCHANNEL\Protocols\SSL 2.0\Server' -name 'DisabledByDefault' -value 1 -PropertyType 'DWord' -Force | Out-Null 
New-Item 'HKLM:\SYSTEM\CurrentControlSet\Control\SecurityProviders\SCHANNEL\Protocols\SSL 2.0\Client' -Force | Out-Null 
New-ItemProperty -path 'HKLM:\SYSTEM\CurrentControlSet\Control\SecurityProviders\SCHANNEL\Protocols\SSL 2.0\Client' -name 'Enabled' -value '0' -PropertyType 'DWord' -Force | Out-Null 
New-ItemProperty -path 'HKLM:\SYSTEM\CurrentControlSet\Control\SecurityProviders\SCHANNEL\Protocols\SSL 2.0\Client' -name 'DisabledByDefault' -value 1 -PropertyType 'DWord' -Force | Out-Null
New-Item 'HKLM:\SYSTEM\CurrentControlSet\Control\SecurityProviders\SCHANNEL\Protocols\SSL 3.0\Server' -Force | Out-Null
New-ItemProperty -path 'HKLM:\SYSTEM\CurrentControlSet\Control\SecurityProviders\SCHANNEL\Protocols\SSL 3.0\Server' -name 'Enabled' -value '0' -PropertyType 'DWord' -Force | Out-Null 
New-ItemProperty -path 'HKLM:\SYSTEM\CurrentControlSet\Control\SecurityProviders\SCHANNEL\Protocols\SSL 3.0\Server' -name 'DisabledByDefault' -value 1 -PropertyType 'DWord' -Force | Out-Null 
New-Item 'HKLM:\SYSTEM\CurrentControlSet\Control\SecurityProviders\SCHANNEL\Protocols\SSL 3.0\Client' -Force | Out-Null 
New-ItemProperty -path 'HKLM:\SYSTEM\CurrentControlSet\Control\SecurityProviders\SCHANNEL\Protocols\SSL 3.0\Client' -name 'Enabled' -value '0' -PropertyType 'DWord' -Force | Out-Null 
New-ItemProperty -path 'HKLM:\SYSTEM\CurrentControlSet\Control\SecurityProviders\SCHANNEL\Protocols\SSL 3.0\Client' -name 'DisabledByDefault' -value 1 -PropertyType 'DWord' -Force | Out-Null

Windows Server Disable SSL v 2 and SSL v3

What this actually does is create some registry settings;

Windows Server 2019 Disable SSL v 2 and SSL v3


Disabling TLS 1.0

Note: Depending on your setup this may impact production, test it first!

Execute the following PowerShell commands;

New-Item 'HKLM:\SYSTEM\CurrentControlSet\Control\SecurityProviders\SCHANNEL\Protocols\TLS 1.0\Server' -Force | Out-Null 
New-ItemProperty -path 'HKLM:\SYSTEM\CurrentControlSet\Control\SecurityProviders\SCHANNEL\Protocols\TLS 1.0\Server' -name 'Enabled' -value '0' -PropertyType 'DWord' -Force | Out-Null 
New-ItemProperty -path 'HKLM:\SYSTEM\CurrentControlSet\Control\SecurityProviders\SCHANNEL\Protocols\TLS 1.0\Server' -name 'DisabledByDefault' -value 1 -PropertyType 'DWord' -Force | Out-Null 
New-Item 'HKLM:\SYSTEM\CurrentControlSet\Control\SecurityProviders\SCHANNEL\Protocols\TLS 1.0\Client' -Force | Out-Null 
New-ItemProperty -path 'HKLM:\SYSTEM\CurrentControlSet\Control\SecurityProviders\SCHANNEL\Protocols\TLS 1.0\Client' -name 'Enabled' -value '0' -PropertyType 'DWord' -Force | Out-Null 
New-ItemProperty -path 'HKLM:\SYSTEM\CurrentControlSet\Control\SecurityProviders\SCHANNEL\Protocols\TLS 1.0\Client' -name 'DisabledByDefault' -value 1 -PropertyType 'DWord' -Force | Out-Null

Windows Server 2019 Disable TLS 1.0

What this actually does is create some registry settings;

Windows Server Disable TLS 1.0

Disabling TLS 1.1

Note: Depending on your setup this may impact production, test it first!

Execute the following PowerShell commands;

New-Item 'HKLM:\SYSTEM\CurrentControlSet\Control\SecurityProviders\SCHANNEL\Protocols\TLS 1.1\Server' -Force | Out-Null 
New-ItemProperty -path 'HKLM:\SYSTEM\CurrentControlSet\Control\SecurityProviders\SCHANNEL\Protocols\TLS 1.1\Server' -name 'Enabled' -value '0' -PropertyType 'DWord' -Force | Out-Null 
New-ItemProperty -path 'HKLM:\SYSTEM\CurrentControlSet\Control\SecurityProviders\SCHANNEL\Protocols\TLS 1.1\Server' -name 'DisabledByDefault' -value 1 -PropertyType 'DWord' -Force | Out-Null 
New-Item 'HKLM:\SYSTEM\CurrentControlSet\Control\SecurityProviders\SCHANNEL\Protocols\TLS 1.1\Client' -Force | Out-Null 
New-ItemProperty -path 'HKLM:\SYSTEM\CurrentControlSet\Control\SecurityProviders\SCHANNEL\Protocols\TLS 1.1\Client' -name 'Enabled' -value '0' -PropertyType 'DWord' -Force | Out-Null 
New-ItemProperty -path 'HKLM:\SYSTEM\CurrentControlSet\Control\SecurityProviders\SCHANNEL\Protocols\TLS 1.1\Client' -name 'DisabledByDefault' -value 1 -PropertyType 'DWord' -Force | Out-Null

Windows Server 2019 Disable TLS 1.1

What this actually does is create some registry settings;

Windows Server Disable TLS 1.1
Then REBOOT THE SERVER. Because NONE OF THE ABOVE WILL TAKE EFFECT until you do

Help Something’s Broken!

To revert your settings, execute the following PowerShell;

Remove-Item 'HKLM:\SYSTEM\CurrentControlSet\Control\SecurityProviders\SCHANNEL\Protocols\SSL 3.0\' -Recurse
Remove-Item 'HKLM:\SYSTEM\CurrentControlSet\Control\SecurityProviders\SCHANNEL\Protocols\TLS 1.0\' -Recurse
Remove-Item 'HKLM:\SYSTEM\CurrentControlSet\Control\SecurityProviders\SCHANNEL\Protocols\TLS 1.1\' -Recurse

Then REBOOT THE SERVER.

Related Articles, References, Credits, or External Links

NA

Microsoft Outlook ‘Search’ Not Working

$
0
0

KB ID 0001676

Problem

When attempting to perform a ‘Search’ whilst in Microsoft Outlook, you encounter a problem (it’s not working).

Something Went Wrong and Your Search Could Not Be completed

Something went wrong and your search couldn’t be completed.

Solution

Let’s be clear here, I’m dealing a problem on the ‘client side‘ either with Outlook itself, or with Windows indexing. If you have multiple clients with their mailboxes in an ‘on-premise Exchange Server’ then the problem is probably indexing on their mailbox database, (as long as it’s not Exchange 2019 (or newer) as indexing in new versions of Exchange is done at mailbox level). If that is your problem and you are running Exchange 2016 (or earlier), then see the following article first.

Exchange ContentIndexState ‘Failed’

Each of the following may work, or you may need to work though the list, but BE AWARE once indexing is fixed it can take some time (depending on how much email you have) to index it all, be patient.

Incomplete Missing Outlook Search Results

Before we start ‘fixing’ search, are you sure you are not just missing emails because modern Outlook will only cache 3 months of email locally, so emails older than that, simply cannot be seen by the index? If so you may need to change the following setting.

Change Local Outlook Cache Size

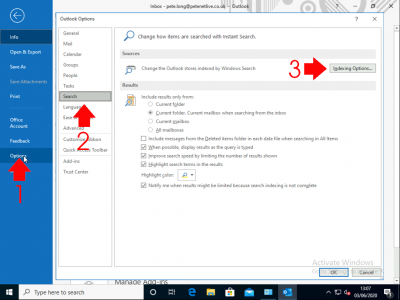
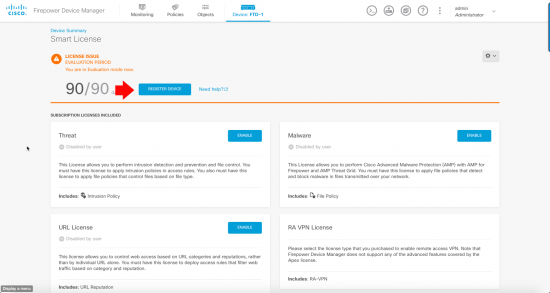
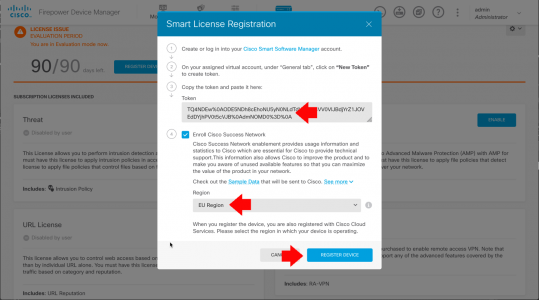
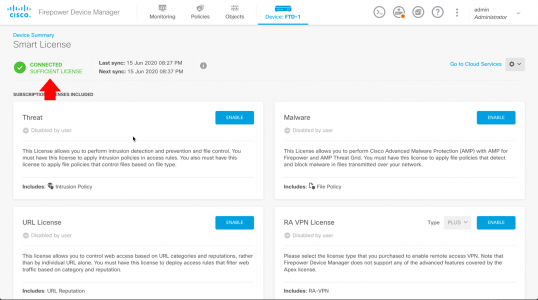
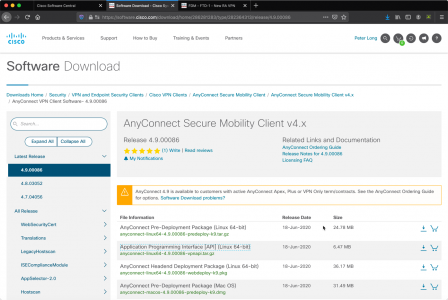
Microsoft Outlook: Check Indexing, and Rebuild Index

Wishing Outlook > File > Options > Search > Indexing Options.

Outlook Search Not Working

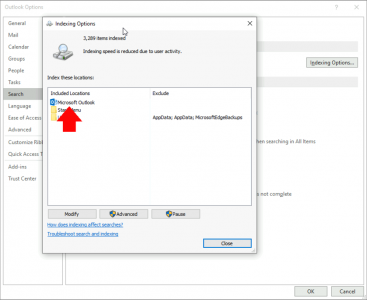
Make sure Microsoft Outlook is listed.

Outlook Search Index Location

Note: You can get to the same options in ‘Control Panel’ > Indexing options.

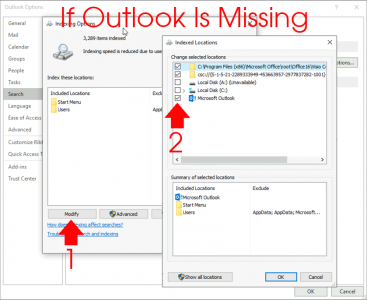
If Microsoft Outlook is NOT listed: Modify > Select it > OK.

Outlook Index Add Location

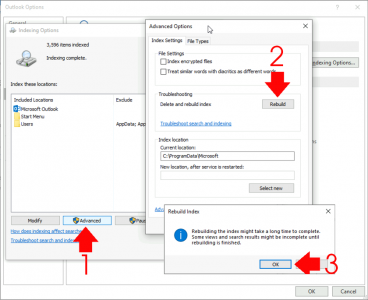
If Microsoft Outlook is IS listed: Advanced > Rebuild > OK.

Force Outlook to Re Index

While in this window, go to the ‘File Types‘ tab, and ensure .msg files are selected.

Enable msg indexing

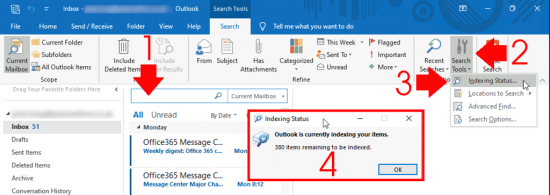
This might take a while! You can see progress, by clicking in the search box > Search Options > Indexing Status.


Fix Outlook Search Not Working

Windows Search Service

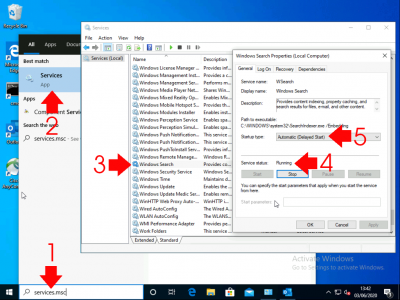
Outlook indexing relies on the Windows Search Service, Run services.msc > Locate the Windows Search Service, ensure it’s running, and it should be set to Automatic (Delayed Start).

Outlook Search Not Working Windows Search

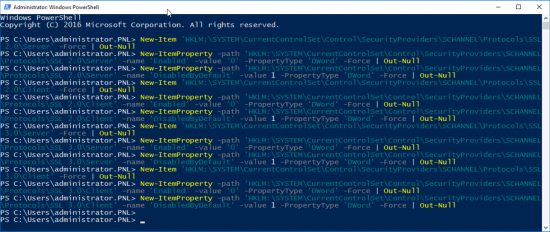
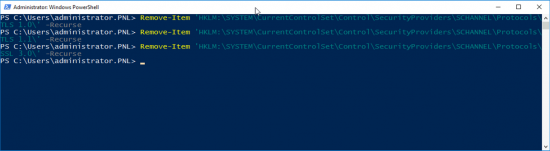
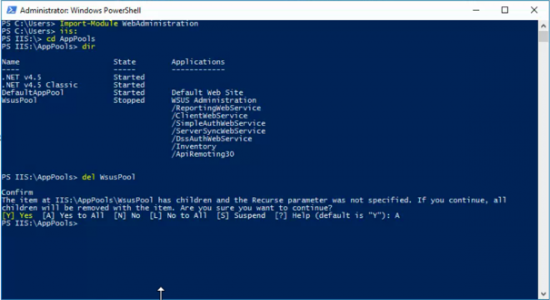
Repairing Windows Search Service

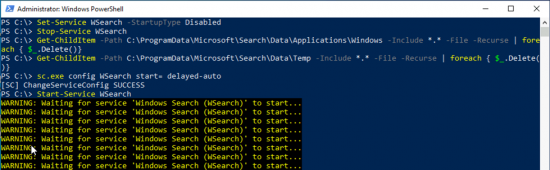
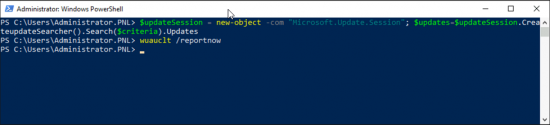
Sometimes it wont start, or you simply want to flush its contents and start again. Occasionally you may need to set the service to ‘disabled’ and reboot before it will let you manipulate it, but I simply opened an administrative Powershell window, and ran the following Powershell commands;

Set-Service WSearch -StartupType Disabled
Stop-Service WSearch
Get-ChildItem -Path C:\ProgramData\Microsoft\Search\Data\Applications\Windows -Include *.* -File -Recurse | foreach { $_.Delete()}
Get-ChildItem -Path C:\ProgramData\Microsoft\Search\Data\Temp -Include *.* -File -Recurse | foreach { $_.Delete()}
sc.exe config WSearch start= delayed-auto
Start-Service WSearch

Note, Before I’m Asked: I used sc.exe and not set-service, because you need Powershell v6 to set a service as ‘Automatic Delayed Start’, and all the visitors may not have Powershell version 6.

Repair Windows Search

Don’t Panic if the service takes a long time to start, (it’s recreating a lot of files!)

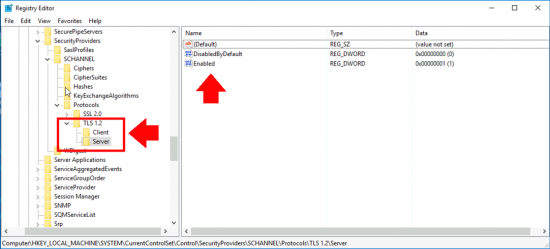
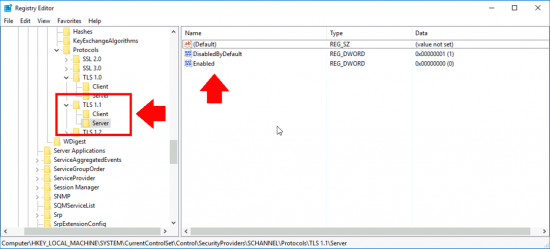
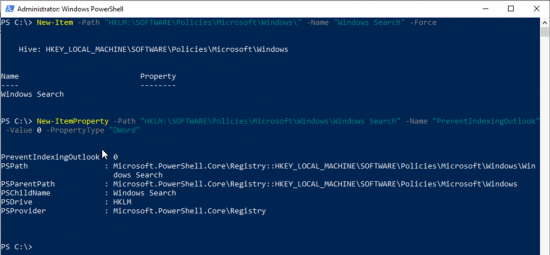
Make Sure Outlook Indexing Has NOT Been Disabled In the Registry

To save you poking about in the Regisry just run the following TWO Powershell commands;

New-Item -Path "HKLM:\SOFTWARE\Policies\Microsoft\Windows\" -Name "Windows Search" –Force
New-ItemProperty -Path "HKLM:\SOFTWARE\Policies\Microsoft\Windows\Windows Search" -Name "PreventIndexingOutlook" -Value 0 -PropertyType "DWord"

Enable Outlook Search Registry

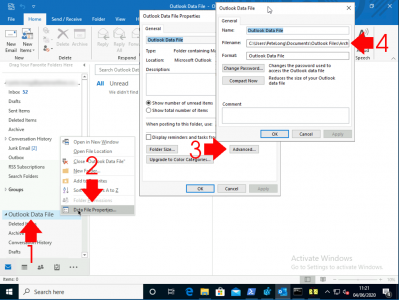
Microsoft Outlook Repairing PST Files

I detest PST files with a passion! Please stop using them, there’s far more efficient ways of storing old emails for those of you that simply need to keep ‘every‘ email you’ve ever received, sent, or deleted. A broken or corrupt PST file can also break search/indexing.

If you are using PST file(s) then firstly you need to know where it/they are. You can get that from their properties > Advanced > Filename.

Office Locate PST File

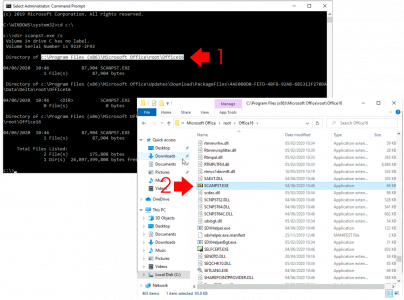
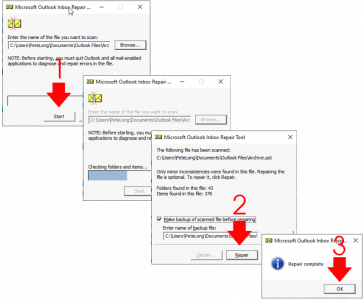
Secondly you need to run the scanpst.exe program to scan and fix them. Each version of Office puts this in a different place annoyingly, but here I’ll tech you some old-school search ninja skills to find it on your PC, (this also saves me listing all the versions and locations, and having to keep updating them!)

Open an administrative Command Window > Execute the following two commands;

cd c:\
dir scanpst.exe /s

After while it should show you where scanpst.exe is, (this is still how I search for files, it’s a lot quicker);

Office Fix PST File

You can now run scanpst.exe and point it at your PST files.

Office Repair Broken PST File

Check Indexing has NOT been disabled by Group Policy

You can get a group policy enforced on you remotely by your IT admins, or on your local PC with local group policy (unless you run a ‘Home’ version of windows where there is no group policy. You can run winver from command line or Powershell and that will tell you, if you’re unsure).

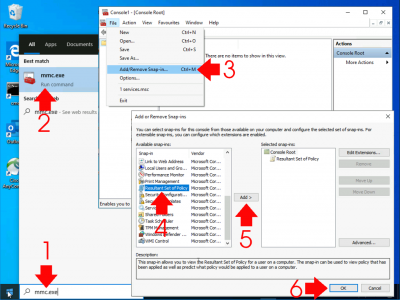
Here I’m going to use Resultant  Set Of Policy, to show me the sum total of ALL policies being applied to make sure some doofus hasn’t disabled indexing for the drive/location. My outlook Index should be in (C:\ProrgamData\Microsoft by default, Note: That’s a hidden folder so you may not see it if you try and browse to it).

Run > mmc.exe > File > Add/Remove Snap-in > Resultant Set of Policy > Add > OK.

Resultant Set Of Policy

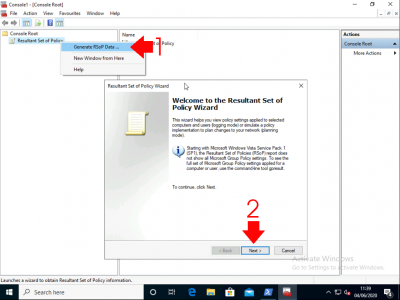
Right click Resultant Set of Policy > Generate RSoPData > Next.

Generate Resultant Set Of Policy

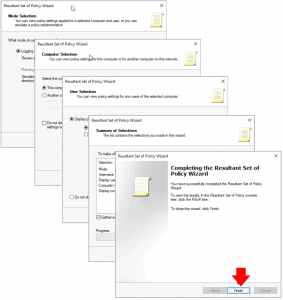
Accept all the defaults (keep clicking next) > Finish.

Generate Resultant Set Of Policy Data

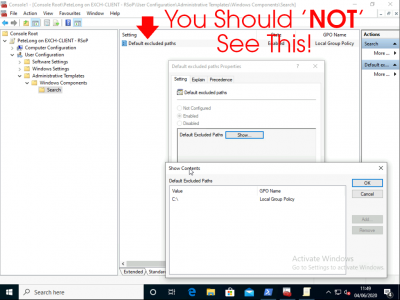
Below, someone has disabled Indexing, (on the C drive!) You should NOT be able to see this. In fact you may not even see administrative templates.

Outlook Indexing Disabled in GPO

Note: Above it’s been set in ‘Local‘ policy, if yours has been set by ‘Domain‘ group policy, you will need to speak to your IT department.

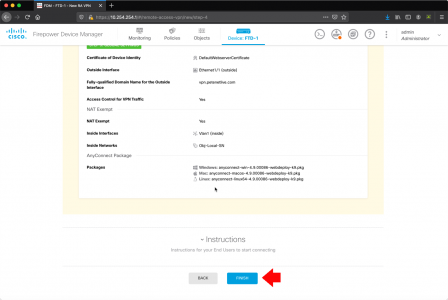
Repair Microsoft Office

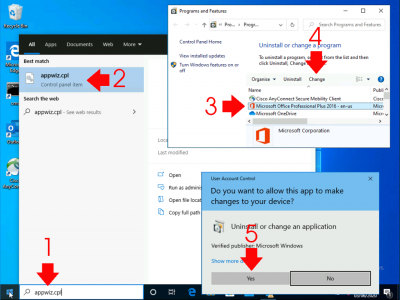
Run appwiz.cpl > Locate Microsoft Office > Change > Yes.

Office Repair Install

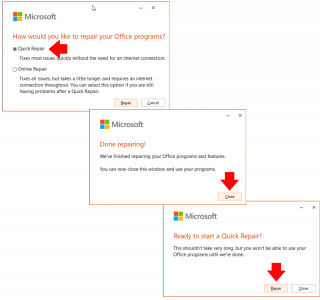
Try Quick Repair first (you can rerun and try Online Repair if you wish afterwards) > Repair > Close.

Office 365 Repair

Update Microsoft Office

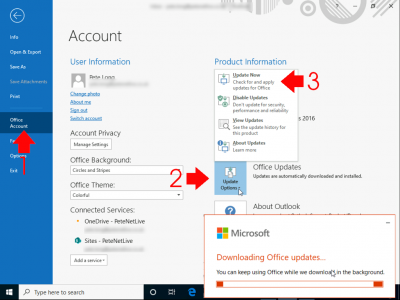
You should be able to update office from File > Office Account > Update eOptions > Update Now.

Update Microsoft Office

I cant see that option! If you have a retail or volume copy of Windows you may need to manually download the updates. To find out your version of office see the following link;

Finding Out Your Microsoft Office Licence Version

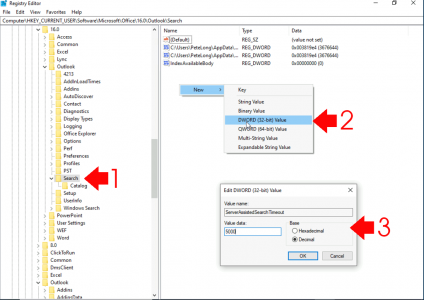
Outlook 2016 and 2019 (Office 365 Version)

You may need to create a DWORD registry value called ServerAssistedSearchTimeout and set its value to 5000 (decimal), in the following Ley;

HKEY_CURRENT_USER > Software > Microsoft > Office > {version} > Outlook > Search

Search Broken Office 2016 and 2019 O365


Please feel free to comment any ‘fixes’ I’ve missed, below!

Related Articles, References, Credits, or External Links

NA

Reimage Cisco 1010 ASA to FTD

$
0
0

KB ID 0001677

Problem

Sorry it’s taken me a while to get round to this, every time I do some work on the firewall I need to kill the internet at home, and I’ve got a wife and two daughters, who live online! So if you follow the site you will know I’ve got a Cisco Firepower 1010 device, and I’ve been looking at it running the ASA code.

Now here’s how to ‘re-image’ the device with the FTD (Firepower Threat Defence) operating system.

Warning this can take a while, if you are performing this in production equipment, plan in at least a couple of hours downtime.

Solution

Firstly this is a lot easier than it was on the old ASA 5500-x platform, If you have ever updated the OS on a Cisco ASA, then the process is pretty much the same.

Before proceeding, you need to unregister the firewall from its Smart Licence (assuming it’s registered correctly). You can do this with the following command;

licence smart deregister

Or from the ASDM;

Then connect the firewall via console cable, I’m going to copy the operating system in from a TFTP server on my mac, (you can use FTP or HTTP if you prefer).

Petes-ASA# copy tftp flash

Address or name of remote host []? 192.168.1.20

Source filename []? cisco-ftd-fp1k.6.6.0-90.SPA

Destination filename [cisco-ftd-fp1k.6.6.0-90.SPA]? {Enter}
Accessing tftp://192.168.1.20/cisco-ftd-fp1k.6.6.0-90.SPA...!!!!!!!!!!!!!!!!
!!!!!!!!!!!!!!!!!!!!!!!!!!!!!!!!!!!!!!!!!!!!!!!!!!!!!!!!!!!!!!!!!!!!!!!!!!!!
!!!!!!!!!!!!!!!!!!!!!!!!!!!!!!!!!!!!!!!!!!!!!!!!!!!!!!!!!!!!!!!!!!!!!!!!!!!!
!!!!!!!!!!!!!!!!!!!!!!!!!!!!!!!!!!!!!!!!!!!!!!!!!!!!!!!!!!!!!!!!!!!!!!!!!!!!
!!!!!!!!!!!!!!!!!!!!!!!!!!!!!!!!!!!!!!!!!!!!!!!!!!!!!!!!!!!!!!!!!!!!!!!!!!!!
Verifying file disk0:/cisco-ftd-fp1k.6.6.0-90.SPA...

Writing file disk0:/cisco-ftd-fp1k.6.6.0-90.SPA...

1097176240 bytes copied in 331.300 secs (3314731 bytes/sec)
Petes-ASA#

Now we simply need to set the image as the primary boot OS.

Petes-ASA# configure terminal
ciscoasa(config)# boot system disk0:/cisco-ftd-fp1k.6.6.0-90.SPA

The system is currently installed with security software package 9.13.1.2, which has:
   - The platform version:  2.7.1.107
   - The CSP (asa) version: 9.13.1.2
Preparing new image for install...
!!!!!!!!!!!!!!!!!!!!!!!!!!!!!!!!!!!!!!!!!!!!!!!!!!!!!!!!!
Image download complete (Successful unpack the image).
Attention:
   If you proceed, the system will be re-imaged and then reboot automatically.
   All existing configuration will be lost and the default configuration will be applied.
Installation of version 6.6.0-90 will do the following:
   - upgrade to the new platform version 2.8.1.105
   - upgrade to the CSP FTD version 6.6.0-90
Do you want to proceed? [confirm] {Enter}

The firewall will install the new OS then reboot itself, it will take a while, be patient! Once rebooted the FTD software will ask you to login, the default username and password is admin and Admin123, upon logging in, you are asked to change the password.

firepower login: admin
Password: Admin123
Successful login attempts for user 'admin' : 1

Copyright 2004-2020, Cisco and/or its affiliates. All rights reserved.
Cisco is a registered trademark of Cisco Systems, Inc.
All other trademarks are property of their respective owners.

Cisco Fire Linux OS v6.6.0 (build 37)
Cisco Firepower 1010 Threat Defense v6.6.0 (build 90)

Hello admin. You must change your password.
Enter new password: {new-password}
Confirm new password: {new-password}
Your password was updated successfully.

Cisco Firepower Extensible Operating System (FX-OS) Software
TAC support: http://www.cisco.com/tac
Copyright (c) 2009-2019, Cisco Systems, Inc. All rights reserved.

The copyrights to certain works contained in this software are
owned by other third parties and used and distributed under
license.

Now you can carry out an initial configuration of the Firepower. 

firepower# connect ftd

Here I set the basic IPv4 settings, and tell the firewall it will be managed locally via FDM (Firepower Device Manager), that’s the web management interface on the device, rather than FMC (Firepower Management Center) a separate management appliance.

You must accept the EULA to continue.
Press  to display the EULA:
End User License Agreement

Effective: May 22, 2017

This is an agreement between You and Cisco Systems, Inc. or its affiliates
("Cisco") and governs your Use of Cisco Software. "You" and "Your" means the
individual or legal entity licensing the Software under this EULA. "Use" or
"Using" means to download, install, activate, access or otherwise use the
Software. "Software" means the Cisco computer programs and any Upgrades made

PRESS THE SPACE BAR A LOT!
---------------Output removed for the sake of Brevity---------------------
mentioned are the property of their respective owners. The use of the word
partner does not imply a partnership relationship between Cisco and any other
company. (1110R)

Please enter 'YES' or press Enter to AGREE to the EULA: YES

System initialization in progress.  Please stand by.
You must configure the network to continue.
You must configure at least one of IPv4 or IPv6.
Do you want to configure IPv4? (y/n) [y]: y
Do you want to configure IPv6? (y/n) [y]: n
Configure IPv4 via DHCP or manually? (dhcp/manual) [manual]: {Enter}
Enter an IPv4 address for the management interface []: 10.254.254.254
Enter an IPv4 netmask for the management interface []: 255.255.255.0
Enter the IPv4 default gateway for the management interface [data-interfaces]: 10.254.254.1
Enter a fully qualified hostname for this system [firepower]: FTD-1
Enter a comma-separated list of DNS servers or 'none' [208.67.222.222,208.67.220.220]: 8.8.8.8,8.8.4.4,194.168.4.100
Enter a comma-separated list of search domains or 'none' []: {Enter}
If your networking information has changed, you will need to reconnect.
Setting DNS servers: 8.8.8.8 8.8.4.4 194.168.4.100
No domain name specified to configure.
Setting hostname as FTD-1
Setting static IPv4: 10.254.254.254 netmask: 255.255.255.0 gateway: 10.254.254.1 on management0
Updating routing tables, please wait...
All configurations applied to the system. Took 3 Seconds.
Saving a copy of running network configuration to local disk.
For HTTP Proxy configuration, run 'configure network http-proxy'

Manage the device locally? (yes/no) [yes]: {Enter}
Configuring firewall mode to routed


Update policy deployment information
    - add device configuration
Successfully performed firstboot initial configuration steps for Firepower Device Manager for Firepower Threat Defense.

>

At this point I reboot the unit, but be prepared, it can take a LONG time before it comes back online, (wait at least 40 minutes). 

IMPORTANT you have configured the IP address on the MANAGEMENT interface (1) , to configure further, and complete the Firepower 1010 initial setup, connect to any one of the LAN interfaces (2), and navigate to https://192.168.1.1 (you should get an DHCP address, if you don’t, then you’ve not waited long enough!)

Related Articles, References, Credits, or External Links

NA

Cisco Firepower 1010 (FTD) Initial Setup

$
0
0

KB ID 0001678


If you’re here you’ve either purchased a new Cisco Firepower device running FTD (FirePower Threat Defence) or have re-imaged your Firepower device from ASA to FTD code.

On its factory defaults, the unit will have the following settings.

  • Inside IP address (VLAN 1) 192.168.1.1 (on all interfaces from 2 to 8).
  • Outside IP Address set to DHCP in interface 1.
  • Management IP address 192.168.45.1 on the Management Interface.
  • DHCP Scopes on both the inside and management interfaces (192.168.1.x and 192.168.45.x respectively).

  1. Power Connector.
  2. 8 x Gigabit Ethernet ports: Normally GigabitEthernet 1/1 will be for the WAN, GigabitEthernet 1/2 though 1/8 will be for the LAN (with 1/7 and 1/8 being PoE).
  3. Management Port.
  4. Console Port (RJ45).
  5. Console Port (Mini USB).
  6. USB Port (useful for upgrades, and backups).
  7. Kensington Lock: Seriously? I’ve not seen one of these since about 2005, does anyone still use them?
  8. Reset Button: Depress for 3 seconds reverts the firewall to its factory settings, (and preserves the config apparently).
  9. Status Lights, (another reason not to put things on top of it!) Though you will notice there’s some on the back also. Note: When all lights are solid the firewall is operational, when the centre light is blinking, it’s still booting).

FirePower 1010 Setup

I will be deploying this as a stand alone FTD firewall, that will be managed locally on the device itself via FDM (Firepower Device Manager) and not via an FMC (Firepower Management Center) appliance.

Smart Licensing: If you’re not already familiar with Cisco Smart Licensing, I’ve covered it in more depth here. Set yourself up a free Smart License Account, and generate a token, copy it to the clipboard, (we will need it in a minute).

Firepower Generate Smart License Token

Connect to the firewall via a LAN port on https://192.168.1.1, or via the Management port on https://192.168.45.1 (unless you have ran though the FTD setup at command line, and have already changed the management IP).

Default usernames, (you will be asked to change them) are;

  • Username: admin
  • Password: Admin 123

Initial Config Firepower 1010

Scroll down.

Outside Interface Config Firepower 1010

Here I’m accepting the default Outside/Public Interface settings of DHCP enabled, with IPv6 disabled, if yours has a static IP, or you want to user IPv6 then change the settings accordingly > Next.

Outside Interface DHCP Firepower 1010

I’ll accept the defaults here, be advised those NTP servers may take a little while to ‘go-green’ (you will see what I mean later) > Next.

NTP Config Firepower 1010

I’m going to do this manually in a minute, so we can skip this > Next.

Firepower 1010 Skip Smart Licening

Note: The unit will have a default policy of let everything out (sourced from inside), and nothing in (sourced from outside) we will leave that as it is, as a decent start point.

Stanalone device > Configure Interfaces.

Firepower 1010 Change Inside IP

Note: Below I’m going to REMOVE the DHCP Scope, then change the ‘inside’ IP address (to avoid errors). Then later I will add the new DHCP scope back in again.

VLANs > Vlan1 > Edit. > DHCP section > Edit > Remove.

Firepower 1010 Edit DHCP Scope

You can now set the inside IP address accordingly. (Don’t panic you wont lose connectivity yet!) > OK.

Firepower 1010 Change IP Address

Now you need to Save/Commit the changes, and Deploy them. Now you will lose connectivity, if you have changed the inside IP address, so manually give yourself an IP address on the new network, and reconnect to the firewall.

Firepower 1010 Save Changes

Cisco Firepower Setup DHCP

Create a new DHCP Scope: Should you require the firewall to be a DHCP server, log back in to the new internal IP address > System Settings > DHCP Server.

Firepower 1010 Setup DHCP Scope

Create DHCP Server > Enable DHCP Server > Enter the new scope > OK.

Firepower 1010 Create DHCP Scope

Remember to commit the changes, and deploy them again!

Cisco Firepower FTD Licensing

Thankfully this is MUCH easier than doing the same thing while running ASA Code (on the same hardware!) > Smart Licence > View Configuration.

Firepower Smart Licence Registration

Register Device.

Firepower Register Device

Paste in your token, (from above) > Set your location > Register Device. Go and have a coffee, it will look like it’s broken/not worked for a few minutes.

Firepower Register Device token

After a while you should see this;

Firepower Registered

There will be some outstanding changes to save and deploy also, now the unit is registered.

Firepower Save Changes

Back in the Cisco Smart Licence portal, it should look a bit like this;

Firepower Smart Licensing Correct

Once fully complete and operational, all connected interfaces should have all the options ‘go-green’. For me the NTP servers took a while!

Note: Obviously the interfaces in orange are not in use!

Firepower Device Healthy


Related Articles, References, Credits, or External Links

NA

Article 0

$
0
0

KB ID 0001680

Problem

This does not work – Simple port forward of http to internal web server?


-=-=-

Cisco FDM Port Forwarding

-=-=-

Cisco FDM Create Network Object

-=-=-

Cisco FDM Port Forward HTTP

-=-=-

-=-=-

Cisco FDM Open a port

-=-=-

Cisco FDM Show ACL Diagram

-=-=-

Cisco FDM Save and deploy Changes


?


Remove and Reinstall Microsoft WSUS

$
0
0

KB ID 0001679

Problem

I don’t like WSUS, the product is OK (ish) the problem with it is, every time it’s deployed, typically the person it was deployed for never looks after it, or manages it properly, and months/years later it becomes a massive ‘bag of spanners’, which is never the client’s fault, it’s always the poor guy who built it, or the support company’s fault.

If you run WSUS, log into the the thing at least once a week, sort out reporting problems, approve updates accordingly. If I look at your WSUS and see ‘This machine has not reported in for 12 months”. Then I’m going to care as much as you do!

Solution

So let’s say your a conscientious tech and you’ve taken over WSUS from someone else who let it get into a state! There comes a point when its simpler to wipe it out and start again, it might be simpler to create a new server/VM and reinstall from scratch, if that’s the case, do that instead of this! (Remember any GPO’s pointing client to WSUS will need updating, unless the new server has the same FQDN as the old one though!)

Here I’m removing WSUS and re-installing it on the same server, I already have multiple GPOs setup pointing my clients to the WSUS server so I don’t need to do that part.

Warning: If you have ‘Computer Groups’ setup in your GPOs telling client machines that they should be in different computer group object in your WSUS deployment, then take a screenshot of all the group names before you start so you can manually add them back in after rebuild. Note if you have computer groups but don’t reference them with your GPOs you don’t need to do this.

Mine’s a small typical deployment using WID (Windows Internal DataBase), to prove this navigate to C:\Windows\WID, and look for SUSDB. If yours is using SQL you will need to remove that independently, (assuming SQL is only doing WSUS of course!)

Remove WID and WSUS from an administrative Powershell window;

Unistall-WindowsFeature -Name UpdateServices,Windows-Intern-Database -Restart

KEEP THIS WINDOW OPEN!

Remove WSUS and WID

Now locate the folder containing all your updates, usually called WSUS (unless it was named something bizarre!) Then delete it.

Delete WSUS Updates

Now delete the C:\Windows\WID directory.

Delete WID Directory

Now to remove the IIS AppPool for WSUS, 

Import-Module WebAdministration
IIS:
cd AppPools
del WsusPool

Remove WSUS AppPool

Whilst still in web administration, jump up a directory and go to sites, then delete the WSUS Adminisration website;

cd..
cd .\Sites\
del ".\WSUS Administration\"

Remove WSUS Website

Reinstall the WSUS components;

I
nstall-WindowsFeature -Name UpdateServices, UpdateServices-WidDB, UpdateServices-Services, UpdateServices-RSAT, UpdateServices-API, UpdateServices-UI

Install WSUS and WID From PowerShell

Now launch WSUS and complete the configuration. Recreate your WSUS directory, (make sure theres plenty of space for the updates!) In production I would not have this on the C:\ Drive!

Install WSUS Set Update Directory

Select your new folder.

Create WSUS Set Update Directory

Next > Untick (if not required) > Next.

Deploy WSUS on Server 2016.

Next (Unless you have an upstream WSUS server) > Next (Unless you have a proxy server).

Setup WSUS on Server 2019.

Start connecting > Wait for a while until it will let you continue.

Setup WSUS on Server Sync

Select the languages you require > Next > select the products you want to update > Next.

Setup WSUS on Server Products

Select the ‘type‘ of updates you require, (I typically never select Service Packs, Update Rollups, or drivers, (but that’s my preference.)) > Next > Select automatically and set it for early in the morning > Next.

Setup WSUS on Server Shedule

Let it begin synchronisation > Next > Finish.

Setup WSUS on Server Settings

You can view synchronisation progress from the main WSUS window

WSUS Server Check Syncronization Progress

At this point you can setup any computer/server ‘test’ groups you require, and start authorising updates for those groups, or setting auto-authorise if that’s your preferred option.

Computers Not Reporting Into WSUS or Erroring

For the most part manually visiting ‘problem client’ and manually running though the update procedure and rebooting a few times will fix the problem, (assuming that the GPO telling it to get its updates from WSUS is correct!)

But sometimes clients flatly refuses to check in at all, for those run the following Powershell commands on them;


$updateSession = new-object -com "Microsoft.Update.Session"; $updates=$updateSession.CreateupdateSearcher().Search($criteria).Updates

wuauclt /reportnow

Force WSUS client to report in correctly


Related Articles, References, Credits, or External Links

Windows Server Update Services – Install and Configure

Windows Client(s) not ‘appearing’ in WSUS

Cisco FTD Site to Site VPN

$
0
0

KB ID 0001681

Problem

While working out how to create a VPN on the Cisco FTD (Firepower 1010), I thought I might as well set it up to the Cisco ASA that I have in the Data Center on my test network. This is what I’m connecting;

VPN FTD to Cisco ASA


Create Site to Site VPN On Cisco FTD (using FDM)

Using a web browser connect to the devices FDM > Site to Site VPN > View Configuration.

Cisco FTD Site to Site VPN from FDM

Create Site-to-site-connection.

FDM VPN Wizard Cisco

  • Connection profile name: Something sensible like VPN-To-HQ or VPN-To-Datacentre.
  • Local VPN Access Interface: outside.
  • Local Network: Crete new network.

FDM on FTD VPN Wizard Cisco

  • Name: This will be your local LAN so give it a recognisable name.
  • Type: Network
  • Network: Your local (behind the FTD) network i.e. 10.254.254.0/24
  • OK.

FDM VPN add Object

  • Remote IP Address: The public IP address of the other device (in my case the Cisco ASA).
  • Remote Network: Add
  • Crete new network

FDM VPN add Peer Detsils

  • Name: This will be the remote sites LAN so give it a recognisable name.
  • Type: Network
  • Network: The remote (behind the ASA) network i.e. 192.168.100.0/24
  • OK.


FDM VPN add Peer Object

Check the settings are correct > Next.

Cisco FTD 1010 VPN

I’m using IKEv2 (if your ASA is older than version 8.4 you will need to use IKEv1) > IKE Version 2 Globally Applied > Edit.

Cisco FTD IKEv2 VPN

Create new IKE Policy.

Cisco FTD IKEv2 Policy


  • Priority: 1
  • Name: S2S-IKEv2-Policy
  • Encryption: DES Really! (Why is that the default?) Remove DES and replace with AES256

I leave the rest of the settings as they are some people might not like Sha1 if you want to change it to sha254 for example then do so, but remember to change it on the IKEv2 policy on the ASA also. Also DON’T CONFUSE PRF with PFS, we will get the chance to set PFS later. > OK.

Cisco FTD IKEv2 AES256 Policy

IPsec Proposal > Edit.

Cisco FTD |PSec Policy

Add in AES-SHA > OK. 

Cisco FTD |PSec SHA

Enter (and confirm) the local and remote Pre-Shared Key (I usually set these the same, but they don’t have to be). Scroll down.

Cisco FTD VPN Shared Secret

  • Nat Exempt: inside
  • Diffie Helman Group for Perfect Forward Secrecy (PFS): Leave disabled.
  • Next

Cisco FTD VPN NAT Exemption

Review the settings > Finish.

Cisco FTD VPN Sumary

FTD VPN One Way VPN Traffic Warning!

At this point if you configure the ASA, the tunnel will come up, and if you’re behind the FTD everything will work. But If you’re behind the ASA and you want to talk to anything behind the FTD, it wont work. This confused me for a while, I could ping from my house to my servers at the DC but they could not ping me!

Resolution: What you need to do is (on the FTD) ALLOW traffic ‘inbound’ on the outside interface, for the subnet behind the ASA. (Yes that’s bobbins I know, it should do that for you, but at the moment it does not).

Policies > Access Control > Add.

Cisco FTD Allow VPN Traffic

  • Title: Allow-VPN-Traffic
  • Source Zone: outside_zone
  • Source Networks: The Network behind the ASA
  • Source Ports: ANY
  • Destination Zone: inside_zone
  • Destination Networks: ANY
  • Destination Ports/Protocols: ANY
  • OK

Cisco FTD VPN One Way

Pending changes > Deploy Now.

Cisco FTD VPN Save and Deploy

It can take a while to deploy, I recheck pending changes, and wait until it says it’s finished.

Cisco FTD VPN Check Deployment

Create ASA Config for VPN to Cisco FTD

I’ve covered Cisco ASA IKEv2 VPN configs elsewhere, so I’ll just post the config here and you can change the details (in red) and copy and paste it into your ASA.

object network OBJ-SITE-A
 subnet 192.168.100.0 255.255.255.0
object network OBJ-SITE-B
 subnet 10.254.254.0 255.255.255.0
!
access-list VPN-INTERESTING-TRAFFIC extended permit ip object OBJ-SITE-A object OBJ-SITE-B
!
nat (inside,outside) source static OBJ-SITE-A OBJ-SITE-A destination static OBJ-SITE-B OBJ-SITE-B no-proxy-arp route-lookup
!
crypto ipsec ikev2 ipsec-proposal VPN-TRANSFORM
 protocol esp encryption aes-256
 protocol esp integrity sha-1
!
crypto map CRYPTO-MAP 1 match address VPN-INTERESTING-TRAFFIC
crypto map CRYPTO-MAP 1 set peer 2.2.2.2
crypto map CRYPTO-MAP 1 set ikev2 ipsec-proposal VPN-TRANSFORM
crypto map CRYPTO-MAP interface outside
!
crypto ikev2 policy 10
 encryption aes-256
 integrity sha
 group 14
 prf sha
 lifetime seconds 86400
crypto ikev2 enable outside
!
tunnel-group 2.2.2.2 type ipsec-l2l
tunnel-group 2.2.2.2 ipsec-attributes
 ikev2 remote-authentication pre-shared-key cisco123
 ikev2 local-authentication pre-shared-key cisco123
!

Troubleshooting and debugging FTD VPN

All the traditional command line tools we used to use for VPN troubleshooting are available to you, you will need to SSH into the ‘Management Port’ before you can use them though! Or you can simply do the debugging and troubleshooting on the ASA!

Troubleshoot phase 1 (IKE)

show crypto isa
debug crypto ikev2 protocol

Troubleshoot phase 2 (IPSec)

show crypto ipsec sa
debug crypto ipsec 255

Related Articles, References, Credits, or External Links

NA


Cisco FTD Deploy AnyConnect (from FDM)

$
0
0

KB ID 0001682

Problem

In this article I will focus on ‘Remote Access’ VPN, which for Cisco FTD means using the AnyConnect client. Ive spent years deploying this solution for ASA so it’s a product I know well. As with all things Cisco, there are a couple of things that could trip you up. Let’s get them out of the way first.

If you are used to AnyConnect then you probably have the client software. It’s the same software package that’s installed with Cisco ASA. Sometimes just getting access to the download is a trial! Anyway you will need the AnyConnect ‘Package’ files, these typically have a .pkg extension, (Cisco refer to these as Head-End packages). Theres one for macOS, one for Windows, (well another one now for ARM processors, but I’ve not needed it yet), and one for Linux. You will need to download a package for each platform your users will need to connect with.

AnyConnect Software Download

AnyConnect Licence! After years of getting a few free with a Cisco ASA, I was unhappy to find that’s not the case with Cisco FTD. If you want to use AnyConnect you need to have a licence, and it needs to be in your Smart Licensing Account, (before you enable Remote Access VPN). 

Final Gotcha! Make sure you HAVE NOT enabled HTTPS management on the outside interface of the FTD before you start configuring AnyConnect, or you will get all the way to the end, and it will fall over and you will have to start again (thanks Cisco! How hard would it be to say, if you enable this, I will disable https outside management is this OK?) 

Solution

If you haven’t already done so enable the Remote Access VPN licence > Smart Licence > Fire Configuration > RA VPN  License > Enable > Change to licence type (mines Apex). Have a coffee and recheck everything is licensed OK.

AnyConnect 4 – Plus and Apex Licensing Explained

FTD Enable RA-VPN License

Remote Access VPN > Configure > Create Connection Profile.

FTD Enable AnyConnect

Give the profile a name, a group alias, and group URL > I’m using the FTD as my AAA Identity source (so my username and passwords are held on the firewall) that’s fine for small deployments, but in production you should think about deploying an AAA solution (called a Special Identities Realm in FTD). Scroll down.

FTD AnyConnect AAA and Profile

I typically create a new network object for my remote clients to use, you can select your internal DHCP server to send out addresses if you wish > Next.

FTD AnyConnect DHCP Pool

I’m using Cisco Umbrella DNS servers, (or the DNS servers formally known as OpenDNS) > I’m setting a ‘welcome banner’ but you dont need to, (some people find them annoying!) > Scroll down.

FTD AnyConnect Welcome Banner and DNS

Split tunnelling: As always Cisco assume you want to tunnel everything, in most cases that’s NOT the requirement (BUT it IS the most secure!) I setup split tunnelling by Excluding my internal networks > Next.

FTD AnyConnect Split Tunnelling

Select the certificate the FTD will present (don’t choose the web one it will error!) > Select the interface your client will connect to (typically outside) > Enter the FQDN of the device > I allow bypass for VPN traffic, if you want to scan remote traffic with firepower etc DON’T select this > Enable NAT Exemption (select the internal interface) > Internal Networks: Then add in the internal network, I’ve already got an object for that, (you may need to create one.) > Scroll down.

FTD AnyConnect Global Settings

Here you upload your .pkg files (I mentioned above) when you have finished > Next.

FTD Upload AnyConnect Packages

Review the settings > Finish.

FTD AnyConnect Settings

Cisco FTD Create User (via FDM)

You will need a username and password to authenticate (skip this as you are not using the FTD’s internal user database.) Objects > Users > Add > Supply a username and password > OK

FTD Create VPN User

Pending Changes > Deploy Now.

FTD Save and Deploy

Go and have a coffee again, keep clicking pending changes until it looks like this. (Quite why it takes so long, I have no idea?) It’s even more fun, if you made a mistake, because it will just error and fall over, so you have to find the error (if you can) > then remove the pending change and start all over again. Cheers Cisco!

FTD Check Deployment

Finally go to an external client and give it a try, if your clients don’t have the client software installed simply ‘browse’ to the FTD to get it.

FTD Test AnyConnect

Related Articles, References, Credits, or External Links

Cisco Firepower 1010 Configuration

Cisco ASA VPN Static to Dynamic IP (DHCP)

$
0
0

KB ID 0001683

Problem

I had a call with a client last week, they are in one of my employer’s DCs, and their servers are behind a vASA. They had purchased some Meraki MX devices for their IT team who were working remotely (during the Covid-19 lockdown), and were struggling. Normally we would just suggest AnyConnect, but these guys were building new machines for  their clients, and needed access directly to the domain from their home networks to facilitate this. So a Site-to-Site VPN was the ‘best fit’ for them.

But being home internet connections they were on DHCP for their public IP addresses. If we were all Meraki, then Meraki Auto VPN would have them up and running in no time. Conversely if they were all ‘proper’ Cisco we would be OK. In fact if they had static IP’s at home we would be OK.

So how to setup a site-to-site VPN ‘into’ a Cisco ASA with a static IP,  from another firewall with a dynamically assigned (DHCP) public IP?

Site-to-Site-Static-to-DHCP

I tested this firstly using a Cisco ASA at the ‘remote/dynamic’ end, then tested with a Meraki MX Device. But the methodology can be applied to any ISAKMP/IPSEC capable firewall with a dynamically assigned public IP that you want to establish a VPN into an ASA with a static IP address.

Solution

Step 1: Investigate Your Remote Device

Do your homework on the remote device, find out what it supports for VPN connectivity, you will need to answer the following questions;

  • IKE Version: Does it use/support IKEv1 or IKEv2 (or both) Set the ASA config accordingly
  • Phase 1 Encryption: What does it support? DES <- Don’t Use this if you can avoid it! 3DES, AES, AES-128, AES-192, AES-256 etc.
  • Phase 1 Hashing: What does it support? MD5, SHA/SHA1, SHA256 etc.
  • Phase 1 Diffie Hellman Group (for IKEv1): Group 1,2,5,14 etc.
  • Lifetime: {in seconds}
  • Pseudorandom function (for IKEv2): MD5, SHA1 or SHA256
  • Phase 2 (IPSEC) Encryption: 3DES, AES, AES-128, AES-192, AES-256 etc.
  • Phase 2 (IPSEC) Hashing: MD5, SHA1 or SHA254
  • Phase 2 PFS: Off or DH1, DH2, DH5, or DH14 etc.
  • Subnet on the remote site: Make sure it does not overlap with your central site, (or anyone else who will also be ‘dynamically’ connecting*).
  • Pre-Shared-Key: MAKE SURE this is long/complicated and hard to guess. 

*Note This may mean your remote sites may need to change their subnets so they don’t overlap!

Step 1 Configure the ‘Central’ ASA

I’ve covered IKEv1 VPNs and IKEv2 VPNs elsewhere on the site, feel free to go and see what what the following configuration is doing. For my Meraki Tunnel I’m going to use IKEv1, Phase 1 (3DES, SHA, Diffie Hellman Group 2, and a Lifetime of 86400 Seconds,) and Phase 2 (3DES, SHA and no PFS). Note: Some would consider this weak, but it’s the default setting on the remote device so lets keep it simple. In production you can slowly make phase1/2 more secure to your liking once you know it’s working.

Change the values in Red;

WARNING: If you already have a crypto map in use then change the keyword CRYPTO-MAP (below) to match yours. (Or all your VPNs will suddenly stop working!) Issue the command show run crypto map, if you’re unsure.

!
object network OBJ-MainSite
subnet 192.168.100.0 255.255.255.0
object network OBJ-RemoteSite-01
subnet 192.168.1.0 255.255.255.0
!
nat (inside,outside) source static OBJ-MainSite OBJ-MainSite destination static OBJ-RemoteSite-01 OBJ-RemoteSite-01 no-proxy-arp route-lookup
!
crypto ikev1 policy 65535
 authentication pre-share
 encryption 3des
 hash sha
 group 2
 lifetime 86400
!
crypto ikev1 enable outside
!
crypto ipsec ikev1 transform-set TS-IPSEC-VPN esp-3des esp-sha-hmac
!
crypto dynamic-map DYNAMIC-CRYPTO-MAP 65535 set ikev1 transform-set TS-IPSEC-VPN
crypto dynamic-map DYNAMIC-CRYPTO-MAP 65535 set reverse-route
crypto map CRYPTO-MAP 65535 ipsec-isakmp dynamic DYNAMIC-CRYPTO-MAP
crypto map CRYPTO-MAP interface outside
!
tunnel-group DefaultL2LGroup ipsec-attributes
 ikev1 pre-shared-key V3ryL0ng&H@rd2Gue55
!

Step 3: Configure the Remote (DHCP) Firewall

If the remote end was going to be another Cisco ASA, here’s the config;

object network OBJ-MainSite
 subnet 192.168.1.0 255.255.255.0 
object network OBJ-RemoteSite
 subnet 192.168.100.0 255.255.255.0 
! 
access-list VPN-INTERESTING-TRAFFIC extended permit ip object OBJ-RemoteSite object OBJ-MainSite 
nat (inside,outside) source static OBJ-RemoteSite OBJ-RemoteSite destination static OBJ-MainSite OBJ-MainSite no-proxy-arp route-lookup 
!
crypto ikev1 policy 10
 authentication pre-share
 encryption 3des
 hash sha
 group 2
 lifetime 86400
!
crypto ikev1 enable outside
!
crypto ipsec ikev1 transform-set VPN-TRANSFORM esp-3des esp-sha-hmac
!
crypto map CRYPTO-MAP 1 match address VPN-INTERESTING-TRAFFIC 
crypto map CRYPTO-MAP 1 set peer 203.0.113.1 
crypto map CRYPTO-MAP 1 set ikev1 transform-set VPN-TRANSFORM 
crypto map CRYPTO-MAP interface outside
!
tunnel-group 203.0.113.1 type ipsec-l2l
tunnel-group 203.0.113.1 ipsec-attributes
pre-shared-key V3ryL0ng&H@rd2Gue55
isakmp keepalive threshold 10 retry 2

Note For IKEv2 sample ASA Configs, Click Here

However if the remote end was going to be a Meraki Device.

Log into the Meraki Portal, and select your ‘customer’ (if you have more than one) > Security & SD WAN > Site-to-Site VPN.

Type: Hub > Scroll down.

Non-Meraki VPN Peers > Add a peer.

  • Name: Give it a sensible name.
  • IKE Version: IKEv1 (Note some versions don’t support IKEv2).
  • Public IP :Of the ASA.
  • Private Subnets: The subnet(s) behind the ASA.
  • Availability: ‘All Networks’ Unless you want to filter it.
  • Save.

Note: Should you wish to change any phase1/phase2 settings, click the link that says ‘Default‘ under IPSec policies.


Related Articles, References, Credits, or External Links

Special thanks to Paul White for putting me on the right road, and to Andrew Dorrian for taking the time to test the Meraki VPN config for me.

Outlook (for macOS) Notifications Stopped Working

$
0
0

KB ID 0001684

Problem

Like most of us I spend my working day based around Outlook calendar meetings and entries, I’ve even got birthdays and anniversaries in there. So recently when the notification pop-ups stopped working, it was a potential problem. Occasionally I could hear the notification ‘sound’, but I had to open outlook and change to the notification window to see them. When you are as absent minded as me, that’s a recipe for disaster.

I don’t know if it was a macOS update or a Microsoft Office update that had broken it, (or if I’d done something stupid myself!).

Solution

I tried a few solutions but this is the only one that worked. Click the ‘Apple Icon’ (top left) > System Preferences > Notifications > Scroll down and select Outlook > On your keyboard press the ‘Delete/Backspace’ key, to remove Outlook > Close system preferences.

If Outlook is open close it > Open Outlook > At the notification prompt > Click ‘Allow’.

The problem ceased.

Related Articles, References, Credits, or External Links

NA

Cisco FTD (and ASA) Creating AnyConnect Profiles

$
0
0

KB ID 0001685

Problem

A few days ago I did an article on Deploying Cisco AnyConnect with the Cisco FTD, there I glossed over the AnyConnect profile section. For a long time now, we have been able to edit the AnyConnect profile from within the firewall (if we are running ASA code!) But for the FTD we need to take a step backwards and go back to using the ‘offline’ AnyConnect profile editor.

Solution

Firstly you need to download the offline profile editor, you will find it on the Cisco AnyConnect Mobility Client download page;

FTD -AnyConnect Profile Editor

I wont insult your intelligence, the setup is straight forward;

Cisco AnyConnect Profile Editor

Launch the editor, and the screen you will see is exactly the same as you would normally see while using the profile editor in a Cisco ASA, (when launched from within the ASDM).

Cisco AnyConnect Profile Editor Settings

Note: I’m not going to go though all the settings, (this post would become immense!) Typically I allow remote (RDP) connections, and set the public FDQN for my AnyConnect profile.

Once you have finished, you can simply save the settings as an XML file.

Cisco AnyConnect Profile Editor Export XML

Import an AnyConnect ‘Profile XML File’ into Cisco ASA

As mentioned above with all ‘modern’ versions of the ASDM/AnyConnect client you can create and edit an AnyConnect profile directly from within the ASDM. But (for completeness) here’s how to import one you created externally, (or exported form another firewall).

Configuration >Remote Access VPN > Network (Client) Access > AnyConnect Client Profile > Import.

Cisco ASA Import AnyConnect Profile XML

Import an AnyConnect ‘Profile XML File’ into Cisco FTD

Objects > AnyConnect Client Profiles > Create AnyConnect Client Profile > Give it a name > Upload.

Cisco FTD Import AnyConnect Profile XML

Browse to, and select the previously created XML file > Open.

Cisco FTD Upload AnyConnect Profile XML

Then save and deploy the changes (this takes ages!).
Cisco FTD Save and Deploy

You can now select this ‘profile file’ when setting up AnyConnect, or edit any existing AnyConnect Remote Access VPN configuration, and add this profile to it.

Related Articles, References, Credits, or External Links

NA

Cisco FTD: AMP/URL Filtering/Threat Detection and AVC

$
0
0

KB ID 0001686

Problem

This brings me to the end of my recent FTD articles. Although this is not a complete run though of all the capabilities, it will point you in the right direction to enable;

Solution

Each of these is a ‘Licensed Feature‘ which means it’s going to cost you. Not only that, but  you need to have the licences in your Cisco Smart Account before you start.

Connect to the FTD via the FDM web console. > Smart Licence > View Configuration > Enable Threat, Malware, and URL License.

Enable FTD Licenses Threat URL and Malware

Make sure it looks like this, before proceeding.

Enable FTD Licenses Threat URL and Malware

Mines got a ‘vanilla’ (factory default) policy, (allow everything out). But it’s set to TRUST, you need to change that to ALLOW, (you can’t do advanced inspection while it’s set to trust) > OK.

FTD Edit Access Rule

FTD: Enable IDS/IPS Intrusion Policy

With a policy access rule selected > Intrusion Policy > Enable > Select the level you want (they are pretty self explanatory, and if you have worked with Cisco IDS before you will be familiar) > OK.

Note: By default the FTD will be in IPS mode (prevention), If you want to change to IDS mode (detection). Then select policies > Security Policies > Intrusion > Inspection Mode > Edit > Chose ‘detection’ > OK

FTD Enable Intrusion Detection

FTD: Enable AMP Policy

While in the access policy > File Policy > Block Malware All > OK.

FTD Enable AMP Malware Inspection

FTD: Enable URL Filtering Policy

Now we need to create a new access rule and set its action to BLOCK. Create (add) a new access rule > Make sure it is ABOVE your default TRUST or ALLOW rule > Give it a name > Set the action to BLOCK > Then I’m simply adding the inside zone as the source, and the outside zone as the destination > URLs.

FTD Enable URL Filtering

Then simply add in either the individual URLs you want to block. Or (more sensibly) the URL Category, i.e. Adult, Social Networking, or Gambling etc.  you want to block > OK > OK.

FTD Enable URL Filtering

FTD: Enable Application Inspection (AVC)

Cisco have had AVC for a long time, but not many people use it, it’s the ability to perform up-to layer 7 (application layer) inspection and blocking. So let’s say you want to let your employees use LinkedIn but you don’t want them to use the job search, you can block that, or you want to block BitTorrent traffic, you can also do that with AVC. There are thousands of different options.

Like URL filtering you need to enable this on an access rule that’s set to BLOCK (here I’m lazily adding to the same one as my URL blocking, I suggest in production you create one just for AVC).

FTD AVC Application Filtering

DONT FORGET: No changes will be applied untill you save and deploy the changes. (WHICH TAKES AGES!)

Related Articles, References, Credits, or External Links

Cisco Firepower 1010 Configuration

Patch Your DNS Servers! SigRed

$
0
0

KB ID 0001687

Problem

WARNING: This is rated 10 on the CVSS scale.

Yesterday Microsoft released a critical notice (KB4569509) to address vulnerabilities identified in (CVE-2020-1350). Basically it allows a remote attacker to perform remote code execution on your DNS servers (unless you patch them!) 

To see how easy that is to do, watch the video below;

Solution

You need to make a slight change in the Windows DNS Server registry. I’ve written the PowerShell out, to save you poking around in the registry, it will change the key for you, and then restart the DNS Service.

# Set DNS Registry Key (Vulnerability CVE-2020-1350)
$RegKey ="HKLM:\SYSTEM\CurrentControlSet\Services\DNS\Parameters"
Set-ItemProperty -Path $RegKey -Name TcpReceivePacketSize  -Value 0xFF00
Get-ItemProperty -Path. -Name TcpReceivePacketSize
Restart-Service DNS

If you have a Cisco Firewall you can use the default DNS inspection to mitigate this, RFC 1035 define DNS packets should be less than 512 bytes. But Window uses EDNS so you may have “message-length maximum client auto” in your config, If you remove that, and change the maximum allowed size to 65280 you will mitigate THIS problem. Though I don’t like that as a solution, (unless you have a lot of DNS servers to update, and want to throw in a quick fix while you patch them all). 

Related Articles, References, Credits, or External Links

NA

VMware Converter ‘A file I/O Error Occurred’

$
0
0

KB ID 0001688

Problem

It seems every time I use VMware Converter, there’s some new error that jumps up and makes me stumble!

Yesterday the problem was;

FAILED: A file I/O error occurred while accessing

VMWare Converter Error IO

Solution

Some searching told me this is actually a DNS problem, (where the converter could not resolve the DNS name of the machine being converted). BUT I had put the FQDN directly into this machines ‘hosts file’ so I doubt that was my problem. I suspect it was the fact that this machine was presenting a certificate that wasn’t trusted was actually the problem.

But either way the way to fix it is to re-queue the job again, but this time choose “Use proxy mode“.

Fix VMWare Converter IO Error

Then it worked fine.

Related Articles, References, Credits, or External Links

NA


AnyConnect: Allow ‘Local’ LAN Access

$
0
0

KB ID 0001689

Problem

Note: This WONT WORK if you ‘force-tunnel’ or ‘tunnel-all’ remote VPN traffic, (if you are unsure Google ‘what’s my ip’ > Take note of it > Connect to AnyConnect and repeat the procedure, if your public IP address has changed to the IP address of the ASA then you force-tunnel/tunnel-all traffic).

With more people remote working now, I’m getting a lot more questions about RA-VPN and particularly AnyConnect. By default when connecting to any Cisco remote access VPN, it pretty much stops you connecting to anything outside the VPN tunnel, (unless you enable Split Tunnelling). This includes stopping you talking to assets on your remote network also.

This is basically ‘Good practice’, as a corporate entity you have authenticated a remote machine NOT the entire network it is on! But what happens when your MD want to print a work document on his/her home printer? Or you have a NAS drive at home with documents on it you can access while connected to the VPN?

AnyConnect-Local-LAN-Access

Well, then you can ‘make a judgement call’ to whether or not you want to enable ‘Local LAN Access’ for your remote clients.

Full Disclosure: While this does not let everything on the remote clients LAN connect to the corporate network. If another client on a remote network was infected and compromised, and it proliferated its infection via the LAN,  (to your authenticated remote client), then that client could infect the corporate network. This is what’s known as a ‘pivot attack’.

Solution

Assuming you are happy to enable local LAN access its a TWO STEP procedure. Firstly you enable Local LAN Access on the AnyConnect Client Profile, then you enable split tunnelling and allow all networks, (because you don’t know what all the remote network addresses may be). 

Step 1: Add Local LAN Access to the AnyConnect Client Profile

If you are unfamiliar with ‘AnyConnect Client profiles’, they are simply XML files that are applied to to an AnyConnect Connection Profile, I already have one so I just need to edit it, And tick ‘Local LAN Access’.

AnyConnect Alow LAN Access

What If you Don’t Already Have One? Not a problem. In the ASDM > Configuration > Remote Access VPN > Network (Client) Access > AnyConnect Client Profile > Add > Give it a name > Set the Group Policy to your AnyConnect Group Policy > OK > Apply > Edit.

What Does User Controllable Mean? It means your users can enable or disable it, (see below.) If you untick this then they wont have that option.

AnyConnect Alow LAN Access User Controllable

Step 2: Add 0.0.0.0/32 to Split Tunnelling

You configure split tunnelling in your AnyConnect Group-Policy (ASDM > Configuration > Remote Access VPN > Network (Client) Access > Group Policies) Locate yours and edit it, navigate to Advanced > Split Tunnelling > Policy: Untick inherit, and set to Exclude Network List Below > Network List: Untick Inherit and click Manage.

Firstly: Create an ACL and call it “ACL-Local-LAN-Access’ > OK

Secondly: Select the ACL you just created and add an ACE to it > permit 0.0.0.0/32 > OK > OK > OK > Apply > File > Save Running Configuration to Flash.

Your remote workers will need to disconnect and reconnect before it will take effect. In some cases with older clients they need to reboot, (or have the AnyConnect service stopped  and restarted.) If you experience problems make sure your clients have got the new XML file with;

<LocalLanAccess UserControllable="true">true</LocalLanAccess>

inside it, to find out where those files are stored see THIS POST.

Related Articles, References, Credits, or External Links

NA

PowerCLI: Get All Snapshot Information

$
0
0

KB ID 0001690

Problem

This was asked on EE today, and it was an interesting one so I wrote it up. How to locate all the Snapshots in your VMware virtual infrastructure, and see how much space they are taking.

Solution

Use the following PowerCLI;

Get-Snapshot * | Select-Object -Property VM, Name, SizeGB, Children | Sort-Object -Property sizeGB -Descending | ft -AutoSize

Related Articles, References, Credits, or External Links

NA

Veeam: Backup to Public Cloud?

$
0
0

KB ID 0001691

Problem

I’ve always been a fan of Veeam, I’ve championed it for years, as a consultant and engineer I want solutions that are easy to deploy, administer, and upgrade, that cause no problems. Like all things that are easy to use, and gain a lot of popularity, Veeam is starting to get DESTROYED BY DEVELOPMENT. What do I mean? Well, things that were simple and easy to find now require you to look at knowledge base articles and pull a ‘frowny face’. Also the quality of support has gone dramatically downhill. We stand at the point where another firm can come in and do what Veeam did, (march in and steal all the backup & replication revenue worldwide, with a product that simply works and is easy to use).

I digress (sorry). So you want to backup to public cloud yes?

Solution

Well then, you log into Veeam look at your backup infrastructure, and simply add an External Repository and backup to that? NO! That would be common sense, (and the way Veeam used to to things). External Repositories are not for that, Veeam points this out when you try and add one;

So how do you backup to public cloud? (I know other vendors are available, but we are talking primarily about Azure and AWS). Well to do that you need to be more familiar with Scale Out Backup Repositories (SOBR).

With an SOBR you can add ‘cloud storage’ i.e. Azure Cold Blob storage or AWS S3, as ‘Capacity Tier‘ storage.  How is the Capacity Storage Tier Used? Well theres two options, ‘Backup to Capacity after x Days’ or ‘Backup to Capacity Tier as soon as backup are created‘. like so;

  1. Send your backup to a Scale Out Backup Repository.
  2. The backup gets placed into the Performance Tier.
  3. Option 1: Copy to Cloud after x Days, or Option 2: Copy to cloud immediately.

Note: This is configured on the SOBR configuration NOT on individual backup jobs/sets.

Adding Azure Cold Blob Storage

Well before you can add cloud storage to a SOBR you need to add it to Veeam, how’s that done? Well firstly you need to create an Azure Storage account.

Create StorageAccount in Azure

Then generate an ‘Access Key‘.

Veeam Add Azure Storage Account Access Keys

Then create a ‘Container‘ in your storage account.

Veeam Add Azure Storage Account Container

Then within Veeam > Options > Manage cloud credentials > Add > Add Azure Storage Account > Enter the Storage account and Access Key > OK.

Veeam Add Azure Storage Account

Adding ‘Cloud Storage’ as ‘Capacity Tier’ to a Scale Out Backup Repository

Either create a new Scale Out Backup Repository, (Backup Infrastructure > Scale Out Backup Repository,) or edit an existing one. When you get to Capacity Tier > Tick the ‘Extend..’ option > Add > Microsoft Azure Blob Storage.

Veeam Add Azure Blob Storage

Azure Blob Storage > Give the storage a name > Next.

Veeam Add Azure Cold Blob

Select the storage account you created above > Select your Gateway Server (usually the Veeam B&R server but it does not have to be) > Next > Browse.

Veeam Add Azure Cold Blob Folder

Select or create a new folder > Limit the amount of space to use (if required) > Next > Finish.

Veeam Add Azure Cold Blob Storage Limit

What about AWS? Well Microsoft kindly give me a certain amount of ‘free‘ Azure credits every month so it’s easy to showcase their product, (I use this for learning and PNL tutorials), so Microsoft pretty much get the benefit. I know AWS have a free tier and a trial tier, but honestly after spending 2 hours trying to find out what you actually get, and am I going to get stung on my credit card bill If I do ‘xyz‘ I lost all interest!

AWS, be like Veeam used to be, make it easy! AWS is like flying with Ryanair,

Oh so you want a seat? That will be and extra £x a month, and for every trip to the toilet will be an extra £x a month. Will you be wanting nuts? Because we charge by the nut, and no one knows how many nuts are in each bag, so it will be different every time, and speaking of time if you want to look at the clock that will be £x a month also!

People will email me and complain Azure is the same, and to an certain extent I will agree, but nothing will change until, public cloud providers start charging fixed prices for things, so IT departments can work out what the Opex is going to be e.g. like private cloud providers do! Of course working for a private cloud provider maybe I’m a little biased? 

Related Articles, References, Credits, or External Links

NA

Azure: Point To Site VPN (Remote Access User VPN)

$
0
0

KB ID 0001692

Problem

Given my background I’m usually more comfortable connecting to Azure with a Route Based VPN from a hardware device, like a Cisco ASA. I got an email this afternoon, a client had a server in a private cloud and a server in Azure, they needed to transfer files from the Azure server to the server in the private cloud. Now on further investigation this client had a Cisco vASA so a VPN was the best option for them, (probably).

But what if they didn’t? Or what if they were ‘working from home’ and needed to access their Azure servers that were not otherwise publicly accessible?

Well the Microsoft solution for that is called an ‘Azure Point to Site VPN‘, even though in the current Azure UI they’ve called it ‘User VPN Configuration‘, because ‘Hey! Screw consistency and documentation that goes out of date every time a developer has a bright idea, and updates the UI’ Note: I have a thing about things being changed in GUIs!

Azure Remote Access VPN Point To Site

So regardless whether you are on or off the corporate LAN, you can connect to your Azure Virtual Networks.

Solution

This is not a full Azure tutorial, I’m assuming, as you want to connect to existing Azure resources, you will already have most of this setup already. But, just to quickly run through. You will need a Resource Group, and in that Resource Group you will need a Virtual Network. (Note: I like to delete the ‘default‘ subnet and create one with a sensible name).

Azure vNet

So far so good, within your virtual network you will need to create, (if you don’t already have one,) a ‘Gateway Subnet‘. To annoy the other network engineers, I’ve made it a /24, but to be honest a /29 is usually good enough).

Azure Virtual Network

Now to terminate a VPN, you need a ‘Virtual Network Gateway‘.

Azure Remote VPN

Make sure it’s set for VPN (Route Based) > Connected to your Virtual Network  > Either create (or assign) a public IP to it. I told you I’d be quick, however the Gateway will take a few minutes to deploy, (time for a coffee.)

Azure Virtual Network Gateway

For the purpose of this tutorial I’ll just create some certificates with PowerShell, (a root CA cert, and a client cert signed by that root certificate). This wont scale very well in a production environment. I’d suggest setting up a decent PKI infrastructure, Then using auto-enrolment for your users to get client certificates. However for our run through, execute the following TWO commands;

$cert = New-SelfSignedCertificate -Type Custom -KeySpec Signature -Subject "CN=Azure-VPN-Root-Cert" -KeyExportPolicy Exportable -HashAlgorithm sha256 -KeyLength 2048 -CertStoreLocation "Cert:\CurrentUser\My" -KeyUsageProperty Sign -KeyUsage CertSign

New-SelfSignedCertificate -Type Custom -DnsName Azure-VPN-Client-Cert -KeySpec Signature -Subject "CN=Azure-VPN-Client-Cert" -KeyExportPolicy Exportable -HashAlgorithm sha256 -KeyLength 2048 -CertStoreLocation "Cert:\CurrentUser\My" -Signer $cert -TextExtension @("2.5.29.37={text}1.3.6.1.5.5.7.3.2")

Azure Generate VPN Certificates

Now launch ‘certmgr‘ and you will see the two certificates. Firstly, export the client certificate.

Export Azure Generate VPN CertificatesYes you want to export the private key > You want to Save it as a .PFX file > Create a password for the certificate (MAKE NOTE OF IT!) > Save it somewhere you can get to, (you will need it in a minute).

Export Azure Generate VPN Certificates to PFX

Secondly, export the Root CA certificate.

Export Azure Root VPN Certificates

 You DON’T export the private key > Save as Base-64 encoded > Again save it somewhere sensible, you will also need it in a minute.

Export Azure Client VPN Root Certificates

Open the ROOT CA CERT with Notepad, and copy all the text BETWEEN —-BEGIN CERTIFICATE—- and —-END CERTIFICATE—- Note: This is unlike most scenarios, when working with PEM files, where you select everything, (it tripped me up!)

Copy Certificate Information

Back in Azure > Select your Virtual Network Gateway > Select ‘User VPN Connection’ (seriously, thanks Microsoft be consistent eh!) > ‘Configure now‘.

Azure Client VPN Configuration

Pick an address pool for your remote clients to use, (make sure it does not overlap with any of your assets, and don’t use 192.168.1.0/24, or 192.168.0.0/24, Note: These will work, but most home networks use these ranges, and let’s not build in potential routing problems before we start!)

Choose IKEv2 and SSTP > Authentication Type = Azure Certificate > Enter your Root CA details, and paste in the PEM text, you copied above > Save > Time for another coffee!

Azure Point to Site VPN

When is stopped deploying, you can download the the VPN client software.

Azure Download VPN Client

Azure Point to Site (User VPN) Client Configuration

So for your client(s) you will need the Client Certificate, (the one in PFX format,*) and the VPN Client software >  Double click the PFX file > Accept ‘Current User‘.

*Note: Unless you deployed user certificates already, and your corporate Root Cert was entered into Azure above.

Azure Deploy VPN Client Cetiificate

Type in the certificate password you created above > Accept all the defaults.

zure Deploy VPN Client

Yes.

Azure Deploy VPN Client Cetiificate Warning

Now install the Client VPN software, you may get some security warnings, accept them and install.

Azure Deploy VPN Client Software

Now you will have a configured VPN connection. I’m a keyboard warrior so I usually run ncpa.cpl to get to my network settings, (because it works on all versions of Windows back to NT4, and ‘developers’ haven’t changed the way it launches 1006 times!)

Launch Azure VPN Client

Launch the Connection > Connect > Tick the ‘Do not show…‘ option > Continue > If it works, everything will just disappear and you will be connected.

Connect Azure VPN Client

Related Articles, References, Credits, or External Links

NA

Azure: Point to Site VPN From mac OS?

$
0
0

KB ID 0001693

Problem

We mac users always get overlooked. If I had a pound for every time I’ve heard ‘Yeah we don’t support macs?” I would be a rich man. But thankfully this makes us work things out for ourselves usually!

So recently I did a article Azure: Point To Site VPN (Remote Access User VPN) but what if you want to use the same solution for a remote mac user?

Solution

Firstly you will want to download the VPN package (and have a valid client/user certificate, [see the link above]).

Download VPN Cient Azure

Obviously the installer is for Windows, but within the ZIP file you download, it has a copy of the XML file with the settings in it, and a copy of the Root CA certificate you used.

So your first job is to ‘import‘ the client certificate, it will be in PFX format, (if you followed my instructions), so you will need to supply the password you specified when creating the PFX file (not the mac password), when prompted to install it (double click on it).

macosx import pfx file

The engineer in me isn’t quite sure why the client needs the Root CA certificate on it, (because that’s not how certificates work!) But Microsoft insist it’s necessary, so also double click and install the Root CA Certificate, (it’s inside the VPN Package).

macosx import Root CA Cert

You don’t need to install VPN software onto the mac, (it has its own built in). Click the Apple Logo > System Preferences > Network > Add > Interface = VPN > VPN Type = IKEv2 > Service Name = Azure-Client-VPN > Create.

macosx Cilient VPN to Azure

Now open the XML file from within you VPN client software ZIP file, and locate the FQDN of the ‘Gateway’ address in Azure > Copy it to the clipboard.

macosx Cilient VPN to Azure server name

Paste the server address into BOTH Server Address AND Remote ID > (Leave Local ID blank for now) > Authentication Settings

WARNING: I’m using mac OS Catalina, so I choose ‘None’ (NOT CERTIFICATE). But for mac OS Mojave (and older) CHOOSE CERTIFICATE). It’s a bug that causes an error (see below) if you don’t.

macosx Cilient VPN IKEv2 to Azure

Select > Choose the CLIENT certificate you imported earlier, (Take note of the name in brackets, this is the common name on the certificate). You will need this in a minute!  > Continue > OK.

mac Cilient VPN to Azure

Put the Common Name from the certificate into the Local ID section > Apply > Connect.

mac Azure Point to Site VPN

All being well it should connect, (though it may prompt for you to enter your user password). BY DEFAULT the option ‘Show VPN Status in Menu Bar‘ should be ticked, if it isn’t then tick it.

mac Azure Point to Site VPN

With that option ticked, you can connect and disconnect the VPN quickly without needing to go back into System Preferences like so;

mac Azure VPN Connect and Disconnect

Error: VPN Connection, ‘An unexpected error occurred’

mac Azure Point to Site VPN error

Remember above when I said choose ‘None‘ for Catalina, NOT certificate? Well this is what happens if you choose certificate!

Related Articles, References, Credits, or External Links

NA

Viewing all 808 articles
Browse latest View live