Quantcast
Channel: PeteNetLive
Viewing all 802 articles
Browse latest View live

Hyper-V Ceate and Deploy Machine Templates (Without VMM)

$
0
0

KB ID 0001214 Dtd 03/07/16

Problem

Last week, myself and a few of my colleagues had to deploy a LOT of servers into Hyper-V. The client did not have System Center Virtual Machine Manager, so the process of creating and deploying a machine from a template is a little more convoluted

Solution

Here I’m deploying Windows Server 2012 Datacenter, but we repeated the process for Oracle Linux (Red Hat,) and, with the exception of sysprep, the process was the same. To start, build an ‘image machine‘ and ensure it is updated, and has on it any software you may require.

Update Windows Server

Keeping the Image For Future Updates?

If you intend to re-use this master image in the future, i.e. start it up install any outstanding updates, and then re-use it to deploy future virtual machines then BEFORE you sysprep it, take a ‘Checkpoint’. Then in future you can revert to this checkpoint and rerun sysprep again, this is because there is a three time limit on sysprep with the generalize option.

Checkpoint Windows VM

Run sys prep, it lives in;

C:\Windows\System32\Sysprep\

Tick the ‘Generalise’ option, and set it to ‘Shutdown’.

Sysprep Windows Server

Create a folder to hold your template(s).

Hyper-V Templates Directory

Export your master VM into the templates directory you have just created.

Hyper-V Export VM

Hyper-V Deploying Machines From Template

Create a new virtual machine.

Hyper-V Create New VM

MAKE SURE: You select the option ‘attach a virtual disk later’, select all other options for the new VM as you require.

 Hyper-V No Disks

Within your template directory, create a copy of the hard drive and rename it so it has the same name as your newly deployed VM. 

Hyper-V Copy Disks

Then cut/paste this newly renamed drive into the folder for your new virtual machine.


Hyper-V Paste Virtual Disks

On your new VM > Settings > SCSI Controller > Hard Drive > Add.

Hyper-V Add Virtual Disk

Navigate to the hard drive file you copied and renamed > Apply > OK.

Hyper-V Import Virtual Disk

On the ‘Firmware’ tab move the new hard drive up, so it is at the top of the boot order.

Hyper-V Boot Order

You can now power on the new VM.

Related Articles, References, Credits, or External Links

NA


Remote Desktop Web – Session Timeouts (Altering)

$
0
0

KB ID 0001215 Dtd 04/07/16

Problem

Timeouts for the RDWeb portal are defined by the choice you made when you logged in, if you selected ‘private’ or ‘public’ on the PC options, this sets the timeout. The default is 240 mins for private, and 20 minutes for public connections.

Solution

To alter these values you need to make changes in the ‘Internet Information Services Management Console’ on the RDWeb server.

Navigate to {Server-name} > Sites > Default Web Site > RDWeb > Pages > Application Settings.


Set RDSWeb Timeouts

You need to alter;

PrivateModeSessionTimeoutIn… AND PublicModeSessionTimeoutIn…

Edit the values according to your requirements.

Set RDSWeb Public Private Timeout

If you find that the changes don’t take effect immediately drop to command line and issue an ‘iisreset’ command.


Related Articles, References, Credits, or External Links

NA

PowerShell – Updating Users Email Addresses In Active Directory

$
0
0

KB ID 0001216 Dtd 05/07/16

Problem

Note: I'm referring to the Email address value that is listed on the user object in Active Directory, this will not effect any Exchange Settings!

A colleague asked me today if I had any PowerShell to update ALL the users in a clients AD, to match their UPN to their Email addresses. A quick internet search turned up loads of handy scripts to update the UPN to mach the email address, but not the way round he wanted.

AD User Name


Solution

In most (not all) cases your UPN is the same as your sAMaccountname and your domain name, so you can simply run the following;

Import-Module ActiveDirectory
Get-ADUser -Filter * -SearchBase 'DC=test,DC=net' | `
    ForEach-Object { Set-ADUser -EmailAddress ($_.samaccountname + '@test.net') -Identity $_ }

Note: Save the above as a file with a .ps1 extension, or execute both commands separately.

Update AD EMail Addresses

Now you may, (like on my test network above,) have your user logon name set to something other than firstname.lastname if so and you would prefer to set the Email value to firstname.lastname@domain.com then use the following instead.

Import-Module ActiveDirectory
Get-ADUser -Filter * -SearchBase 'DC=test,DC=net' | `
    ForEach-Object { Set-ADUser -EmailAddress ($_.givenName + '.' + $_.surname + '@test.net') -Identity $_ }

Note: Save the above as a file with a ps1 extension, or execute both commands separately.

Update AD EMail firstname lastname


Related Articles, References, Credits, or External Links

PowerShell - Update All Domain Users With Email Address From UPN

Group Policy To Throttle Network Speed via QoS

$
0
0

KB ID 0001217 Dtd 06/07/16

Problem

Why would you want to do this? Well what if you want to test slow link group policy processing, or you are testing BranchCache? Using Group policy you can ‘throttle’ traffic to and from a particular IP address. Below I will pick a domain client on 192.168.110.120, and throttle all traffic between that client, and the domain controller to be 100kbps.


Solution

As I sad above I’m throttling traffic to my domain controller so I’ll create a GPO and link it to the Domain Controllers OU. Call it something sensible.

create and link group policy

Edit the policy

edit existing group policy

Navigate to;

Computer Configuration > Policies > Windows Settings > Policy-based-Qos > Create new policy.

Qos Based Group Policy

Give the policy a name and set the throttle rate > Next.

GPO to Throttle Traffic

All Applications > Next.

GPO to Throttle Applications

Specify the IP you are throttling traffic to and from > Next.

GPO to Throttle IP Address

TCP and UDP > Finish.

GPO to Qos TCP and UDP

Then wait for the policy to apply, or run gpupdate /force on the DC.

Related Articles, References, Credits, or External Links

NA

Cisco ASA IVEv2 –‘Failed To Allocate Memory’

$
0
0

KB ID 0001218 Dtd 07/07/16

Problem

This week I was trying to get a VPN tunnel up for a client. They wanted a tunnel from their Cisco ASA into Microsoft Azure. Normally I'd use IKEv1 (because I know how to troubleshoot it!) But the guys running the site in Azure were using policy routing, which needs IKEv2.

So I converted from IKEv2 to IKEv2. As I said I'm used to debugging IKEv1, but not IKEv2, so I was struggling to make sense of what was going on. The 'interesting traffic' was spawning a LOT of phase 1 tunnels, but Phase 2 IPSEC refused to pass traffic.

Clients-ASA(config)# show cry isa

There are no IKEv1 SAs

IKEv2 SAs:

Session-id:151, Status:UP-IDLE, IKE count:25, CHILD count:0

Tunnel-id                 Local                Remote     Status         Role
526939783    222.222.222.222/500     123.123.123.123/500      READY    RESPONDER
      Encr: 3DES, Hash: SHA96, DH Grp:2, Auth sign: PSK, Auth verify: PSK
      Life/Active Time: 86400/4423 sec

Tunnel-id                 Local                Remote     Status         Role
3227575251    222.222.222.222/500     123.123.123.123/500      READY    RESPONDER
      Encr: 3DES, Hash: SHA96, DH Grp:2, Auth sign: PSK, Auth verify: PSK
      Life/Active Time: 86400/4425 sec

Tunnel-id                 Local                Remote     Status         Role
3073641799    222.222.222.222/500     123.123.123.123/500      READY    RESPONDER
      Encr: 3DES, Hash: SHA96, DH Grp:2, Auth sign: PSK, Auth verify: PSK
      Life/Active Time: 86400/4482 sec
-----------------Further Output Removed for the Sake of Brevity------------------


A debug of IKEv2 was pretty confusing but it did reveal this;

Decrypted packet:Data: 616 bytes
IKEv2-PROTO-1: Failed to allocate memory
IKEv2-PROTO-1:
IKEv2-PROTO-5: SM Trace-> SA: I_SPI=E212F1C2B09EC680 R_SPI=6F2FE9A86EEDB017 (R) MsgID = 00000000 CurState: IDLE Event: EV_DELETE
IKEv2-PROTO-5: Action: Action_Null
IKEv2-PROTO-5: SM Trace-> SA: I_SPI=E212F1C2B09EC680 R_SPI=6F2FE9A86EEDB017 (R) MsgID = 00000000 CurState: EXIT Event: EV_ABORT
IKEv2-PROTO-5: SM Trace-> SA: I_SPI=E212F1C2B09EC680 R_SPI=6F2FE9A86EEDB017 (R) MsgID = 00000000 CurState: EXIT Event: EV_CHK_PENDING_ABORT
IKEv2-PROTO-5: SM Trace-> SA: I_SPI=E212F1C2B09EC680 R_SPI=6F2FE9A86EEDB017 (R) MsgID = 00000000 CurState: EXIT Event: EV_UPDATE_CAC_STATS
IKEv2-PROTO-3: Abort exchange
IKEv2-PROTO-2: Deleting SA
IKEv2-PROTO-3: Rx [L 222.222.222.222:500/R 123.123.123.123:500/VRF i0:f0] m_id: 0x0
IKEv2-PROTO-3: HDR[i:E212F1C2B09EC680 - r: 0000000000000000]
IKEv2-PROTO-4: IKEV2 HDR ispi: E212F1C2B09EC680 - rspi: 0000000000000000
IKEv2-PROTO-4: Next payload: SA, version: 2.0
IKEv2-PROTO-4: Exchange type: IKE_SA_INIT, flags: INITIATOR
IKEv2-PROTO-4: Message id: 0x0, length: 616

Solution

The ASA was running version 8.4(6) which is not listed as being affected by this bug

ASA IKEv2 fails to accept incoming IKEV2 connections
CSCud50997
 
But that's what the problem was, upgrade to 9.2(4) and the tunnel came straight up without error.


(Related Articles, References, Credits, or External Links

NA

Azure to Cisco VPN –‘Failed to allocate PSH from platform’

$
0
0

KB ID 0001219 Dtd 12/07/16

Problem

It's been a week for strange VPN shenanigans with Cisco and Azure. I was liaising with an Azure service provider for a customer this week, and trying to get a VPN up from a Cisco ASA in one of our data centres in the UK. This is what we were seeing;

Failed to Allocate PSH

And I could see the same error in the debugs;

Decrypted packet:Data: 616 bytes
IKEv2-PROTO-1: Failed to allocate PSH from platform
IKEv2-PROTO-1:
IKEv2-PROTO-5: SM Trace-> SA: I_SPI=65EAE07164D4916D R_SPI=034FB3DBCA5E9891 (R) MsgID = 00000000 CurState: IDLE Event: EV_DELETE
IKEv2-PROTO-5: Action: Action_Null
IKEv2-PROTO-5: SM Trace-> SA: I_SPI=65EAE07164D4916D R_SPI=034FB3DBCA5E9891 (R) MsgID = 00000000 CurState: EXIT Event: EV_ABORT
IKEv2-PROTO-5: SM Trace-> SA: I_SPI=65EAE07164D4916D R_SPI=034FB3DBCA5E9891 (R) MsgID = 00000000 CurState: EXIT Event: EV_CHK_PENDING_ABORT
IKEv2-PROTO-5: SM Trace-> SA: I_SPI=65EAE07164D4916D R_SPI=034FB3DBCA5E9891 (R) MsgID = 00000000 CurState: EXIT Event: EV_UPDATE_CAC_STATS
IKEv2-PROTO-2: Abort exchange
IKEv2-PROTO-2: Deleting SA


Solution

After a conversation with the service provider, it turns out that they are providing a multi tenant solution that utilises many VPNs for multiple clients, because of this they HAVE TO use a security gateway that uses 'Route Based/Dynamic Routing'.

There are two types of VPNs that you can run out of Azure;

  • Static routing VPNs – Static routing VPNs or policy-based VPNs. These encrypt and route traffic through an interface based on a customer defined policy. Static routing VPNs require a static routing VPN gateway. With this type of VPN you CAN NOT have multiple site to site VPNs.
  • Dynamic routing VPNs – Dynamic routing or route-based VPNs. These depend on a tunnel interface specifically created for forwarding traffic. Any traffic arriving on the virtual tunnel interface (VTI) will be forwarded through the correct VPN connection. 

Why is this a problem?

If you look on the currently supported VPN devices for Azure;

Azure to Cisco VPN Compatibility

Route-based is not compatible, this is because VPN's based on VTI's are NOT supported on the Cisco ASA platform. If you are a Cisco firewall type, this is the same reason you can't use an ASA for DMVPN, or to terminate a GRE tunnel on.

What can you do?

In my case I'm going to put a Cisco IOS Router (Cisco ISR 1921), beside the Firewall and route all the Azure traffic via that. As you can see from the table above that IS supported.


Related Articles, References, Credits, or External Links

NA

Microsoft Azure To Cisco ISR Router Site to Site VPN

$
0
0

KB ID 0001220 Dtd 19/07/16

Problem

Last week I was having problems getting a VPN up from a client's Cisco ASA into Azure. This was because the Azure estate was using 'route-based' or a 'dynamic routing VPN'. See the following article;

Azure to Cisco VPN – ‘Failed to allocate PSH from platform’

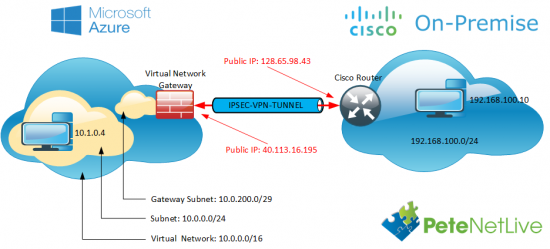
So the firewall was a non-starter, but Cisco ISR routers are supported, and they can handle virtual tunnel interfaces (VTI's). So I used a Cisco ISR 1921 router, sat that beside the firewall, and gave that a public IP. Note: I did have to route the traffic to Azure, to use this router instead of the firewall but that's easy. 

Now we just need to  get the VPN Tunnel up.

Cisco Router to Azure VPN


Solution

OK, before you get started your router needs to be able to support crypto/VPN's. That means you should be running a 'security' license (show license should say you have a securityk9 licence installed and running, or K8 if you live in North Korea, or 1986). If you don't, the router will not recognise any of the crypto commands.

Log into the router and create an ACL to allow the traffic from your local LAN, to the Azure LAN.

Petes-ISR#conf terminal
Enter configuration commands, one per line.  End with CNTL/Z.
Petes-ISR(config)#access-list 101 permit ip 192.168.100.0 0.0.0.255 10.0.0.0 0.0.0.255

To establish 'Phase 1' of the VPN tunnel we need an IKE proposal. Note I'm using IKEv2, that is a requirement for route-based, or dynamic routing from Azure.

Petes-ISR(config)#crypto ikev2 proposal IKE-PROP-AZURE
IKEv2 proposal should have atleast an encryption algorithm, an integrity algorithm and a dh group configured
Petes-ISR(config-ikev2-proposal)# encryption aes-cbc-256 aes-cbc-128 3des
Petes-ISR(config-ikev2-proposal)# integrity sha1
Petes-ISR(config-ikev2-proposal)# group 2
Petes-ISR(config-ikev2-proposal)# exit

Then add the proposal we created above to an IKEv2 Policy, (Note: a policy can have multiple proposals).

Petes-ISR(config)#crypto ikev2 policy IKE-POLICY-AZURE
IKEv2 policy should have atleast one complete proposal attached 
Petes-ISR(config-ikev2-policy)# proposal IKE-PROP-AZURE
Petes-ISR(config-ikev2-policy)# exit

Create a keyring, (in IKEv2 you can have multiple keys), and specify your VPN pre shared key, (PSK or shared secret).

Petes-ISR(config)#crypto ikev2 keyring KEYRING-AZURE
Petes-ISR(config-ikev2-keyring)# peer 40.113.16.195
Petes-ISR(config-ikev2-keyring-peer)# address 40.113.16.195
Petes-ISR(config-ikev2-keyring-peer)# pre-shared-key 1234567890asdfg
Petes-ISR(config-ikev2-keyring-peer)# exit
Petes-ISR(config-ikev2-keyring)# exit

Now all the 'Phase 1' settings get tied together in a Phase 1 profile. (Note: GigabitEthernet0/0 is the public facing port, yours may be different).

Petes-ISR(config)#crypto ikev2 profile PROFILE-PH1-AZURE
% IKEv2 profile MUST have match identity or match certificate statements
Petes-ISR(config-ikev2-profile)# match address local interface GigabitEthernet0/0
Petes-ISR(config-ikev2-profile)# match identity remote address 40.113.16.195 255.255.255.255
Petes-ISR(config-ikev2-profile)# authentication remote pre-share
Petes-ISR(config-ikev2-profile)# authentication local pre-share
Petes-ISR(config-ikev2-profile)# keyring KEYRING-AZURE
Petes-ISR(config-ikev2-profile)# exit

For 'Phase 2' (IPSEC) you create a 'transform set'.

Petes-ISR(config)#crypto ipsec transform-set TRANSFORM-AZURE esp-aes 256 esp-sha-hmac
Petes-ISR(cfg-crypto-trans)# mode tunnel
Petes-ISR(cfg-crypto-trans)# exit

Then you tie all the 'Phase 2' settings together with a 'Phase 2' profile, and link that back to the 'Phase 1' profile.

Petes-ISR(config)#crypto ipsec profile PROFILE-PH2-AZURE
Petes-ISR(ipsec-profile)# set transform-set TRANSFORM-AZURE
Petes-ISR(ipsec-profile)# set ikev2-profile PROFILE-PH1-AZURE
Petes-ISR(ipsec-profile)# exit

You then need to create a tunnel, that will use all these settings.

Note: Yes you can use 169.254.x.x (I know it's an APIPA address, but it will work fine).

Petes-ISR(config)#int tunnel 1
Petes-ISR(config-if)# ip address 169.254.0.1 255.255.255.0
Petes-ISR(config-if)# ip tcp adjust-mss 1350
Petes-ISR(config-if)# tunnel source GigabitEthernet0/0
Petes-ISR(config-if)# tunnel mode ipsec ipv4
Petes-ISR(config-if)# tunnel destination 40.113.16.195
Petes-ISR(config-if)# tunnel protection ipsec profile PROFILE-PH2-AZURE
Petes-ISR(config-if)# exit

Finally the router needs to 'know' that traffic destined for Azure is sent down the VPN tunnel.

Petes-ISR(config)#ip route 10.0.0.0 255.255.255.0 tunnel 1

Do I Need To Worry About NAT?

No, (even if you are doing NAT Overload). Unlike an IPSEC VPN on a firewall you do not need to exempt the traffic for the VPN, from NAT translation. That's because it leaves the router through the tunnel interface and not the public facing interface.

Below are all the commands you can copy and paste and change accordingly;

Assumptions

192.168.100.0/24 is behind the router
10.0.0.0/16 is the Azure network
40.113.16.195 is the Azure Gateway IP
1234567890asdfg is the pre shared key
GigabitEthernet0/0 is the ‘public facing interface on the router’


!
access-list 101 permit ip 192.168.100.0 0.0.0.255 10.0.0.0 0.0.0.255
!
crypto ikev2 proposal IKE-PROP-AZURE
 encryption aes-cbc-256 aes-cbc-128 3des
 integrity sha1
 group 2
 exit
!
crypto ikev2 policy IKE-POLICY-AZURE
 proposal IKE-PROP-AZURE
 exit
!
crypto ikev2 keyring KEYRING-AZURE
 peer 40.113.16.195
   address 40.113.16.195
   pre-shared-key 1234567890asdfg
   exit
 exit
!
crypto ikev2 profile PROFILE-PH1-AZURE
 match address local interface GigabitEthernet0/0
 match identity remote address 40.113.16.195 255.255.255.255
 authentication remote pre-share
 authentication local pre-share
 keyring KEYRING-AZURE
 exit
!
crypto ipsec transform-set TRANSFORM-AZURE esp-aes 256 esp-sha-hmac
 mode tunnel
 exit
!
crypto ipsec profile PROFILE-PH2-AZURE
 set transform-set TRANSFORM-AZURE
 set ikev2-profile PROFILE-PH1-AZURE
 exit
!
int tunnel 1
 ip address 169.254.0.1 255.255.255.0
 ip tcp adjust-mss 1350
 tunnel source GigabitEthernet0/0
 tunnel mode ipsec ipv4
 tunnel destination 40.113.16.195
 tunnel protection ipsec profile PROFILE-PH2-AZURE
 exit
!
ip route 10.0.0.0 255.255.255.0 tunnel 1


Related Articles, References, Credits, or External Links

Microsoft Azure To Cisco ASA Site to Site VPN

Exchange 2016 Install Error ‘Skipping creating Discovery Arbitration Mailbox because of insufficient permission”

$
0
0

KB ID 0001221 Dtd 01/08/16

Problem

Note: Can also be seen on Exchange 2013.

While installing a new Exchange 2016 Server into a clients Exchange 2010 infrastructure last week, the setup failed with the following error.

Exchange Arbitration Permissions Error

A cutdown version of the error;

          Write-ExchangeSetupLog -Info ("Cannot find E-discovery arbitration mailbox with name=$name.");
          }
          }
          else
          {
          write-exchangesetuplog -info "Skipping creating Discovery Arbitration Mailbox because of insufficient permission."
          }
          }
        " was run: "Microsoft.Exchange.Data.DataValidationException: Database is mandatory on UserMailbox.
   at Microsoft.Exchange.Configuration.Tasks.Task.ThrowError(Exception exception, ErrorCategory errorCategory, Object target, String helpUrl)
   at Microsoft.Exchange.Configuration.Tasks.Task.WriteError(Exception exception, ErrorCategory category, Object target, Boolean reThrow)
   at Microsoft.Exchange.Configuration.Tasks.DataAccessTask`1.Validate(TDataObject dataObject)
   at Microsoft.Exchange.Configuration.Tasks.SetTaskBase`1.InternalValidate()
   at Microsoft.Exchange.Configuration.Tasks.SetRecipientObjectTask`3.InternalValidate()
   at Microsoft.Exchange.Management.Common.SetMailEnabledRecipientObjectTask`3.InternalValidate()
   at Microsoft.Exchange.Management.RecipientTasks.SetUserBase`3.InternalValidate()
   at Microsoft.Exchange.Management.RecipientTasks.SetMailboxBase`3.InternalValidate()
   at Microsoft.Exchange.Management.RecipientTasks.SetMailbox.InternalValidate()
   at Microsoft.Exchange.Configuration.Tasks.Task.b__b()
   at Microsoft.Exchange.Configuration.Tasks.Task.InvokeRetryableFunc(String funcName, Action func, Boolean terminatePipelineIfFailed)".

Click for the full Error.


Solution

This error is about arbitration mailboxes, so let's have a look at those, (on my Exchange 2010 server, in the Exchange Shell).

Get-Mailbox –Arbitration | Select Name,Database

Exchange 2010 show arbitration

As you can see I've got a system mailbox that is not attached to any database, (the one with the yellow error under it). So I simply need to associate that with a mailbox database.

Set-Mailbox ‘{mailbox}’ –Database {Exchange-2010-Database} –Arbitration

Exchange 2010 Repair Arbitration Mailbox

Answer 'A' for 'All' when prompted.

Working Example

Set-Mailbox ‘SystemMailbox{e0dc1c29-89c3-4034-b678-e6c29d823ed9}’ –Database ‘Mailbox Database’ –Arbitration 

Now check the arbitration mailboxes again, and there should be no errors.

Exchange 2010 Display Arbitration

Re-run setup.exe from the Exchange install media again, and the install should detect the failed one, and let you continue from the point of failure.

Exchange 2016 Incomplete Installation

Related Articles, References, Credits, or External Links

NA


Android – Stop ‘Facebook’ Messenger Hijacking Your SMS

$
0
0

KB ID 0001222 Dtd 01/08/16

Problem

Just because Facebook changed the name to simply ‘messenger’ then had it as a separate ‘app’ to confuse the masses into thinking it was nothing to do with Facebook, does not mean I want it to handle my SMS messages!

I already have something to handle my SMS messages, MY PHONE! Yes it’s running Android so I’m slowly giving my soul to Google, but that doesn’t mean Facebook can get in on the act, and serve me adverts based on whats in my text messages.

After a recent update, it decided to jump in and intercept my SMS messages then keep prompting me to change my default SMS app to Messenger, which if you are in a hurry you can inadvertently do.


Solution

From within Messenger > Profile > SMS.

001 - Facebook Messenger Settings

TURN OFF the toggle switch at the top for ‘Default SMS app’.

002 - Facebook Messenger Disable SMS


Related Articles, References, Credits, or External Links

NA

Outlook Error “The name of the security certificate is invalid or does not match the name of the site.”

$
0
0

KB ID 0000036 Dtd 02/08/16

Problem

Seen in Outlook when connecting to a mailbox on an Exchange Server, its caused by using a self signed certificate OR a purchased certificate, where the internal and external names are different.

The name of the security certificate is invalid or does not match the name of the site

Solution

1. On the Exchange Server > Start > All Programs > Microsoft Exchange Server {version} > Exchange Management Console. Issue the following four commands;

Exchange 2016 (change the values in red)

Note: This uses the new Set-ClientAccessService commandlet.

Get-WebServicesVirtualDirectory -Server EXCHANGE-MAIL | Set-WebServicesVirtualDirectory -InternalUrl https://mail.publicdomain.co.uk/ews/exchange.asmx -ExternalURL https://mail.publicdomain.co.uk/ews/exchange.asmx

Set-OWAVirtualDirectory -identity "EXCHANGE-MAIL\owa (Default Web Site)" -InternalURL https://mail.publicdomain.co.uk/owa -ExternalURL https://mail.publicdomain.co.uk/owa

Get-OABVirtualDirectory -Server EXCHANGE-MAIL | Set-OABVirtualDirectory -InternalURL https://mail.publicdomain.co.uk/OAB -ExternalURL https://mail.publicdomain.co.uk/OAB

Get-ECPVirtualDirectory -Server EXCHANGE-MAIL | Set-ECPVirtualDirectory -InternalURL https://mail.publicdomain.co.uk/ECP -ExternalURL https://mail.publicdomain.co.uk/ECP

Get-MAPIVirtualDirectory -Server EXCHANGE-MAIL | Set-MAPIVirtualDirectory -InternalURL https://mail.publicdomain.co.uk/MAPI -ExternalURL https://mail.publicdomain.co.uk/MAPI -IISAuthenticationMethods NTLM,Negotiate

Get-ActiveSyncVirtualDirectory -Server EXCHANGE-MAIL | Set-ActiveSyncVirtualDirectory -InternalURL https://mail.publicdomain.co.uk/Microsoft-Server-ActiveSync -ExternalURL https://mail.publicdomain.co.uk/Microsoft-Server-ActiveSync

Set-OutlookAnywhere -identity "EXCHANGE-MAIL\RPC (Default Web Site)" -ExternalHostname mail.publicdomain.co.uk -InternalHostname mail.publicdomain.co.uk -InternalClientsRequireSSL $true -ExternalClientsRequireSsl $true -ExternalClientAuthenticationMethod:NTLM

Set-ClientAccessService -Identity EXCHANGE-MAIL -AutoDiscoverServiceInternalUri https://mail.publicdomain.co.uk/Autodiscover/Autodiscover.xml

Exchange 2013, Exchange 2010 and SBS 2011 (change the values in red)

Set-ClientAccessServer -Identity EXCHANGE-MAIL -AutodiscoverServiceInternalUri https://mail.publicdomain.co.uk/autodiscover/autodiscover.xml

Set-WebServicesVirtualDirectory -Identity "EXCHANGE-MAIL/EWS (Default Web Site)" –InternalUrl https://mail.publicdomain.co.uk/EWS/Exchange.asmx

Set-OABVirtualDirectory -Identity “EXCHANGE-MAIL/OAB (Default Web Site)” -InternalURL https://mail.publicdomain.co.uk/OAB

Set-ActiveSyncVirtualDirectory -Identity “EXCHANGE-MAIL/Microsoft-Server-ActiveSync (Default Web Site)” -InternalURL https://mail.publicdomain.co.uk/Microsoft-Server-Activesync

Note:If you get repeated certificate prompts for 'autodiscover.domain.com' that should be from 'mail.domain.com', create an SRV record (_autodiscover) to redirect to mail.domain.con

Outlook Anywhere Note

If you intend to use Outlook Anywhere, you may also want to execute the following command. Particularly if you use SBS, which has a habit of setting remote.publicdomain.com as the default outside name.

Set-WebServicesVirtualDirectory –Identity ‘EXCHANGE-MAIL/EWS (Default Web Site)’ –ExternalUrl https://mail.publicdomain.co.uk/ews/exchange.asmx

Exchange 2007 (change the values in red)

Set-ClientAccessServer -Identity EXCHANGE-MAIL -AutodiscoverServiceInternalUri https://mail.publicdomain.co.uk/autodiscover/autodiscover.xml

Set-WebServicesVirtualDirectory -Identity "EXCHANGE-MAIL/EWS (Default Web Site)" -InternalUrl https://mail.publicdomain.co.uk/ews/exchange.asmx

Set-OABVirtualDirectory -Identity "EXCHANGE-MAI/Loab (Default Web Site)" -InternalUrl https://mail.publicdomain.co.uk/oab

Set-UMVirtualDirectory -Identity "EXCHANGE-MAIL/unifiedmessaging (Default Web Site)" -InternalUrl https://mail.publicdomain.co.uk/unifiedmessaging/service.asmx

For Small Business Server 2008

For SBS 2008 the commands are Different! (the following commands are for Exchange 2007 on SBS 2008 ONLY;

Set-ClientAccessServer -Identity EXCHANGE-MAIL -AutodiscoverServiceInternalUri https://mail.publicdomain.co.uk/autodiscover/autodiscover.xml

Set-WebServicesVirtualDirectory -Identity "EXCHANGE-MAILEWS (SBS Web Applications)" -InternalUrl https://mail.publicdomain.co.uk/ews/exchange.asmx

Set-OABVirtualDirectory -Identity "EXCHANGE-MAILoab (SBS Web Applications)" -InternalUrl https://mail.publicdomain.co.uk/oab

et-UMVirtualDirectory -Identity "EXCHANGE-MAILunifiedmessaging (SBS Web Applications)" -InternalUrl https://mail.publicdomain.co.uk/unifiedmessaging/service.asmx

Note: where EXCHANGE-MAIL is internal and mail.publicdomain.co.uk is external name

2. Then open the IIS Manager Expand Application Pools > MSExchangeAutodiscoverAppPool > Right Click > Recycle.

Note: You may have to enter the FQDN of the server rather than its Netbios name!!

Related Articles, References, Credits, or External Links

Original article written 04/11/11 - Updated 07/03/13

IIS – Cannot Download File From Website (With Extension .xyz)

$
0
0

KB ID 0001223 Dtd 02/08/16

Problem

I first saw this problem a few months ago, when I wasted to download some .bin and .pkg files from a web server running IIS, into a Cisco firewall. Then again this week I needed to get a large .iso file into a clients network so I put it on a publicly accessible web server running IIS, and had the problem again.


Solution

On the IIS server, open administrative tools > Internet Information Services (IIS) Manager > Drill down to the default website > Locate the ‘MIME Types‘ and open them.

MIME Type IIS

You will probably find there is not one for the file extension you cannot download (in this case .iso) > Add one in > Set the MIME type to;

application/octet-stream

Add File Download to IIS


Then re-try your download.

Related Articles, References, Credits, or External Links

NA

Exchange 2016 (& 2013) Enable Circular Logging

$
0
0

KB ID 0001224 Dtd 11/07/16

Problem

Let's be clear about this, the correct way to flush/clear the Exchange logs is to perform a backup of the mailbox database in question, with an 'Exchange aware' piece of backup software. This will clear down the logs properly.

Why Do We Need Logs?

Well I'm glad you asked, if there's a problem, and we lose the database, we can 'play' the log files back into the database to restore any messages that were 'lost' e.g. because you restored from a backup taken at 22:00 hours last night, and it's now 10:00 hours the following morning. The logs let us get the email that came in after the backup had finished. This is why after a successful backup the logs are usually cleared.

Stop Waffling My Servers Down!

OK so you put your log files on a system drive? It's filled up with logs, and taken the server down. Either because you're a doofus, or you are doing an Exchange migration, and now theres a ton of logs, and you didn't follow my Exchange 2016 Migration Walkthrough.


Solution

Luckily I've caught this one early! (There's an Exchange 2012 to 2016 migration going on, hence the large amount of space taken by Exchange log files).

001 - Exchange Log Folder Full

Enable Exchange 2016 / 2013 Circular Logging from EAC

From within the Exchange Admin Center > Servers  > Databases > Select your Mailbox DB > Edit > Maintenance > Enable Circular Logging > Save.

002 - Exchange EAC Enable Circular Logging

Then you need to restart the 'Microsoft Exchange Information Store' service, (run services.msc).

Restart Exchange Information Store

Enable Exchange 2016 / 2013 Circular Logging from EAC

Run the following commands;

Set-MailboxDatabase {Database-Name} -CircularLoggingEnabled $True
net stop "Microsoft Exchange Information Store"

net start "Microsoft Exchange Information Store"

005 - Exchange 2016 Enable Circular Logging

Note: To disable it again.

Set-MailboxDatabase {Database-Name} -CircularLoggingEnabled $False
net stop "Microsoft Exchange Information Store"

net start "Microsoft Exchange Information Store"

Now things should look a bit tidier.

004 - Flush Exchange Logs

Don't Forget: Logging is a good thing TURN IT BACK ON!

Related Articles, References, Credits, or External Links

NA

Exchange 2016 – EAC (ECP) Works But OWA Does Not

$
0
0

KB ID 0001225 Dtd 11/07/16

Problem

During an Exchange 2010 to Exchange 2016 Migration, I was busy migrating mailboxes into the 2016 mailbox database. I noticed that while the Exchange Admin Center worked fine (I was doing the migration from there!) Outlook Web Access did not. I got a ‘Something Went Wrong” error.

Error-OWA-Something-went-wrong

:-(

Something Went Wrong

We Cant get the information right now. Please try again later.

More Details

Refresh the page

Solution

Navigate to C:\Program Files\Microsoft\Exchange Server\V15\FrontEnd\HttpProxy and take a copy of the SharedWebConfig.config file.

Shared Web Config

Then Paste a copy of that file into the C:\Program Files\Microsoft\Exchange Server\V15\ClientAccess directory.

OWA Something Went Wrong

Then restart the IIS Services (iisreset).

IISReset

If the problem persists ensure the certificate used for https binding, (in IIS.) is the same for the Exchange Front End, and the Exchange Back End web sites.

Related Articles, References, Credits, or External Links

NA

Setting Up Meraki MDM

$
0
0

KB ID 0001226 Dtd 03/08/16

Problem

As is usually the case with Meraki this is pretty simple to setup. If you are familier with Meraki and have not deployed MDM before then stop a second. I mistakenly setup a dashboard for a client recently, (like I usually do with Meraki deployments). Then could not work out how to add the MDM component without an order number!

Meraki MDM is free (up to 100 devices) which is great, but BE WARNED, register 101 devices, and you get a bill for 101 devices not 1 device!


Solution

Go to the Meraki website, and register for mobility management, this will let you create a login and a network within the Meraki Dashboard


009 - Meraki - Register for MDM

If you already have a Meraki dashboard you will find MDM under Network-wide > MDM.

Meraki - MDM

If you want to manage Apple devices, then you need to download a certificate from Apple, (this requires you to have an Apple ID, if you don’t have one go and set one up). Download the CSR (Certificate Signing Request), and then USE THE HYPERLINK to go to Apple’s website.

Meraki - Apple Certificate

Upload your .CSR file.

Meraki - Upload CSR

Download your ‘push certificate’.

Meraki - Download Signing Cert

Back in the MDM dashboard, enter your Apple ID  >Browse to your new push certificate, and select ‘Save’.

Meraki - Upload Apple Cert

Note: If you registered though meraki then you will already have a network defined, (skip the next two steps). If you have an existing dashboard, you may need to create a network.

Meraki - Create Network

Select MDM > Create Network,

Meraki - Create MDM Network

You can now add devices to the MDM network.

Meraki - MDM Add Devices


Related Articles, References, Credits, or External Links

NA

Public Folder Migration Error hr=0x80040111

$
0
0

KB ID 0001228 Dtd 05/08/16

Problem

I usually follow my own documented process for migrating public folders to Exchange 2016. I did that this week, and this happened;

Public Folder Migration Error

Error;

MapiExceptionLogonFailed: Unable to make connection to the server. (hr=0x80040111, ec=-2147221231)
Diagnostic context:
    Lid: 49064   dwParam: 0x1
    Lid: 37288   StoreEc: 0x6AB
    Lid: 49064   dwParam: 0x2
    Lid: 49191   EMSMDBMT.EcDoConnectEx called [length=178]
    Lid: 48679   EMSMDBMT.EcDoConnectEx returned [ec=0x80040111][length=56][latency=0]
    Lid: 45169   StoreEc: 0x80040111
    Lid: 50544   ClientVersion: 15.1.225.42
    Lid: 52080   StoreEc: 0x80040111
    Lid: 1494    ---- Remote Context Beg ----
    Lid: 22086
    Lid: 27206
    Lid: 39869
    Lid: 56893   StoreEc: 0x8004010F
    Lid: 44989
    Lid: 24684
    Lid: 20076   StoreEc: 0x80040111
    Lid: 29100
    Lid: 20396   StoreEc: 0x80040111
    Lid: 9486    StoreEc: 0x80040111
    Lid: 24492
    Lid: 18348   StoreEc: 0x80040111
    Lid: 26540   dwParam: 0xE0003
    Lid: 22444   dwParam: 0xC30001
    Lid: 1750    ---- Remote Context End ----
    Lid: 51152
    Lid: 52465   StoreEc: 0x80040111
    Lid: 60065
    Lid: 33777   StoreEc: 0x80040111
    Lid: 59805
    Lid: 52487   StoreEc: 0x80040111
    Lid: 19778
    Lid: 27970   StoreEc: 0x80040111
    Lid: 17730
    Lid: 25922   StoreEc: 0x80040111
    + CategoryInfo          : NotSpecified: (:) [New-PublicFolderMigrationRequest], RemoteTransientException
    + FullyQualifiedErrorId : [Server={New-Server},RequestId=6cbefa76-98ad-4a2e-bb33-237d7fd795fd,TimeStamp=03/08/2016 7:1
   7:17 PM] [FailureCategory=Cmdlet-MapiExceptionLogonFailed] 42728F13,Microsoft.Exchange.Management.Migraion.NewMgrationBatch
    + PSComputerName        : {new-server}

Solution

Although it looks a pretty scary error, it's quite straightforward to rectify. I was doing a migration and I'd moved all the mailboxes already, so I had dismounted and removed the mailbox database on the source Exchange server. (Exchange 2010). All I had to to was mount a mailbox database (I just created a new empty one, and mounted it.)

Create Mailbox Database

If I then tried to do the migration, it queued up properly!

PF Migration Request

Related Articles, References, Credits, or External Links

NA


Outlook – Constantly Asks for Password

$
0
0

KB ID 0001227 Dtd 05/08/16

Problem

I did an Exchange 2010 to 2016 Migration for a school this week. They are going to reimage all their PCs to Windows 10 and install Office 2016 over the summer holidays. But a few staff members were working over the holidays and needed their Win7/Outlook 2010 clients pointing to the new Exchange server.

This I did (I simply created new mail profiles and let auto discover do its work). But then the Outlook clients prompted for a username and password every five minutes (even if 'remember password' was ticked).

Solution

Outlook promoting for passwords all the time is a common problem, and one I really struggled with here. Make sure before you troubleshoot this error that you have done the following;

  • Updated your version of Outlook with the latest updates.
  • Make sure you have NOT cached old/incorrect passwords in Windows Credential Manager.
  • Make sure some 'clown' had NOT ticked 'Always ask for Credentials' (Account > More Settings >security tab). While you are in there if you are on Office 365 ensure 'Anonymous Authentication' IS selected.
  • Make sure you are NOT going though a proxy server! If you are, you need to make an exception for the Exchange traffic.
  • The names and urls that your Exchange server are setup and match the certificate on the Exchange server (and can be resolved in DNS) see this article.

Given my Exchange background the answer was pretty much staring me in the face. Modern Exchange servers, use https for pretty much everything now, (IMAP and RPC are old school). The problem was the account settings to collect mail via https/Outlook anywhere needed changing. After a bit of trial and error and some internet searching the following cured the problem.

Go to the properties of your mail account > More settings.

Exchange Account Settings

Tick > Connect to Exchange using HTTP  > Exchange Proxy Settings.

Exchange Account Proxy Settings

Enter the correct URL of your Exchange server > Tick connect using SSL only > Enter 'msstd:{Exchange-URL} > UNTICK both the https options > Set the authentication to NTLM Authentication (or negotiate) > OK.

Exchange Outlook https settings

As a side note: I also set the MSSTD address on the Exchange server, with the following shell command;

Set-OutlookProvider EXPR -CertPrincipalName msstd:mail.petenetlive.com

Set-OutlookProvider EXCH -CertPrincipalName msstd:mail.petenetlive.com

Related Articles, References, Credits, or External Links

Outlook Error “The name of the security certificate is invalid or does not match the name of the site.”


Exchange – Cannot Delete Mailbox Move Request

$
0
0

KB ID 0001228 Dtd 08/08/16

Problem

On the tail end of an Exchange 2010 to 2016 migration last week, I needed to decommission the old Exchange 2010 server. It would not let me remove the mailbox database, as it had a ‘move-request’ that it thought had not completed, (for the administrator account). However if I tried to delete the move request from the EMC this happened;

Cannot remove Move Request

Error

Failed to communicate with the mailbox database

MapiExpetionNoAccess Unable to open message store

(hr=0x080070005, ec=-2147024891


Solution

Even trying to remove the move request with PowerShell failed. In the end I had to remove the request in ADSIEdit.msc. 

Windows Key+R > asdiedit.msc > Connect to > Default Naming Context > DC={your domain}, DC={your domain extension} > Navigate to the user affected > Properties > Filter > Show only attributes that have values.

Remove Exchange Move Request

Locate the following two values and clear them;

msExchMailboxMoveFlags

msExchMailboxMoveStatus

Remove Exchange Move Attributes

This is enough to remove the failed mailbox move request, but if you’re nervous, then just refresh the move request section and it should disappear.

Clear Exchange Move Request


Related Articles, References, Credits, or External Links


Exchange 2016 (2013) Renaming and Moving Databases

$
0
0

KB ID 0001229 Dtd 12/08/16

Problem

Exchange has a habit of naming its databases as 'Mailbox Database {Random-Number}'. This makes my OCD 'itch'. So one of the first things I do is rename the database to something more sensible. Then I like to move the databases from the server system drive, and also relocate the log files into their own partition/drive.


Solution

Rename a Mailbox Database

Log into Exchange Admin Center > Servers > Databases  > Select the Database > Edit > Rename the Database as required > Save.

Rename Exchange Database

Note: You can change the database location here also, but not the log file path so I do that using the Exchange Shell.

Moving a Mailbox Database and Log Files

The syntax for mixing both the database files and the log files is;

Move-DatabasePath MBX-DB-2016 -EdbFilePath E:\EX-Databases\MBX-DB-2016.edb -LogFolderPath L:\EX-Logs

Move Exchange Database and Logs

You will be asked to confirm the move and that you are happy to take the database offline.

Related Articles, References, Credits, or External Links

NA

Exchange – Test User Extest Isn’t Available

$
0
0

KB ID 0001230 Dtd 16/08/16

Problem

While troubleshooting some connectivity issues I used the Test-EcpConnectivity commandlet and got the following error;

Exchange Test User isnt accessible

Test user ‘extest_bebc4142688e4’ isn’t accessible so this cmdlet  wont be able to test Client Access Server connectivity

Solution

To enable the test user you need to run a script, and you will find it in the script directory in the Exchange setup media . Locate and run the new-testcasconnectivityuser.ps1 script. You will need to supply a password for this account, but from this point forward Exchange will look after that for you.

Enable Exchange Test User

Related Articles, References, Credits, or External Links

NA

VMware ESX – Enable ‘Embedded Host Client’

$
0
0

KB ID 0001231 Dtd 16/08/16

Problem

Since ESX 6.0.0 Update 2 you've been able to use the Embedded Host Client in ESX. Which is great if (like me) you use a Mac because I don't have to fire up a windows box to load the 'Fat' VI client anymore.

What about older version of ESX?

If you are running 5.5 (update3) or newer then you can install and use the Embedded Host Client.

Why didnt you just upgrade to 6.0.0 Update 2?

Well my second host is using the custom HP build of ESX, and I didn't want to do a remote upgrade, to find my host then had no drivers for its network cards!


Solution

You will need to enable SSH on the host, connect via SSH and issue the following three commands;

esxcli network firewall ruleset set -e true -r httpClient
esxcli software vib install -n esx-ui -d https://hostupdate.vmware.com/software/VUM/PRODUCTION/main/vmw-depot-index.xml
esxcli network firewall ruleset set -e false -r httpClient

Enable Embedded Host Client

Now you can connect to and manage the client via web browser, the URL will be https://{ip-adress-or-name}/ui

HP Server Embedded Host Client


Related Articles, References, Credits, or External Links

NA

Viewing all 802 articles
Browse latest View live