Quantcast
Channel: PeteNetLive
Viewing all 801 articles
Browse latest View live

Cisco AnyConnect With Server 2016 NPAS (RADIUS) Different Groups

$
0
0

KB ID 0001474

Problem

A few years ago I replaced a firewall that was setup like this, and while it took me a while to work out what was going on, I remember thinking it was an elegant solution. Fast forward to today, and I’m now working with the guy who set it up! (Kudos to Paul White).

So when I had a client with a similar requirement, I sat down fired up the lab, and documented it.

AnyConnect-RADIUS-NAP

What was used;

  • Windows 10 Remote Client
  • AnyConnect v4 Client
  • Server 2016 NAP (NPAS) Server
  • Windows 2016 Domain.
  • Cisco vASA (v9.2)

Solution

Cisco ASA Configuration

First, configure RADIUS AAA;

!

aaa-server PNL-RADIUS protocol radius

aaa-server PNL-RADIUS (inside) host 192.168.110.19

 key 666999

 radius-common-pw 666999

 exit

!

Create a ‘Pool’ of IP addresses for the remote clients;

! 

ip local pool POOL-ANYCONNECT-SN 192.168.249.1-192.168.249.254 mask 255.255.255.0

!

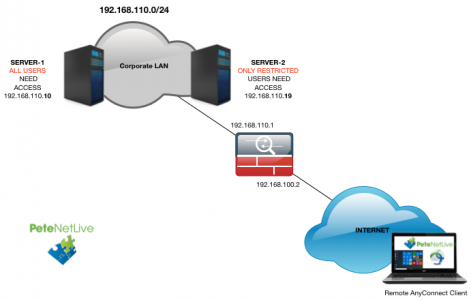
Create some ‘Objects’ one for the Pool you created above, one for the server(s) that everyone can access, and one for the server(s) only restricted users can access;

!

object network OBJ-ANYCONNECT-SN

  subnet 192.168.249.0 255.255.255.0

!

object-group network OBJ-USER-ACCESS-SERVERS

 description Servers than can be accessed by VPN-USER-ACCESS AD Group

 network-object host 192.168.110.10

!

object-group network OBJ-RESTRICTED-ACCESS-SERVERS

 description Servers than can only be accessed by VPN-RESTRICTED-ACCESS AD Group

 network-object host 192.168.110.19

!

Enable Webvpn and AnyConnect;

!

webvpn

  enable outside

  no tunnel-group-list enable

  anyconnect image disk0:/anyconnect-win-4.6.00362-webdeploy-k9.pkg 1

  anyconnect image disk0:/anyconnect-macos-4.6.00362-webdeploy-k9.pkg 2

  anyconnect enable

!

Create the ACLs for your TWO AD user groups;

!

access-list ACL-VPN-USER-ACCESS-SERVERS extended permit ip object-group OBJ-USER-ACCESS-SERVERS object OBJ-ANYCONNECT-SUBNET

!

access-list ACL-VPN-RESTRICTED-ACCESS-SERVERS permit ip object-group OBJ-USER-ACCESS-SERVERS object OBJ-ANYCONNECT-SUBNET

access-list ACL-VPN-RESTRICTED-ACCESS-SERVERS permit ip object-group OBJ-RESTRICTED-ACCESS-SERVERS object OBJ-ANYCONNECT-SUBNET

!

Stop NAT being performed on the remote AnyConnect traffic;

!

nat (inside,outside) 1 source static any any destination static OBJ-ANYCONNECT-SN OBJ-ANYCONNECT-SN no-proxy-arp route-lookup

!

Each Group-Policy (below) wont have its own tunnel-group so you need to enable RADIUS on the default web tunnels group, and assign the IP Pool you created (above). Note: I’m allowing authentication to fall back to LOCAL in case the RADIUS server fails;

!

tunnel-group DefaultWEBVPNGroup general-attributes 

 authentication-server-group PNL-RADIUS LOCAL

 address-pool POOL-ANYCONNECT-SN

!

Finally, create a group-policy that the NAP server will tell the ASA to allocate to the users of the AD Groups (VPN-USER)ACCES, and VPN-RESTRICTED-USER-ACCESS);

!

group-policy GP-USER-ACCESS-SERVERS internal

group-policy GP-USER-ACCESS-SERVERS attributes

 dns-server value 192.168.110.10

 vpn-idle-timeout 30

 vpn-tunnel-protocol ssl-client

 split-tunnel-policy tunnelspecified

 split-tunnel-network-list value ACL-VPN-USER-ACCESS-SERVERS

 default-domain value test.net

!

group-policy GP-RESTRICTED-ACCESS-SERVERS internal

group-policy GP-RESTRICTED-ACCESS-SERVERS attributes

 dns-server value 192.168.110.10

 vpn-idle-timeout 30

 vpn-tunnel-protocol ssl-client

 split-tunnel-policy tunnelspecified

 split-tunnel-network-list value ACL-VPN-RESTRICTED-ACCESS-SERVERS

 default-domain value test.net

!

Related Articles, References, Credits, or External Links

Thanks to Paul White and Trevor Stanley.

Windows Server 2016 & 2012 Setup RADIUS for Cisco ASA 5500 Authentication

Windows Server 2008 R2 – Configure RADIUS for Cisco ASA 5500 Authentication

Cisco ASA5500 Client VPN Access Via RADIUS (Server 2003 & IAS)

Cisco – Testing AAA Authentication (Cisco ASA and IOS)


PowerShell: Bulk Add/Remove Users From Groups

$
0
0

KB ID 0001475

Problem

I had to do this a few weeks ago, so I documented it. I had a list of usernames in a CSV file and I needed to bulk-add them to a security group.

Bulk Add Group Users Solution

Firstly you will need the usernames (sAMAccountNames) in .csv format like so,  (Note: As a header Im using User-Name.) I’ve saved the file to C:\Temp on my server.

User Name CSV

Execute the following commands;

Import-Module ActiveDirectory 

Import-Csv -Path “C:\Temp\Users-To-Add.csv” | ForEach-Object {Add-ADGroupMember -Identity “Group-Name” -Member $_.’User-Name’}

Bulk add Users to Group

And there’s our users;

Bulk add Users from CSV

Bulk Remove Group Users Solution

Use the following command;

Import-Csv -Path “C:\Temp\Users-To-Remove.csv” | ForEach-Object {Remove-ADGroupMember -Identity “Group-Name” -Member $_.’User-Name’ -Confirm:$false}

Bulk remove Users from a Group

Now if we check the group, the users have gone;

Bulk remove Users from group with CSV

Related Articles, References, Credits, or External Links

PowerShell: Bulk Enable / Disable Users

Exchange Bulk Export / Import Mail Contacts

Bulk Export Users From One Domain, and Import Into Another

ASA Connection Error: ‘The First Key-Exchange Algorithm’

$
0
0

KB ID 0001476

Problem

When attempting to connect to a Cisco ASA firewall via SSH you see the following error;

SSH Error Diffie Hellman Group 1

The first key-exchange algorithm supported by the server is diffie-hellman-group1-sha1, which is below the configured warning threshold.
Do you want to continue with this connection?

Clicking ‘Yes’ will let you connect.

Solution

When connected, execute the following commands;

conf t

sss key-exchange group dh-group14-sha1

write mem

Fix SSH Error Diffie Hellman Group 1

Problem solved.

Related Articles, References, Credits, or External Links

How Diffie Hellman Works

Domain Replication Issues – Troubleshooting

$
0
0

KB ID 0000301

Problem

You have one or more domain controllers in your Windows domain that is not replicating to one or more replication partners.

Solution

Step 1 DNS First!

Before you start make sure all the domain controllers are pointing the PDC emulator ONLY for their DNS settings.

1. On the PDC emulator > Start > run > dnsmgmt.msc {enter}.

2. Expand _msdcs.yourdomainname Right Click it > Properties > Set Dynamic updates to “Secure and non secure” > apply > OK.

3. Expand yourdomain-name > Right Click it > Properties > Set Dynamic updates to “Secure and non secure” > apply > OK.

4. Right Click the Server-name above > All Tasks > Restart.

5. Expand _msdcs.yourdomainname again.

6. There should be a big long GUID number there for each domain controller {an Alias (CNAME) entry}.

7. Delete them all (DONT delete the name server entries, or the SOA record!).

8. On each domain controller restart the netlogon service.

9. Back on the PDC emulator close and re-open the DNS management console.

10. Ensure those GUID entries have recreated (Note: You may need to apply the cup of coffee rule).

Step 2 Remove and recreate the Server replication Links

Install the support tools on all the domain controllers.

Start on the PDC emulator and repeat the process on all successive domain controllers.

1. Start > Administrative tools > Active directory Sites and Services.

2. Expand each server down to the NTDS settings.

3. Delete all the <automatically generated > entries and any manual ones so the right hand window is empty, (leave this window open). THIS IS SAFE DON’T PANIC.

4. Start > run > adsiedit.msc

5. Expand > Configuration > Expand “cn=configuration,dc=domainname” > Expand “cn=sites”.

6. Expand your site name i.e. “cn=default-fist-site-name” > Expand “cn=yourservername”.

7. Expand “cn=ntds settings”.

9. In the right hand window delete all the entries.

10. Start > run > cmd {enter}.

11. Issue the following command.

Repadmin /kcc

12. Switch back to Active directory Sites and Services > Right click NTDS settings on the server you are working on.

13. Select “All Tasks” > “Check replication Topology”.

14. Right Click “Sites” at the top of the tree and select refresh.

15. Drill back down to the Servers NTDS Settings and then try to right click the connector on the right and “Replicate now”.

Possible errors

Possible Error 1 Target Principle Name is incorrect.

Target Principle Name is Incorrect

Cause: Either when attempting a manual domain replication or trying to access a resource on another machine.

1. If you are on a domain controller stop and disable the Key Distribution Center Service and stop it.

Stop Kerberos Key Distribution Center Service

2. Start > Run > cmd {enter}.

3. Issue the following command;

netdom resetpwd /s:server /ud:domainadministrator /pd:password123 {enter}.

Netdom reset domain controller machine password

Where</br server=name of the PDC emulator domain = your domain name password123=the domain administrators password.

4. Reboot the Server.

5. If it’s a domain controller restart the Key Distribution Center service and set its start-up to automatic.

6. Retry replication.

Sucessful Replication


Possible Error 2 The RPC server is unavailable.

The time on both the domain controllers may be out of sync

1. Start > run > cmd {enter} > Issue the following command;

net time pdc-servername /set /y

2. If it gives you a permission error the carry out the procedure under “Target principle name is incorrect” above to reset the machine password.

Ref: http://support.microsoft.com/kb/257187

Possible Error 3 The time between replications with this source has exceeded the tombstone lifetime. Replication has been stopped with this source.

Replication Tombstone

Cause: Replication has been offline for a long time.

1. Start > Run > regedit {enter}.

2. Navigate To:

HKEY_LOCAL_MACHINESYSTEMCurrentControlSetServicesNTDSParameters.

3. If the registry entry exists, modify it; otherwise create a new DWORD value by right-clicking Parameters.

4. Type Allow Replication With Divergent and Corrupt Partner and press Enter.

5. Double-click the entry and for the Value data type 1, then click OK.

Allow Replication with Divergent

6. Locate the “Strict Replication Consistency Key” change its value from 1 to 0 (zero).

Disable Srict Replication Consitency

6. Close the registry editor. You do not need to reboot after this change.

7. Retry Replication

Manual AD Replication

Possible Error 4 The destination server is currently rejecting replication requests.

Rejecting Replication Requests

Cause: Sometimes (usually after many failures) A DC will stop accepting replication.

1. Start > Run > cmd {enter}.

2. Issue the following commands;

repadmin /options your-server-name +DISABLE_OUTBOUND_REPL
repadmin /options your-server-name -DISABLE_OUTBOUND_REPL
repadmin /options your-server-name +DISABLE_INBOUND_REPL
repadmin /options your-server-name -DISABLE_INBOUND_REPL

Possible Error 5 This object may not exist because it may have been deleted and already garbage collected.

1. Start Run Regedit

2. Navigate to;

HKEY_LOCAL_MACHINESystemCurrentControlSetServicesNTDSParameters

3. If “Strict Replication Consistency does NOT exist > Click Add Value on the Edit menu > Add REG_DWORD > Strict Replication Consistency

4. Value data: If the value is 1, change it to 0.

Replication Event ID Errors

Event 1388 or 1988 (A lingering object is detected).

1. Start > run > cmd {enter}

2. Issue the following command;

repadmin /removelingeringobjects

Event ID 1113 and 1115 the destination server is currently rejecting replication requests.

1. See Possible Error 4 Above

When the problem has been rectified

Finish up by performing a Metadata cleanup on Active Directory

http://support.microsoft.com/default.aspx?scid=kb;en-us;216498

Related Articles, References, Credits, or External Links

Original Article written 24/07/10

Cisco ASA No Debug Output?

$
0
0

KB ID 0001477

Problem

I see this get asked in forums A LOT, typically the poster has another problem they are trying to fix, someone has asked them to debug the problem and they cant see any debug output.

No Debug Output

Solution

Firstly you need to understand what logging is, and how debugging fits within it. (Bear with me, this is good knowledge to have).

The firewall saves logs in syslog format, and there are 8 Levels of logs, the one with the MOST information is called ‘debugging’ (or severity 7 in Syslog world)

  • 0=Emergencies
  • 1=Alert
  • 2=Critical
  • 3=Errors
  • 4=Warnings
  • 5=Notifications
  • 6=Informational
  • 7=Debugging

So if you are debugging, then all you are doing is looking at syslog output thats severity 7. The ASA can send these logs to an internal memory buffer, and external Syslog server, or to the screen, either the console (via rollover cable) or the monitor (SSH/Telnet session, or what router types, call the virtual terminal lines).

Fine but I cant see anything doofus, that’s why I’m here!

OK, now you understand how it all works, you should understand when you see the commands, why it wasn’t working!

Issue a ‘show log’ command;

Logging Cisco ASA

What does this tell us? Well mose importantly it tells us logging in ON.

Syslog logging: enabled

If it were disabled then you turn it on with;

logging on

The next piece of pertinent information is.

Timestamp Logging: Disabled

While not critical, logs are much easier to interpret when they are stamped with the correct time! I’m in the UK so this is the command I would use (Note: I’m enabling NTP Time sync, this can take a while to synchronise);

clock timezone GMT 0 clock summer-time BST recurring last Sun Mar 1:00 last Sun Oct 2:00

! ntp server 130.88.203.12 source outside

! logging timestamp

Sending Debug Output to the Screen

As mentioned above, you can send output to the console or the monitor;

Send Debug to SSH/Telnet Session

logging monitor debugging terminal monitor

Note: To disable, the command is ‘terminal no monitorNOT ‘no terminal monitor’ (Thanks Cisco!)

Sending Debug Output to the Console (Serial Connection)

Send Debug to SSH/Telnet Session

logging console debugging

Note: To stop it, set it back to ‘warnings’ (the default).

logging console warnings

Sending Debug Output to the Internal Log (Buffer)

This is easier, as you can filter the results for particular IP addresses/ports/usernames etc, which is handy if there are pages and pages to look though, and they are not scrolling past you yes, faster than you can read them!

logging buffered debug login buffer-size 1000000

Then to view the logs file;

show log

To clear the log;

clear logging buffer

To turn off;

no logging buffered debug

To Filter/Search the logs;

show log | include 192.168.100.1

Related Articles, References, Credits, or External Links

NA

ASDM on Windows 10: ‘Cannot find Javaw.exe?’

$
0
0

KB ID 0001478

Problem

Windows 10 machine, (with Latest Java installed), while attempting to launch the ASDM you see;

Cannot Locate javaw.exe

Windows cannot find ‘javaw.exe’. Make sure you typed the name correctly, and then try again.

Solution

I should have fixed this a lot quicker than I did, because the error message was a lot more descriptive in older versions of Windows and the ASDM! This is the same problem seen on Windows 8.

You still need to install the x32 bit versions of Java! once you do it will work fine.

Windows 10 ASDM

Related Articles, References, Credits, or External Links

NA

VMware Cannot Remove / Unmount an NFS Store

$
0
0

KB ID 0001479

Problem

After I had a datastore failure I needed to ‘unmount’ a datastore in my VMware 6.5 environment. But the I attempted to do so I got;

Operation Failed Datastore In Use

The “Remote Datastore” operation failed for the entity with the following error message.

The resource “Datastore-Name” is in use.

Solution

In use by what? Thanks for the assistance! Usually this happens because you have a VM with a VMDK in their datastore, or more likely, a VM has a CD mapped to an ISO that was in this datastore (which was my problem).

In “Datatstore View” > Select the offending Datastore > VMs > Eliminate them one by one.

Find Out whats using NFS

Related Articles, References, Credits, or External Links

NA

Office 365: Allow Mail Relay Through Exchange Online

$
0
0

KB ID 0001480

Problem

If you are used to running ‘on-prem’ Exchange then allowing an IP/Hostname to relay mail (sent mail through without authenticating) it’s handy for things like older multifunction scanners, or applications that need to send emails. Now you SHOULD be sending mail through Office 365 ‘authenticated’, but that’s not always possible.

Solution

From Office 365,Launch The Exchange admin console.

Office 365 Exchange Admin Center
Mail flow > Connections > Add.

Office 365 Add Mail Connector

From: Your Organisations email server.

To: Office 365

Allow Mail Relaying through Office 365

Give the connector a sensible name > Next.

Office 365 Allow Mail Relay

Enter the PUBLIC IP or PUBLIC HOSTNAME > Next.

WARNING: Where possible ensure this IP is only used by the internal host that needs to relay, if you only have one public IP (And you NAT/PAT all your internal IPs to this public IP), then filter the hosts that can send mail ‘outgoing’ on your firewall. If you don’t, and an internal client gets infected it will be able to send unauthenticated mail though your office 365 account!

Allow Mail Relay From IP Address

Text

Allow Mail Relay From Public IP Address

Save.

Related Articles, References, Credits, or External Links


How to Transfer Files from PC to iPhone Wirelessly

$
0
0

KB ID 0001481

Guest post from Tag Jones

When it comes to transferring files from PC to iPhone and vice versa, the most obvious choice is to use iTunes. However, it has been found that many users don’t like working with this application.  Bloated and ponderous, iTunes continues Apple’s ongoing trend of having lost its design mojo.

 Luckily, we have other options. One of the easiest ways is to use Wi-Fi Direct Transfer. With this method, you can pair your computer and iPhone/iPad within seconds and transfer anything you desire in a jiffy. Unlike AirDrop, Wi-Fi Direct allows you to work across all the platforms including Windows and Android. So you can also use this method to share files between an Android device and your iPhone/iPad as well.

How to use Wi-Fi Direct transfer

For it to work, your iPhone and your computer must be connected to the same Wi-Fi network. Since they will connect directly within the Wi-Fi network, you don’t even need an access point. In other words, your devices don’t have to connect to the Internet.

If there is no Wi-Fi network available nearby, you can create one on your own by using the Personal Hotspot feature. Just turn on Personal Hotspot on your iPhone, then on the computer, join the newly created hotspot. That way you can establish a connected Wi-Fi network from anywhere. 

Now we’re going to install a wireless transfer tool on the computer and its companion app on the iPhone. There are actually plenty of tools offering this function in the market. The best ones? Well, below are the apps that I’ve used and personally recommend.

1. SHAREit

The SHAREit application is pretty popular due to the fact that the app is developed by Lenovo and it comes pre-installed on many Android devices from this brand.

Step 1:Download and install the SHAREit appson both your computer and iPhone. After they have been installed, launch the apps.

Step 2:Make sure both devices are connected to the same Wi-Fi network. To send files from your iPhone, select “Send” from the main screen. Note that you’re only able to send photos and videos and other files managed by the Files app. 

Step 3:Select the files you wish to transfer to the computer, then tap “OK”. Now if your computer is on the same Wi-Fi network, it should display on the screen. Tap on it to start transferring. Once done, the files will appear on the window of the desktop app.

Shareit

If you’re not able to connect the two devices, make sure the app is on-screen on both your computer and your iPhone. I have used SHAREit as the primary method to transfer photos from my iPhone to the PC(for editing with Lightroom and Photoshop) and it has worked fine.

3. Xender

Xender is quite similar to SHAREit, except that you don’t have to install a program on your computer. It can work by using your web browser.

Step 1:Download and install the Xender app on your iPhone. It’s free.

Step 2:Connect two devices to the same Wi-Fi network. 

Step 3:On your PC, open your web browser of choice and go to http://web.xender.com. The web page will display the QR code used for connecting from the iOS device.

Xender


Related Articles, References, Credits, or External Links

NA

VMware: The OVF Descriptor is Not Available

$
0
0

KB ID 0001483

Problem

I’ve seen this a couple of times now, and each time I’ve (wrongly) assumed that the OVA/OVF file I’ve downloaded is either corrupt, or it has some sort of problem.

OVF Descriptor Is Not Available

Failed to deploy OVF package.
Cause:
A general system error occurred:
Transfer failed: The OVF descriptor is not available.

Solution

Redeploy the OVF file, but this time instead of selecting the Cluster, select A SPECIFIC HOST to deploy to, this time it deployed without error.

Note: I’m using vCenter 6.5, ESX 6.5, and Firefox to manage the vCenter.

Related Articles, References, Credits, or External Links

NA

Firefox: Cannot Open vCenter Web Client

$
0
0

KB ID 0001482

Problem

I wonder how many hours Ive lost trying to get browsers to connect to things, and the browser has not been happy? This week I needed to connect to a vCenter (6.5) web console with Firefox and was greeted with this.

Cannot open vCenter in Firefox

Your connection is not secure
The owner of {site} has configured their web site improperly. To protect information being stolen, Firefox has not connected to this website.
Error Code: , SEC_ERROR_UNKNOWN_ISSUER

Normally I use Firefox, because if there’s a problem I can simply add an exception and all is well, but this time there was no way to connect at all.

Solution

Browse to about:config, and then search for security.enterprise, set it to true.

vCenter web in Firefox

Now it will work

Firefox and vCenter

Related Articles, References, Credits, or External Links

NA

Windows Server 2016: Enable Flash

$
0
0

KB ID 0001484

Problem

I have a management server the tI connect to manage my infrastructure, having just replaced it with server 2016, I could no longer manage my VMware Center as it didn’t have flash. Back in server 2012 this was an easy fix;

Windows Server 2012 – Enable Flash

However try and to the ton Server 2016 and this happens;

Windows PowerShell Copyright (C) 2016 Microsoft Corporation. All rights reserved.

PS C:\Users\administrator.PNL> Install-WindowsFeature Desktop-Experience

Install-WindowsFeature : ArgumentNotValid: The role, role service, or feature name is not valid: ‘Desktop-Experience’. The name was not found. At line:1 char:1 + Install-WindowsFeature Desktop-Experience + ~~~~~~~~~~~~~~~~~~~~~~~~~~~~~~~~~~~~~~~~~ + CategoryInfo : InvalidArgument: (Desktop-Experience:String) [Install-WindowsFeature], Exception + FullyQualifiedErrorId : NameDoesNotExist,Microsoft.Windows.ServerManager.Commands.AddWindowsFeatureCommand

Success Restart Needed Exit Code Feature Result ——- ————– ——— ————– False No InvalidArgs {}

PS C:\Users\administrator.PNL>

Solution

Note: You need Server 2016 Datacenter (Desktop Experience) version to do this.

Go to the flash website and it (wrongly,) thinks you are using Windows 10 (we it’s the same code, I’ll let them off,) and it also says “it’s already installed just enable it”, but its not there?

Flash Missing Server 2016

You need to install it with the following command;

dism /online /add-package /packagepath:”C:\Windows\servicing\Packages\Adobe-Flash-For-Windows-Package~31bf3856ad364e35~amd64~~10.0.14393.0.mum”

Install Flash on server 2016

You will then need to reboot!

Post reboot, you will see Server 2016 will now download updates for Flash, and it’s enabled.

Related Articles, References, Credits, or External Links

NA

Windows USB Install Error 0x80070026

$
0
0

KB ID 0001485

Problem

Now physical servers don’t really come with DVD drives any more, Im forever deploying Windows, ESX, or some other Linux OS via a bootable USB drive.

I generally use Unerbootin, and just point it at the .iso file and away we go, which I did this week when trying to deploy Window Server 2016. However when I did that, this happened;

Error 0x80070026 install

Windows cannot open the required file {Drive}:\Sources\install.wim. Make sure all files required for installation are available, and restart the installation. Error code: 0x80070026

Solution

I assumed there was a problem with my .iso, so I downloaded a new one, same problem. I then put the drive in another machine and went to make sure that install.wim was there, (in fact I was going to copy the install.wim from the .ISO onto the drive,) when I noticed something. The install.wim on the drive was 4 GB and the source file was over 5GB.

Only at this point did I realise what was happening! The USB drive is formatted at FAT, and that file is too big to be supported in that file system?

FAT32 USB Install Windows

Format the drive at NTFS;

NTFS USB Install Windows

Then recreate it

Bootable Widows Install USB

And Windows Server 2016 installed fine! (I’ll put that one down to experience!)

Related Articles, References, Credits, or External Links

NA

OSX: Backup ‘Sparsebundle’ is Already In Use

$
0
0

KB ID 0001486

Problem

Thankfully I’ve never had to rely on my Mac backup, but it runs to an EMC Iomega NAS drive that I have in my house, (which also has all my media on it).

Backup Drive already in use

Backup Failed
The backup on “target-name” is already in use.

If I expand ‘details’;

Sparsebundle is already in use

Time Machine couldn’t complete the backup to “target-name”.
The backup disk image “/Volumes/Volume-Name/Mac-Name.sparsebundle” is already in use.

Solution

Now rebooting the NAS drive cures the problem, but (as stated) it’s got all my media on it which is then inaccessible for 10-15 minutes (not good if I’m watching a film, or TV series).

What you need to do is open System Preferences (click the ‘apple’ logo and select System Preferences)  > Spotlight > Privacy > Add > Add in the backup volume.

Sparsebundle Privacy Settings copy

Reboot your mac, (or dismount and remount the backup volume) > problem resolved.

Related Articles, References, Credits, or External Links

NA

IIS: Move WWWRoot Folder

$
0
0

KB ID 0001487

Problem

I migrated an IIS website I use for hosting files this week, and realised I’d forgotten how to relocate the wwwroot directory from it’s default install location on C:\inetpub\wwwroot.

Solution

Firstly, I’m assuming you have instilled the IIS role and you already have a wwwroot folder on your C: Drive, (in the above location). If so you can simply copy this folder to your new partition/drive (in my case the E: drive).

Open IIS Manager, Drill down to the Default Web Site > Manage Website > Advanced Settings > Physical Path > Change accordingly > OK.

Move wwwroot

You can now Stop and Restart the website from within IIS Manager, or run ‘iisreset‘ from command line.

Related Articles, References, Credits, or External Links

NA


Cisco ASA – Password Recovery / Reset

$
0
0

KB ID 0000572

Problem

Note: This procedure allows you to reset the password WITHOUT LOSING THE CONFIG

You need to access a Cisco ASA device and do not have the passwords, there can be lots of reasons for this, lack of good documentation, bought a second hand firewall, the last firewall admin never told anyone etc.

This method does require physical access to the ASA, a console cable, and a machine running some terminal emulation software.

Note: This procedure is for Cisco ASA 5500-X and ASA 5500 Firewalls, for Cisco PIX go here, and Cisco Catalyst go here.

Password Recovery ASA5505-X

Password Recovery ASA 5500

Password Recovery / Reset Procedure for ASA 5500-X/5500 Firewalls

Below is a run though on changing the Cisco ASA passwords (setting them to blank then changing them to something else). Basically you boot the ASA to its very basic shell operating system (ROMMON) then force it to reboot without loading its configuration. At this point you can load the config, without having to enter a password, manually change all the passwords, and finally set the ASA to boot properly again.

Below I’ve used both HyperTerminal and Putty to do the same thing, you can use either, or another terminal emulation piece of software, the procedure is the same.

1. Connect to the the ASA via a console cable (settings 9600/8/None/1/None).

Hyperterminal cisco settings

2. Reboot the ASA, and as it boots press Esc to interrupt the normal boot sequence and boot to ROMMON mode.

ASA ROMMON

3. Execute the “confreg” command and take a note of the number that’s listed (copy it to notepad to be on the safe side).

ASA configuration register - confreg

4. Answer the questions as follows (Note: Just pressing Enter will supply the default answer). Answer no to all apart from the TWO listed below:

ON AN ASA 5500-X (Slightly Different)

do you wish to change the configuration? y/n [n]: Y <<< THIS ONE
disable “password recovery”? y/n [n]: n
disable “display break prompt”? y/n [n]: n
enable “ignore system configuration”? y/n [n]: Y <<< AND THIS ONE
disable “auto-boot image in disks”? y/n [n]: n
change console baud rate? y/n [n]: n
select specific image in disks to boot? y/n [n]: n

ON AN ASA 5500 

Do you wish to change this configuration? y/n [n]: Y <<< THIS ONE
enable boot to ROMMON prompt? y/n [n]:
enable TFTP netboot? y/n [n]:
enable Flash boot? y/n [n]:
select specific Flash image index? y/n [n]:
disable system configuration? y/n [n]:
Y <<< AND THIS ONE
go to ROMMON prompt if netboot fails? y/n [n]:
enable passing NVRAM file specs in auto-boot mode? y/n [n]:
disable display of BREAK or ESC key prompt during auto-boot? y/n [n]:

Cisco ASA Change confreg

5. You may notice, that the configuration register has changed, on an ASA 5500 to 0x00000040, or on an ASA5505-X to 0x00000041, to boot the firewall execute the “boot” command.

Boot Cisco ASA

6. This time when the ASA boots it will start with a {blank} enable password, you can load the normal config into memory with a “copy startup-config running-config” command.

Cisco Blank Password

7. Now you are in enable mode with the correct config loaded, you can change the passwords, and once completed, change the configuration register setting back with a config-register {paste in the number you saved earlier} command, or simply a no config-register command. Save the changes, (write mem) and reboot the firewall.


Cisco ASA change passwords


Related Articles, References, Credits, or External Links

Cisco Catalyst Password Recovery / Reset

Cisco PIX (500 Series) Password Recovery / Reset

Cisco Router – Password Recovery /Bypass

Windows Server DHCP Failover

$
0
0

KB ID 0001488

Problem

Applicable to: Server 2008/2012/2016/2019

Even though we have had this functionality for a while, I’m still seeing people deploy DHCP scopes (split 80/20) across two servers?

You can deploy multiple DHCP servers to serve the SAME DHCP scopes, in either load balanced, or hot standby deployment.

Solution

I’m assuming you already have one DHCP server setup and, with a working DHCP scope. Here mine’s a 2012R2 server and Im adding a new 2016 DHCP server.

On the new server, install the DHCP server role;

Install-WindowsFeature DHCP -IncludeManagementTools

Install DHCP via PowerShell

You normally have to go to Server Manager and run the configuration wizard, but as were are already in PowerShell lets do that here 🙂 (That’s three commands if the last one wraps!)

netsh dhcp add securitygroups

Add-DhcpServerInDC -DnsName pnl-mgmt.pnl.com -IPAddress 192.168.100.3

Set-ItemProperty –Path Set-ItemProperty –Path registry::HKEY_LOCAL_MACHINE\SOFTWARE\Microsoft\ServerManager\Roles\12 –Name ConfigurationState –Value 2

Configure DHCP via PowerShellConfigure DHCP via PowerShell

On the original, (already working,) DHCP server, right click the scope you want to replicate > Configure Failover.

Setup DHCP Failover

Next.

Windows DHCP Failover

Browse to, and select the target (new DHCP server) > Next.

DHCP Failover Partner Server

Select Log Balancing or Hot Standby (as required) > Enter a shared secret password > Next.

DHCP Failover Shared Secret

Review the Settings and click Finish.

DHCP Failover Settings

Hopefully you should see the following.

DHCP Failover Complete

Configure DHCP Failover via PowerShell

To do the same from PowerShell.

PowerShell DHCP Load Balancing

Note: Where DC-01 is the source DHCP server and PNL-MGMT is the new one.

Add-DhcpServerv4Failover –ComputerName “DC-01” –PartnerServer “PNL-MGMT” –Name “DHCP_DC01_PNLMGMT_LoadBalance” –LoadBalancePercent 50 -MaxClientLeadTime 1:00:00 -StateSwitchInterval 00:45:00 -ScopeId 192.168.200.0 -SharedSecret “Password123

Configure DHCP Failover PowerShell

PowerShell DHCP Hot Standby

Note: Where DC-01 is the source DHCP server and PNL-MGMT is the new one.

Add-DhcpServerv4Failover -ComputerName “DC-01” –PartnerServer “PNL-MGMT” -Name “DHCP_DC01_PNLMGMT_Hot_standby” -ServerRole Active -ReservePercent 10 -MaxClientLeadTime 1:00:00 -StateSwitchInterval 00:45:00 -ScopeId 192.168.200.0 -SharedSecret “Password123

Related Articles, References, Credits, or External Links

NA

Running Dropbox On Windows Server

$
0
0

KB ID 0001489

Problem

If you are here, you have probably already found out that Dropbox is not supported on Windows Server platforms. You can install it and set it up happily but it stops working and needs to be relaunched all the time (manually).

I love dropbox! So much I actually pay for it! I run it on my management server and its handy for copying files up into my test network, so I can appreciate how annoying it is having to restart it all the time. So to fix the problem we have to use a piece of software that’s over 15 years old! 

Running Dropbox as a Service on Windows Server

First you have to stop dropbox running.

Stop Dropbox On Server

Then download srvany and extract the executable to the Dropbox install directory (C:\Program Files (x86)\Dropbox). Note: This file is form the old Server 2003 resource kit.

Dropbox as a Service

From an elevated command prompt run the following command;

sc create Dropbox binPath= “C:\Program Files (x86)\Dropbox\srvany.exe” DisplayName= “Dropbox Service”

Run Dropbox on a Server

Run services.msc > locate the Dropbox Service  > And set its ‘LogOn’ to the account you were logged on with, when you installed the Dropbox software.

Dropbox on Server 2019

Change the startup type to Automatic, (Don’t start the service yet!) > OK.

Dropbox Always On

Execute the following three commands;

New-Item -Path HKLM:\SYSTEM\CurrentControlSet\Services\Dropbox\Parameters

New-ItemProperty -Path HKLM:\SYSTEM\CurrentControlSet\Services\Dropbox\Parameters -Name Application -PropertyType String -Value “C:\Program Files (x86)\Dropbox\Client\Dropbox.exe”

Start-Service Dropbox

Keep Dropbox Running On a Server

BE AWARE: Dropbox will now run correctly, but it WONT show in the task tray (like it did before), as it’s now running as a service.

Related Articles, References, Credits, or External Links

NA

Convert ASA 5500-X To FirePOWER Threat Defence

$
0
0

KB ID 0001490

Problem

I’m seeing more and more people asking questions in forums about FTD, so I thought it was about time I looked at it. Cisco ASA 5500-X firewalls can now be re-imaged to run the FTD software. The thinking is that the FTD will merge the Cisco ASA product and the FirePOWER product into one unified operating system. Then that is managed by FDM (FirePOWER Device Manager), basically a web management GUI.

Solution

The re-imaging is done in ROMMON, so before you start you need to ensure your ROMMON is 1.1.8 or newer. You can get that information with a show module command;

Petes-ASA# show module

Mod  Card Type                                    Model              Serial No.
---- -------------------------------------------- ------------------ -----------
   1 ASA 5506-X with FirePOWER services, 8GE, AC, ASA5506            JAD2143XXXX
 sfr FirePOWER Services Software Module           ASA5506            JAD2143XXXX

Mod  MAC Address Range                 Hw Version   Fw Version   Sw Version
---- --------------------------------- ------------ ------------ ---------------
   1 6cb2.aede.0106 to 6cb2.aede.010f  2.0          1.1.8        9.8(1)
 sfr 6cb2.aede.0105 to 6cb2.aede.0105  N/A          N/A          6.2.0-362

Mod  SSM Application Name           Status           SSM Application Version
---- ------------------------------ ---------------- --------------------------
 sfr ASA FirePOWER                  Up               6.2.0-362

Mod  Status             Data Plane Status     Compatibility
---- ------------------ --------------------- -------------
   1 Up Sys             Not Applicable
 sfr Up                 Up

Petes-ASA#

What if yours isn’t?

Don’t panic! Download the firmware upgrade from Cisco, pop it in a TFTP server, and load it into the firewall, then run the upgrade, with the following two commands;

copy tftp://{IP-Of-TFTP-Server}/asa5500-firmware-1108.SPA disk0:asa5500-firmware-1108.SPA 
upgrade rommon disk0:/asa5500-firmware-1108.SPA

Download FTD Software

You need two pieces of software, a boot image (.pkg), and an install package. (.lbff).

FTD Download Software

FTD Boot Image Software

Note: You can install the boot image via TFTP but the main package needs to be deployed to the firewall via HTTP, FTP, or HTTPS

Boot the ASA into ROMMON

Power cycle the firewall and with a console cable attached press Esc when prompted, this will drop you into ROMMON mode.

Cisco Systems ROMMON, Version 1.1.8, RELEASE SOFTWARE
Copyright (c) 1994-2015  by Cisco Systems, Inc.
Compiled Thu 06/18/2015 12:15:56.43 by builders


Current image running: Boot ROM0
Last reset cause: PowerOn
DIMM Slot 0 : Present

Platform ASA5506 with 4096 Mbytes of main memory
MAC Address: 6c:b2:ae:de:01:06


Use BREAK or ESC to interrupt boot.
Use SPACE to begin boot immediately.
Boot interrupted.

rommon 1 >

Set the ASA FTD Boot Image

As mentioned above I’m doing this via TFTP, on the Asa 5506-x (all variants), 5508-X, and 5526-X you need to connect the Management interface to the network with the TFTP server. For the target ASA firewalls you can specify which interface you are using like so (“rommon #1> interface gigabitethernet0/0″).

Set the basic networking requirements, specify the boot file, then use the ‘set‘ command to view the settings, and ‘sync‘ to commit that to memory. It’s also a good idea to make are you can ping the TFTP server, (Windows firewall off first though!)

rommon 1 > address 10.254.254.99
rommon 2 > netmask 255.255.255.0
rommon 3 > server 10.254.254.112
rommon 4 > gateway 10.254.254.112
rommon 5 > file ftd-boot-9.9.2.0.lfbff
rommon 6 > set
    ADDRESS=10.254.254.99
    NETMASK=255.255.255.0
    GATEWAY=10.254.254.112
    SERVER=10.254.254.112
    IMAGE=ftd-boot-9.9.2.0.lfbff
    CONFIG=
    PS1="rommon ! > "

rommon 6 > sync
rommon 7 > ping 10.254.254.112
Sending 10, 32-byte ICMP Echoes to 10.254.254.112 timeout is 4 seconds
!!!!!!!!!!
Success rate is 100 percent (10/10)

Execute the download/install of the boot image, (tftpdnld command);

rommon 12 > tftpdnld
             ADDRESS: 10.254.254.99
             NETMASK: 255.255.255.0
             GATEWAY: 10.254.254.112
              SERVER: 10.254.254.112
               IMAGE: ftd-boot-9.9.2.0.lfbff
             MACADDR: 6c:b2:ae:de:01:06
           VERBOSITY: Progress
               RETRY: 40
          PKTTIMEOUT: 7200
             BLKSIZE: 1460
            CHECKSUM: Yes
                PORT: GbE/1
             PHYMODE: Auto Detect

Receiving ftd-boot-9.9.2.0.lfbff from 10.254.254.112!!!!!!!!!!!!!!!!!!!!!
!!!!!!!!!!!!!!!!!!!!!!!!!!!!!!!!!!!!!!!!!!!!!!!!!!!!!!!!!!!!!!!!!!!!!!!!!
!!!!!!!!!!!!!!!!!!!!!!!!!!!!!!!!!!!!!!!!!!!!!!!!!!!!!!!!!!!!!!!!!!!!!!!!!
!!!!!!!!!!!!!!!!!!!!!!!!!!!!!!!!!!!!!!!!!!!!!!!!!!!!!!!!!!!!!!!!!!!!!!!!!
!!!!!!!!!!!!!!!!!!!!!!!!!!!!!!!!!!!!!!!!!!!!!!!!!!!!!!!!!!!!!!!!!!!!!!!!!
!!!!!!!!!!!!!!!!!!!!!!!!!!!!!!!!!!!!!!!!!!!!!!!!!!!!!!!!!!!!!!!!!!!!!!!!!
!!!!!!!!!!!!!!!!!!!!!!!!!!!!!!!!!!!!!!!!!!!!!!!!!!!!!!!!!!!!!!!!!!!!!!!!!
!!!!!!!!!!!!!!!!!!!!!!!!!!!!!!!!!!!!!!!!!!!!!!!!!!!!!!!!!!!!!!!!!!!!!!!!!
File reception completed.
Boot buffer bigbuf=348bd018
Boot image size = 103582240 (0x62c8a20) bytes
[image size]      103582240
[MD5 signaure]    ea7d29ce6fb200a9a9be486e37c78136
LFBFF signature verified.
INIT: version 2.88 booting
Starting udev
Configuring network interfaces... done.
Populating dev cache
Detected PID ASA5506.
Found device serial number JAD2143XXXX.
Found USB flash drive /dev/sdb
Found hard drive(s):  /dev/sda
fsck from util-linux 2.23.2
dosfsck 2.11, 12 Mar 2005, FAT32, LFN
There are differences between boot sector and its backup.
Differences: (offset:original/backup)
  65:01/00
  Not automatically fixing this.
/dev/sdb1: 53 files, 819023/1919830 clusters
Launching boot CLI ...
Configuring network interface using DHCP
Bringing up network interface.
Depending on your network, this might take a couple of minutes when using DHCP...
ifup: interface lo already configured
Using IPv4 address: 10.254.254.114
Using IPv6 address: fe80::6eb2:aeff:fede:105
Using DNS server: 8.8.8.8
Using DNS server: 8.8.4.4
Using default gateway: 10.254.254.1
INIT: Starting system message bus: dbus.
Starting OpenBSD Secure Shell server: sshd
  generating ssh RSA key...
  generating ssh ECDSA key...
  generating ssh DSA key...
done.
Starting Advanced Configuration and Power Interface daemon: acpid.
acpid: starting up

acpid: 1 rule loaded

acpid: waiting for events: event logging is off

Starting ntpd: done
Starting syslog-ng:.
Starting crond: OK


            Cisco FTD Boot 6.0.0 (9.9.2.)
              Type ? for list of commands
ciscoasa-boot>

Now give the FTD some basic settings, you don’t actually have to give it an IP at this point. Obviously in a production environment, you would use your internal DNS and domain details .

ciscoasa-boot>setup


                Welcome to Cisco FTD Setup
                  [hit Ctrl-C to abort]
                Default values are inside []

Enter a hostname [ciscoasa]: Petes-ASA
Do you want to configure IPv4 address on management interface?(y/n) [Y]: N
Do you want to configure static IPv6 address on management interface?(y/n) [N]: N
Enter the primary DNS server IP address [8.8.8.8]: {Enter}
Do you want to configure Secondary DNS Server? (y/n) [y]: Y
Enter the secondary DNS server IP address [8.8.4.4]:{Enter}
Do you want to configure Local Domain Name? (y/n) [n]: N
Do you want to configure Search domains? (y/n) [n]:N
Do you want to enable the NTP service? [Y]:Y
Enter the NTP servers separated by commas: 194.35.252.7,130.88.202.49,93.93.131.118

Please review the final configuration:
Hostname:               Petes-ASA
Management Interface Configuration

IPv6 Configuration:     Stateless autoconfiguration

DNS Configuration:
        DNS Server:
                        8.8.8.8
                        8.8.4.4

NTP configuration:
        194.35.252.7    130.88.202.49   93.93.131.118
CAUTION:
You have selected IPv6 stateless autoconfiguration, which assigns a global address
based on network prefix and a device identifier. Although this address is unlikely
to change, if it does change, the system will stop functioning correctly.
We suggest you use static addressing instead.

Apply the changes?(y,n) [Y]: Y
Configuration saved successfully!
Applying...
Restarting network services...
Done.
Press ENTER to continue...

This is the point where you need the mail package file on either an http, https, or ftp site. I have a web server so that’s what I use. Note: This takes a while, best go get a coffee!

ciscoasa-boot>system install http://{IP-OF-SERVER}/ftd-6.2.3-83.pkg

######################## WARNING ############################
# The content of disk0: will be erased during installation! #
#############################################################

Do you want to continue? [y/N] Y
Erasing disk0 ...
Extracting   ...
Verifying
Downloading
Extracting
Package Detail
        Description:                    Cisco ASA-FTD 6.2.3-83 System Install
        Requires reboot:                Yes

Do you want to continue with upgrade? [y]: Y
Warning: Please do not interrupt the process or turn off the system.
Doing so might leave system in unusable state.

Starting upgrade process ...
Populating new system image

Reboot is required to complete the upgrade. Press 'Enter' to reboot the system.

Well, it’s telling us to reboot so let’s do so! After its backup you can login and specify the correct settings for the FTD/Management Interface. (Note the FTD Default username and password!)

Cisco ASA5506-X Threat Defense v6.2.3 (build 83)
firepower login: admin
Password: Admin123


Copyright 2004-2018, Cisco and/or its affiliates. All rights reserved.
Cisco is a registered trademark of Cisco Systems, Inc.
All other trademarks are property of their respective owners.

Cisco Fire Linux OS v6.2.3 (build 13)
Cisco ASA5506-X Threat Defense v6.2.3 (build 83)

You must accept the EULA to continue.
Press  to display the EULA: {Enter}
End User License Agreement

Effective: May 22, 2017

This is an agreement between You and Cisco Systems, Inc. or its affiliates
("Cisco") and governs your Use of Cisco Software. "You" and "Your" means the
<-------Output omitted - For the sake of Brevity -------->
partner does not imply a partnership relationship between Cisco and any other
company. (1110R)

Please enter 'YES' or press  to AGREE to the EULA: {Enter}

System initialization in progress.  Please stand by.
You must change the password for 'admin' to continue.
Enter new password: Password123
Confirm new password: Password123
You must configure the network to continue.
You must configure at least one of IPv4 or IPv6.
Do you want to configure IPv4? (y/n) [y]: Y
Do you want to configure IPv6? (y/n) [n]: N
Configure IPv4 via DHCP or manually? (dhcp/manual) [manual]:{Enter}
Enter an IPv4 address for the management interface [192.168.45.45]: 10.254.254.253
Enter an IPv4 netmask for the management interface [255.255.255.0]:{Enter}
Enter the IPv4 default gateway for the management interface [data-interfaces]: 10.254.254.254
Enter a fully qualified hostname for this system [firepower]: PNL-FirePOWER
Enter a comma-separated list of DNS servers or 'none' [208.67.222.222,208.67.220.220]: 8.8.8.8,8.8.4.4
Enter a comma-separated list of search domains or 'none' []:{Enter}
If your networking information has changed, you will need to reconnect.
DHCP Server Disabled
The DHCP server has been disabled. You may re-enable with configure network ipv4 dhcp-server-enable
For HTTP Proxy configuration, run 'configure network http-proxy'

Manage the device locally? (yes/no) [yes]: yes
Configuring firewall mode to routed


Update policy deployment information
    - add device configuration
Successfully performed firstboot initial configuration steps for Firepower Device Manager for Firepower Threat Defense.

That’s us done for the conversion! You can now connect the the firewall with a web browser, (remember you just changed the password!)

FirePOWER Device Manager

Related Articles, References, Credits, or External Links

NA

Why Do You Need Anti-Phishing Software?

$
0
0

KB ID 0001491

Written By: Joseph Gojo Cruz

The basic steps you use in protecting your computer, such as an antivirus program, are important in avoiding phishing scams. Additional security measures include reviewing SSL certificates, building a firewall, and implementing an anti-phishing software.

An anti-phishing software helps you test your employees on how they will react when there’s a phishing attack. In using an anti-phishing software, you could create different kinds of phishing emails that you could send to your employees, the purpose of this kind of software is to help educate your employees about the most up-to-date phishing lures in the internet.

Once they experienced the different kinds of phishing scams with the help of an anti-phishing software, they will be able to recognize phishing scams and will have enough knowledge on how to fight it and prevent it in the future. With the help of digital age nowadays, many quality anti-phishing softwares are now available online, you can look for the reviews to know more info about the softwares and choose which one you think is the best option.

For obvious reasons, credit card safety and sensitive data protection are why you have to implement an anti-phishing software. But how does it really benefit you as a user?

Importance of Anti-Phishing Programs

With the increase in phishing scams reported every year, it’s high time business owners reconsider implementing the latest security features and tools in their database. Below are some important facts about phishing according to the AntiPhishing.org and NGS Software:

  • August, 2005 recorded 13,776 phishing scams connected to 5,259 sites.
  • Phishing attacks have targeted 84 companies, three of them suffered 80% of the fraud.
  • 85% of phishing attacks were targeted to financial entities, like banks.
  • Unfortunately, the phishers succeeded in illegally obtaining personal and sensitive details from almost 5% of the victims.
  • A staggering 57 million of internet users in the US have experienced phishing emails, while 1.7 million of them fell victim to the phishing attacks.

Now you know how crucial it is for businesses and credit card users to protect their data at all times. The more you secure your data, the lower your risk of falling victim to fraudsters.

Here are some tips if you think a phisher has obtained your sensitive details:

  • Immediately report the incident to the bank, credit or lending institution which your personal details have been disclosed.
  • Let the company or entity that was phished know about the incident.
  • Notify the Equifax, TransUnion, or Experian so they’ll take action.
  • Report it to a local police office.
  • Also, send word to the Federal Trade Commission or Federal Bureau of Investigation so they are informed of the case.

Changing your PIN or passwords is also an important step to secure other accounts that may have been connected to the exposed data.

With the different kinds of cyber crimes that’s happening right now, you should never be complacent that your cyber security measures are enough to combat cyber attacks. Never underestimate how cyber criminals work and always be the one who is a step ahead of the game. Phishing might be simple at first look but with all the records that were shown, it is one of the most known cyber crime that businesses fall into. Always strive to be a phishproof business. In that way, your customers are secured that their personal information will never be compromised and fall into the hands of hackers.

Takeaway

Governments and companies are doing their best to stop phishing attacks. However, efforts seem not to be enough to deter phishers and other cyber criminals from accessing private and personal information online. So the best way to protect yourself from phishing is to implement an anti-phishing software.

Software and tools that secure personal data are effective in fighting phishing scams. When your data is secure, you can have peace of mind and confidence when dealing with online payment methods.

Related Articles, References, Credits, or External Links

NA

Viewing all 801 articles
Browse latest View live